Integration with Agent Applications
Contents
Overview
Co-browse functionality is integrated with an agent application in two steps:
- The Co-browse agent web UI is integrated with an agent application UI in one of two ways:
- A browser (embedded) for desktop applications such as Interaction Workspace.
- An iframe for web applications.
- The agent application independently connects to the Co-browse Server in order to:
- Control the co-browse session.
- Integrate the co-browse session with the primary interaction (chat or voice).
- Attach Co-browse data to the primary interaction.
Connection to Co-browse Server
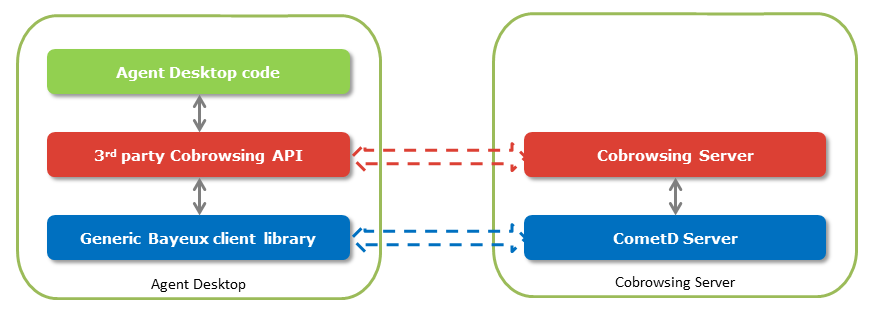
Co-browse Server allows clients to inter-operate within a Co-browse session, mainly using a CometD-based API. The connected clients have one of the following roles in the session:
- Customer — JavaScript client that shares the source web page.
- Agent — JavaScript client that creates a remote view of the shared page.
- Controller — Agent application that controls the Co-browse session.
Controller to Co-browse Server Connection
The agent application establishes a connection to the Co-browse Server through the third-party Co-browse API library (it will be built on top of a CometD .NET client and a Java client, for .NET and Java respectively) before loading the Co-browse agent UI. It supplies the Co-browse session access token, which is required to connect to an already created session. As a result, the agent application is connected to the session as the Controller.
Integration with Agent Desktop and Web-Based Applications
In order to integrate an agent desktop application with Co-browse you must develop a plug-in that:
- Serves the Co-browse agent page in a browser (Internet Explorer 9+/Firefox/Chrome).
- Integrates with Co-browse Server (Controller connection).
Co-browse Web Agent Page
The agent page is the agent side of the co-browse functionality. The agent page is opened in a browser with a dynamically built URL in the following format:
<schema>://<host>:<port>/cobrowse/slave.html#nosidinput=1&sid=<sessionToken>
- <schema> — http or https
- <host> — Co-browse service host (from Configuration Server)
- <port> — Co-browse service port (from Configuration Server)
- <sessionToken> — Co-browse session token. This token is transferred from user to agent by any communication channel.
- nosidinput=1 — Specify this parameter if the plug-in UI provides its own session ID input field.
Co-browse Server Integration
Server integration can be split into the following functions:
- Chat integration — Intercept the "start co-browse" chat message (optional).
- Join a co-browse session (mandatory).
- Close a co-browse session (mandatory).
Chat Integration
This is optional functionality. It provides automatic co-browse session start by a specially formatted chat message. For this functionality, the agent desktop application must be able to:
- "Listen" to the chat interaction (chat messages).
- Check if a message matches a regular expression: ^\{start:\d{9}\}$
- If the message matches, parse the session token from the message (nine digits after "start:").
- Join a co-browse session.
Join a Co-browse Session
A co-browse session can only be joined by having a session token (see Co-browse Web Agent Page) and completing the following steps:
- Issue a request to the REST GET session method.
- Use the reply to stick to the server that "owns" the session (see Stickiness). There are 2 ways of doing this:
- Pass the gcbSessionServer cookie with the server name (sessionServerName in response) in all further HTTP requests (including CometD).
- If the cookies are problematic, use the server URL (sessionServerUrl in response) for all further HTTP requests (including CometD).
- Note: For this to work you have to have the serverUrl option set for all Co-browse nodes in a cluster.
- Establish a CometD connection.
- Join a co-browse session as Controller by sending a message on the JOIN channel.
- Wait for the async server response (notification) on the JOIN channel.
- Attach the following to the current interaction:
- CoBrowseAssociated — The co-browse session flag. This marks the interaction with an active/inactive co-browse session - "Yes" value.
- CoBrowseSessionsQuantity — The number of co-browse sessions for the current interaction.
- CoBrowseSessionId — The co-browse session history identifier received from the JOIN channel (sessionHistoryId).
- Wait for the async server notification on the ACTIVATED channel.
- Attach the following to the current interaction:
- CoBrowseStartTime — A string with the co-browse session start time in UTC (session start time as a timestamp received from the ACTIVATED channel).
Close a Co-browse Session
A co-browse session may be closed due to the following reasons (click "[Show details]" for information about how to handle each scenario):
- The user or agent exits the co-browse session (via the Co-browse web UI) without closing the primary interaction. [Show details]
- The primary interaction is transferred (Co-Browse Server currently does not support co-browse session transfer). [Show details]
- The inactivity timeout has expired against the primary interaction (see Interaction Server's option settings/handling-timeout). [Show details]
- The primary interaction is closed. [Show details]
The web agent Co-browse application can be easily integrated with any web application, such as a web-based agent desktop. To do this, simply add an iframe with the web agent app into the web application:
<!doctype html>
<head>...</head>
<body>
...
<iframe src="http://<CB_SERVER>/cobrowse/slave.html"></iframe>
...
</body>
It is important to keep slave.html in the URI, even if you proxy the Co-browse Server, because the Co-browse scripts rely on it. For example, the URI http://my-site.com/cobrowseAgent/ does not work, even though it actually points to slave.html.
You can enable the web browser console logs in the standard way by adding the debug=1 URL parameter.
<iframe src="http://<CB_SERVER>/cobrowse/slave.html#debug=1"></iframe>To have the web agent immediately join a session, create an iframe with a predefined sid URL parameter:
<iframe src="http://<CB_SERVER>/cobrowse/slave.html#sid=123456789"></iframe>You should use the maximum possible size for the iframe because the Co-browse area adjusts to the end customer's browser window and can be big if the user has a large monitor, for example. If the Co-browse area becomes larger than the containing iframe, an agent will see scrollbars, which may not be very convenient.

