
Public JMX Authorization
By default, JMX is not enabled. If you want to enable JMX, you must protect yourself from the Java deserialization vulnerability and other vulnerabilities. You should secure JMX by using the configuration below or by deploying into a secure zone like a DMZ.
Enabling Remote JMX
To enable remote JMX complete the following:
Enabling Remote JMX Configuration
You can enable remote JMX configuration for Co-browse Server (including embedded Cassandra) or external Cassandra.
Enabling Remote JMX for Co-browse Server
To enable remote JMX for Co-browse Server, open your setenv.bat/sh file and uncomment the JMX settings below this line:
Uncomment to enable JMX Remote
Enabling Remote JMX for External Cassandra
If you use external Cassandra and want to monitor Co-browse column family attributes, open your cassandra.bat (Windows) or cassandra-env.sh (UNIX) and enable these JMX settings:
In cassandra.bat, enable the settings below the line:
... JMX REMOTE ACCESS SETTINGS ...
In cassandra-env.sh add:
JMX_PORT="7199"
JVM_OPTS="$JVM_OPTS -Dcom.sun.management.jmxremote.port=$JMX_PORT"
JVM_OPTS="$JVM_OPTS -Dcom.sun.management.jmxremote.rmi.port=$JMX_PORT"
JVM_OPTS="$JVM_OPTS -Dcom.sun.management.jmxremote.ssl=false"
JVM_OPTS="$JVM_OPTS -Dcom.sun.management.jmxremote.authenticate=false"
JVM_OPTS="$JVM_OPTS -Dcom.sun.management.jmxremote.password.file=/etc/cassandra/jmxremote.password"
JVM_OPTS="$JVM_OPTS -Dcom.sun.management.jmxremote.access.file=/etc/cassandra/jmxremote.access"
Now that you enabled remote JMX, you can set remote authentication.
Setting Remote JMX Authentication
- In the JMX remote settings you enabled above, set the following:
-Dcom.sun.management.jmxremote.authenticate=true
- Specify your credentials:
- Find the jmxremote.access and jmexremmote.password.template files in the <JAVA_HOME>/[jre]/lib/management directory.
- Rename jmxremote.password.template to jmxremote.password.
-
By default, the JMX remote settings you enabled in setenv.bat/sh use the jmxremote.access and jmxremote.password files for authentication.
To enable default roles, uncomment the role/password settings at the bottom of the jmxremote.password file. For example:
monitorRole  QED
controlRole  R&D
TipYou can edit the role names and passwords but you should first make sure the defaults work. -
If you use the same credentials for all host applications, you can use the default password and access files. Otherwise, do the following:
- Copy a pair of jmxremote.access and jmxremote.password files to the path related to each application.
-
Add paths to the access and password files in your JMX remote configuration. For example, in Windows:
set JMX_PORT=7199
set JAVA_OPTS=%JAVA_OPTS% -Dcom.sun.management.jmxremote ^
-Dcom.sun.management.jmxremote.port=%JMX_PORT% ^
-Dcom.sun.management.jmxremote.ssl=false ^
-Dcom.sun.management.jmxremote.authenticate=true ^
-Dcom.sun.management.jmxremote.password.file=<Path>\jmxremote.password ^
-Dcom.sun.management.jmxremote.access.file=<Path>\jmxremote.access
-
Set the owner of the jmxremote.password file to the owner of the application process:
- In Windows, open the jmxremote.password file properties and set the owner in Security Tab > Advanced > Owner.
-
In UNIX, run this command:
chown <username> <path to jmxremote.password>
Update the permissions of the jmxremote.password file:
-
In Windows, open the jmxremote.password file's Permissions:
- Add read permissions, if absent.
- Remove any write permissions, for example, remove create files/write data and create folders/append data.
-
In Unix, run this command:
chmod 444 <path to jmxremote.password>
-
After enabling remote JMX, you can test your authentication using the procedure below.
Testing Remote JMX Authentication
- Start the application server.
-
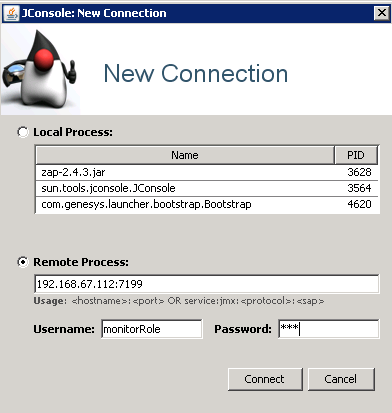
Run JConsole or another JMX visual tool and log in with read-only credentials (monitorRole by default).
-
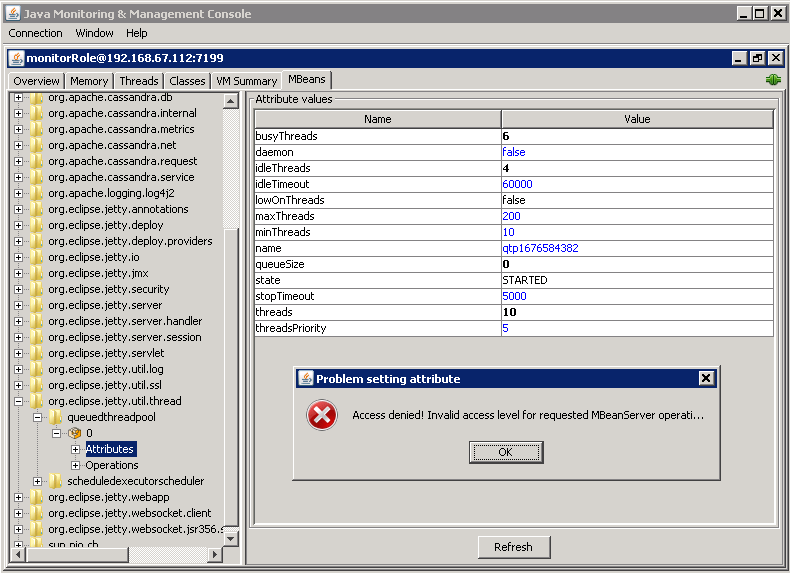
Go to Mbeans. Expand org.eclipse.jetty.util.thread and the queuethreadpool attributes. Try to change the maxThreads. You should see an access denied error.
- Repeat the previous steps with read-write access (controlRole by default) and verify you do not see an access denied error.

