GVG900IntegrationWP
Genesys White Paper
Contents
Integrating Genesys Video Gateway with Genesys
Related Topics
Overview
Genesys Video Gateway is a border element that can establish WebRTC or Flash sessions on the web side, and translates the sessions into SIP audio/video sessions for Genesys SIP Server.
Genesys Video Gateway is built upon multiple components:
- Application Server (Jetty) — Responsible for session creation, login, and resource tracking. It is the first point of contact for incoming sessions from web browsers.
- Notification Server (Jetty) —Responsible for the communication between the Application Server and the MCU while establishing the media session between the web browser and the MCU.
- MCU Server—Handles the media session with web browsers and establishes SIP session with Genesys SIP Server.
- TURN Server—Relays media and enables WebRTC sessions with browsers behind Network Address Translation (NAT).
Chat to Video Escalation Using Co-Browse
A customer on your website establishes a chat session with a contact center agent, and is given option to add audio and video to the existing chat session, eventually adding co-browse. At present time the chat and the audio/video session will belong to different channels, as chat session is established through Genesys eServices products, while the audio/video session is established through Genesys SIP Server and ultimately Workspace SIP Endpoint (video enabled).
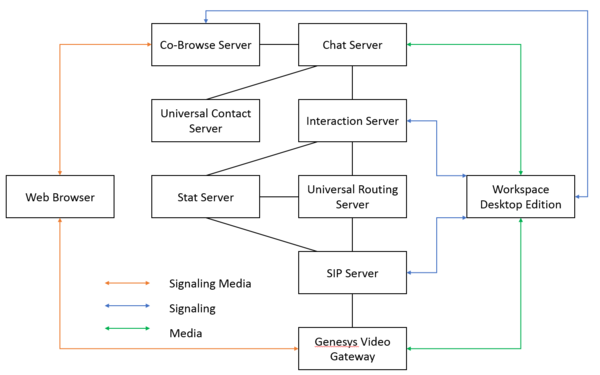
The following high level architecture depicts the minimum components required. Note that the Co-Browse Server and the Video Gateway should be placed in the DMZ.
Click on the graphic to enlarge it.
Integration Logic
You define a common token that is used on both channels. In simple terms, this token is created on the client side, within the web browser. Additionally, the Interaction Server database stores data that is shared between the two interactions and that can be accessed via token— for example, the agent Employee Id and Customer Name are written into Interaction database, and later Universal Routing Server (URS) reads the same data for a new voice interaction.
How does it work?
- The Web Browser creates client side token (for example, a session cookie).
- The client side token is added into the web chat session as UserData, where the key name is set to the ExternalId and the value is the token itself.
- Interaction Server automatically stores the value and the agent's information in the Interaction Server database. Subsequently URS will query Interaction Server to retrieve this Employee Id based on ExternalId
- URS queries the database and attaches the following new key value pairs to the interaction before routing the interaction to the agent:
- IW_BundleUid = UData['ExternalId']
- IW_CaseUid = UData['ExternalId']
- The same client side token is then added as attached UserData (ExternalId) to the web request to establish audio/video session. This results in the Genesys Video Gateway sending an INVITE to SIP Server with a custom SIP header (or Request-URI parameter) containing the token.
- SIP Server extracts the ExternalId token from the incoming SIP message and converts it to TLib UserData.
- URS queries Interaction Server database based on the ExternalId token provided over SIP transport, and returns the associated agent (Employee Id) to which the audio/video session should be routed to. Note that a capacity rule may have been defined in such a way that the agent can formally handle only one interaction at a time (either chat OR voice). In this case URS can force this specific call to be routed at agent handling corresponding chat interaction, ignoring that capacity rule.
- Prior to routing the call, URS again attaches the following key value pairs to ensure the voice (audio/video) call is presented by Workspace Desktop Edition in the same interaction tab as the chat session:
- IW_BundleUid = UData['ExternalId']
- IW_CaseUid = UData['ExternalId']
Creating Client Token
Tokens are created using JavaScript. The token should be unique. For example, the following script creates a random string of 8 characters:
Math.random().toString(36).substring(8)
You can create a session cookie that stores this random string until the user closes the web page. The following JavaScript functions allows you to easily create and read the cookie. Note that since there is no expires parameter, the cookie will be removed when webpage is closed.
function setSessionCookie(cname, cvalue) {
    document.cookie = cname + "=" + cvalue + ";"
}

function getCookie(cname) {
    var name = cname + "=";
    var ca = document.cookie.split(';');
    for(var i=0; i<ca.length; i++) {
        var c = ca[i];
        while (c.charAt(0)==' ') c = c.substring(1);
        if (c.indexOf(name) == 0) return c.substring(name.length, c.length);
    }
    return "";
}
Setting Cookie Example
setSessionCookie('GenesysVideo', Math.random().toString(36).substring(8));
Retrieving Cookie Example
getCookie('GenesysVideo');
Passing Tokens to Chat API
When a Chat session is triggered through Genesys Co-Browse, the JavaScript library exposes methods to add user data and custom functions using the Chat Widget. When the browser token is created, you can customize the Chat Widget to add the token to the Chat Session by passing the ExternalId into the userData variable. This ensures that that HTTP/Websocket request from the browser includes the ExternalId key-value pair in its payload. This is sent by Co-Browse server to Chat server and is ultimately stored in the Interaction Server database. See the following example:
Var _genesys = {
    chat: {
	templates: ‘http://chronos.localdomain:8700/custom/chatTemplatesVideo.html’,
autoRestore: true,
userData: { ExternalId: getCookie(‘GenesysVideo’) },
…
}
Customizing the Widget
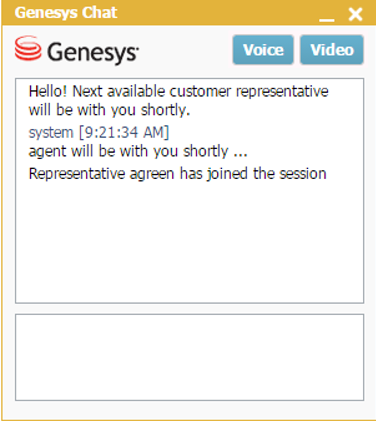
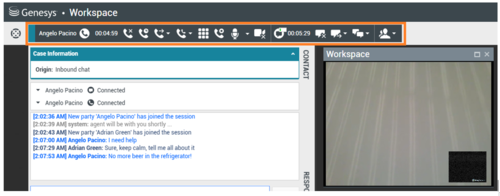
You should also integrate Audio/Video buttons into the Chat widget (as in picture below), as well as a video frame. One possible approach is to include the Audio and Video buttons in the Chat widget template as described in Customization Examples. The advantage of this approach is that newly added buttons are implicitly hidden to agent’s Co-Browse view.
The instrumentation widget for Chat could include something like the following:
onReady: function(chat) {
	chat.onSession(function(session) {
		session.onAgentConnected (function(event) {
		document.getElementById(“video-buttons”).style.display = “inline”;
	})
Where video-buttons element is the DOM container that includes Audio and Video buttons—as soon as the widget receives AgentConnected event, the buttons are made visible.
You should also mark the video frame DOM element as a service element, so that it does not show up in Co-Browse session on the agent side. You can do this by dynamically appending the DOM element from the JavaScript into DOM, as described in the Co-Browse API.
Mapping SIP Headers
Genesys recommends that you set the SIP headers that are passed from the Web Browser to the X-Genesys-ExternalId T-Library attribute. For example, the HTTP URL might look like the following:
http://server/user/demo/sdki.html?service=saypage&type=VIDEO&destination=sip:video@<sip-server-host:port>&arg1=ch%23X-Genesys-ExternalId%23' + getCookie('GenesysVideo');
Set the SIP Server global option userdata-map-trans-prefix to X-Genesys- to ensure that the ExternalId key is available as attached UserData for Universal Routing Server. Alternatively, Genesys Video Gateway can pass the token to SIP Server using the Request-URI parameter with the up prefix instead of the ch prefix.
Using the Find Interaction Object
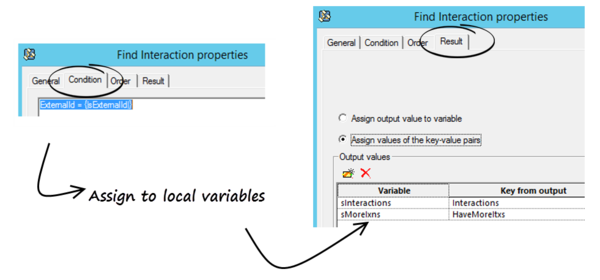
The Find Interaction ![]() object is used to retrieve the specific interaction from Interaction Server.
object is used to retrieve the specific interaction from Interaction Server.
On the Condition tab, add the following where clause:
ExternalId = {|sExternalId|}
Where the sExternalId is the local variable storing UserData extracted from SIP Server (sExternalId = UData['ExternalId'])
On the Result tab, assign results to local variables:
- sInteractions = Interactions
- SMoreIxns = HaveMoreItxs
The agent (Employee Id) who is handling the corresponding chat interaction must be used for subsequent routing. Optionally, the full name of customer might be useful in order to override the caller identity on the voice channel (by default, Genesys Video Gateway presents the voice session to the agent with a random identity).
To get the full name of the customer, use the following Names and Expressions:
- sInteractionId = KVListGetKey[sInteractions,1]
- sAgent = KVListGetStringValue[sInteractions,Cat[sInteractionId,'.AssignedTo']]
- sCallerFullName = Cat[KVListGetStringValue[sInteractions,Cat[sInteractionId,'.FirstName']],' ',KVListGetStringValue[sInteractions,Cat[sInteractionId,'.LastName']]]
To display caller's true identity in Workspace Desktop Edition, overwrite the value in the strategy using Attach IW_OverrideOptions= <WDE Override Transaction object> and set the corresponding option in the <WDEOverride Transaction object> as follows: In the [interaction-workspace] section set display-format.party-name-format = $AttachedData.CallerFullName$|$Party.DisplayName$.
Now both interactions appear as belonging to the same caller, specifically the name of caller defined by the chat session.
Finding the DN Target
The Find Interaction object retrieves the Employee Id of the agent that is currently handling the chat interaction. This information, however, is not sufficient for Universal Routing Server to route the call because agents might be distributed on different switches, and might have various statuses (not necessarily WaitForNextCall).
To find the corresponding DN and Switch information, use the TargetState function. This function queries Stat Server for all DNs belonging to specific agent, and returns all information in the List object, to be parsed.
For example:
lTarget = TargetState[Cat[sAgent,'@stat_1.A']]
Might return:
ASSIGN: lTarget(LOCAL) <- LIST: status:4|agent:agreen|place:2001|login:3002|activity:unknown|loading:1|ready:1|voice:0|dnsrdy:0|dnsall:2|dn.#1.type:38
|dn.#1.number:agreen|dn.#1.switch:|dn.#1.status:2|dn.#1.loading:1|dn.#1.ready:0|dn.#1.media:1|dn.#1.medianame:chat|dn.#2.type:1|dn.#2.number:2001
|dn.#2.switch:sip_1|dn.#2.status:4|dn.#2.loading:0|dn.#2.ready:0|dn.#2.media:0|dn.#2.medianame:voice
This list requires that you parse for the voice DN only. A convenient way to parse the List object is to use a custom Macro like the following:
Parameters:
inList

Definition:
// variable definition
var maxDNs;
var dnObject;
var iDN = 0; //counter
maxDNs= GetIntegerKey('dnsall',inList); // integer maxDNs holds to total DN count used by agent LoggedIn
inList= KVListFromString(inList, "");
while ( iDN < maxDNs ) { // we search only if agent is LoggedIn to at least one DN
  iDN++; //increment counter;
  dnObject= KVListGetListValue(inList, 'dn.#'+iDN);
  if (dnObject.medianame == 'voice' ) { // voice DN is found
     // return data, use function ReturnData[] to access the returned value
     ReturnEx(GetLastError(), dnObject);
  }
}
// return data, use function ReturnData[] to access the returned value
ReturnEx( GetLastError(), "0"); //no voice DN found
The result is a List object for the voice media-type only, which is retrieved using the ReturnData[] function in IRD. The result might look like the following:
lVoiceDN(LOCAL) <- LIST: type:1|number:2001|switch:sip_1|status:4|loading:0|ready:0|media:0|medianame:voice
Where the status is evaluated based on the following table, and the routing decision may follow accordingly:
| ID | State | ID | State | ID | State | ID | State | ID | State | ||||
|---|---|---|---|---|---|---|---|---|---|---|---|---|---|
| 0 | NotMonitored | 5 | OffHook | 10 | OfflineWorkType2 | 15 | NotUsed | 20 | CallInternal | ||||
| 1 | Monitored | 6 | CallDialing | 11 | BreakType1 | 16 | ASM_Engaged | 21 | CallOutbound | ||||
| 2 | LoggedIn | 7 | CallRinging | 12 | BreakType2 | 17 | ASM_Outbound | 22 | CallInbound | ||||
| 3 | OnHook | 8 | NotReadyForNextCall | 13 | CallOnHold | 18 | CallUnknown | 23 | LoggedOut | ||||
| 4 | WaitForNextCall | 9 | AfterCallWork | 14 | NotUsed | 19 | CallConsult |
Merging Interactions for the Agent
Genesys recommends that your strategy attach the same data key value pairs in both the chat and voice interaction using the following attributes:
- IW_BundleUid = UData['ExternalId']
- IW_CaseUid = UData['ExternalId']
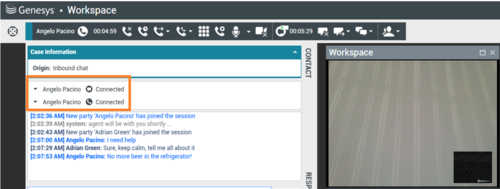
This will allow both interactions to display in the same tab on the agent's Workspace Desktop.
Initiating Co-Browse Session
A Co-Browse session can started only after the previous communication channel has been established (either Chat or Voice/Video). If Co-Browse is requested by the customer after Chat, the Co-Browse session starts automatically.
Since Voice/Video related buttons are added to the existing Chat template and the Video frame has been marked as a service element, these additional DOM elements will not appear in the agent’s Workspace Co-Browse session.
Sequence Diagrams
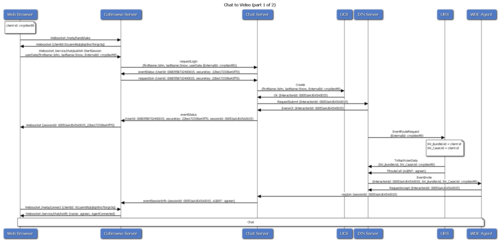
The following diagram describes the chat session establishment:
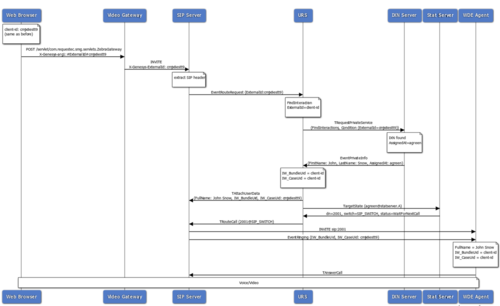
The following diagram describes how the audio/video session is established with the same agent handling chat:
To view the Co-Browse sequence diagram, see the Co-Browse Conceptual Model.
Limitations
- The Find Interaction IRD object cannot define which Interaction Server that Universal Routing Server should use for the query. If multiple Interaction Servers are connected, Universal Routing Server uses the least loaded one causing the request to fail. This solution works correctly if Universal Routing server is connected to single Interaction Server.
- You must start the audio/video session after the chat session is established to route the session to the chat agent.
- Although the Workspace Desktop shows that the agent can take both Chat and Video as a single interaction, there are two distinct interactions. Therefore, interaction control operations executed by the agent (for example, transfer attempt to another agent) affect a single interaction only. Full multi-modality is not included in this release.
- The use case described is simple and makes the assumption that the agent is assigned a capacity rule for only one interaction at a time (either Voice or Chat), and that the agent always logs on and becomes available to both Voice and Chat channels. More complex scenarios are not currently covered by this Integration Whitepaper.

