
(Created target blank page For Version: PSAAS:Julie) |
(Automated save: adding PEC_Migrated template.) |
||
| Line 1: | Line 1: | ||
| − | < | + | = Route Call Block = |
| + | |||
| + | {{Template:PEC_Migrated}} | ||
| + | |||
| + | |||
| + | |||
| + | You can use the '''Route Call''' block in the '''Assisted Service''' phase to route calls to an agent based on various criteria, such as Skills and Agent Groups. | ||
| + | |||
| + | You can sequentially place multiple '''Route Call''' blocks with different settings, so that if routing fails in one block, your application proceeds to the next block. When a '''Route Call''' block successfully routes the call to an agent, the application moves to the '''Finalize''' phase, ignoring any subsequent blocks in the '''Assisted Service''' phase. | ||
| + | |||
| + | ==Call Routing tab== | ||
| + | ===Select Routing Type section=== | ||
| + | Choose between the following routing options: | ||
| + | ====Skill based routing with relaxing criteria==== | ||
| + | Routes the call to an agent that has the required skills. If selected, you can choose from the following options: | ||
| + | <ul> | ||
| + | <li>'''Use system variables RoutingTarget / RoutingVirtualQueue set already in Menu Options''' - Use system variables that were set in a [[Menu#Configuring_Menu_Option_Blocks|Menu Option]] block.</li> | ||
| + | <li>'''Specify Skills in this block''' - Specify one or more skills and a Virtual Queue to use to route this call. If you specified more than one skill, you can choose whether the routing engine considers any or all of the selected skills: | ||
| + | <ul> | ||
| + | <li>'''all skills''' - The application must use all of the selected skills to route the call.</li> | ||
| + | <li>'''any skill''' - The application can use any of the selected skills to route the call.</li> | ||
| + | </ul> | ||
| + | {{NoteFormat|This option uses the skill level specified in the '''Use Skill Proficiency level''' setting (documented below). For example, if you set an initial skill level of <tt>8</tt>, Designer only routes the call to agents with the specified skills that have a level of <tt>8</tt> or greater. You cannot set an individual level for each specified skill.}}</li> | ||
| + | <li>'''Use Skill Proficiency level''' - Enter a Skill level. The call is routed to an agent that has a skill level equal to or higher to the value you provide. If you enable '''Reduce skill requirements''', the required skill level is gradually decremented by a specified skill level, until it reaches the specified minimum skill level. This option allows you to expand the group of agents that can receive this call if other agents are busy.</li> | ||
| + | </ul> | ||
| + | |||
| + | ====Skill expression based routing==== | ||
| + | Enter a skill expression in the '''Skill Expression''' tab, or click the drop-down menu to select a variable that specifies a skill expression. | ||
| + | ====Agent Group routing==== | ||
| + | Route the call to a specific Agent Group or a variable that holds the name of an Agent Group at runtime. | ||
| + | ====Agent routing==== | ||
| + | Route the call to agents by using a variable that holds the ID of an agent at runtime. You must use the following format: <tt>''agentid''@''optional_statserver''.A</tt>. <br>Example: <tt>1001@StatServer.A</tt>. | ||
| + | ====Campaign Group routing==== | ||
| + | Route the call to a specific Campaign Group or a variable that holds the name of a Campaign Group at runtime. | ||
| + | ====Route to another Application==== | ||
| + | Transfer the interaction to the selected application. You can then specify a Phone Number (or the variable containing the Routing Point name) that is associated with the target application. | ||
| + | |||
| + | ====Direct number routing==== | ||
| + | Transfer a call to a number. You can use a variable to hold the number to use at runtime or add direct number elements. Specify the weight for each number and Designer displays and uses the percentage ranking based on the weightings. | ||
| + | ====Force Route==== | ||
| + | Force the call to route to a direct number. When using this routing type, Designer routes the call in a way that is similar to how an interaction is redirected by Route Point routing. When selected, you can specify the target as a ''literal'' value, or as a variable that holds a ''string'', ''number'', or ''object'' value. | ||
| + | |||
| + | {{NoteFormat| | ||
| + | * The '''Routing Priority''' tab and the '''Targeting Options''' in the '''Advanced''' tab ('''Clear targets from queue if this block times out''' and '''Early exit from this block if no agents are logged in''') are not applicable when using '''Force Route'''. | ||
| + | * When the '''Force Route''' option is selected, the overall timeout for the '''Route Call''' block is limited to 30 seconds.}} | ||
| + | |||
| + | ===Other Routing Settings section=== | ||
| + | ====Routing Algorithm==== | ||
| + | Select which algorithm is used to choose an agent when more than one agent is available. For more information, see [[RoutingAlgorithms|Routing Algorithms]]. | ||
| + | ====Overall timeout==== | ||
| + | Enter the maximum time (in seconds) to wait for an agent to be available before moving to the next block. Optionally, you can enable the check box to specify a variable. | ||
| + | |||
| + | {{NoteFormat|System variables '''SelectedTarget''', '''SelectedVirtualQueue''', '''SelectedComponent''', '''SelectedTargetObject''', '''SelectedAgent''', and '''Access''' are automatically set when the call is routed to an agent and can be used later in the application. Refer to the '''Initialize''' phase's '''System Variables''' tab to read a detailed description for each of these variables.}} | ||
| + | |||
| + | ===Example=== | ||
| + | [[File:des_route_call_routing_02.png]] | ||
| + | |||
| + | ==Skill Expression tab== | ||
| + | {{NoteFormat|This tab only appears if you selected the '''Skill expression based routing''' option in the '''Call Routing''' tab.}} | ||
| + | |||
| + | If you selected the option '''Skill expression based routing''' in the '''Call Routing''' tab, you must build the skill expression to identify the best agent to handle the call. The skill expression consists of a list of skills for which you must individually set an operator and an integer value. | ||
| + | |||
| + | Arrange individual skill conditions in the conditions sets. You can specify skills by name or variables that contain the name of the skills at runtime. | ||
| + | |||
| + | {{NoteFormat|When using '''Skill expression based routing''' and you are building the entire skill expression within a variable, you must manually add the single quotes around the skill names. | ||
| + | |||
| + | For example, use this: | ||
| + | <pre>"'New iPhone' > 7"</pre> | ||
| + | |||
| + | instead of this: | ||
| + | <pre>"New iPhone > 7"</pre>}} | ||
| + | |||
| + | ==Treatments tab== | ||
| + | Specify a busy treatment to execute while waiting for an agent to become available. You can choose to play [[MediaResources|audio]] and/or execute a [[SharedModulesBar|shared module]]. | ||
| + | |||
| + | * [[Blocks#treatments|Learn more about busy treatments]] | ||
| + | |||
| + | {{NoteFormat|After a busy treatment has been executed at least 10 times, Designer exits the '''Route Call''' block and moves to the next block if the average duration of the treatment is less than 1000 ms (for example, due to a missing audio file). (However, this does not apply if the '''Force Route''' option is selected.)}} | ||
| + | |||
| + | ===Audio=== | ||
| + | Click '''Add Audio''' to add a [[PlayMessage|Play Message]] child block underneath this '''Route Call''' block. The collection of audio plays repeatedly until the call is successfully routed or times out. | ||
| + | |||
| + | ===Shared Module=== | ||
| + | Click '''Add Module''' to add a [[SharedMod|Shared Module]] child block underneath this '''Route Call''' block. In the child block, you can select a shared module to execute. | ||
| + | |||
| + | A potential use case is to execute a shared module based on a specified set of conditions that can change over time and respond to external factors. For example, you might use a shared module that can play one announcement for callers if the estimated wait time (EWT) is beyond a certain threshold, and another announcement for when they are the next caller in the queue. | ||
| + | |||
| + | To set up this feature: | ||
| + | |||
| + | <ol> | ||
| + | <li>In the application, create a user variable, <tt>ewt</tt>, and set its default value to <tt>0</tt>.</li> | ||
| + | |||
| + | <li>Create a '''Self Service''' type shared module.</li> | ||
| + | |||
| + | <li>In the shared module, create a user variable, <tt>ewt</tt>, and set its default value to <tt>0</tt>.</li> | ||
| + | |||
| + | [[File:des_routecall_treatments6.png|border|center|link=]] | ||
| + | |||
| + | <li>In the '''Self Service''' phase of the shared module, add a '''Segmentation''' block. Add the conditions as shown below:</li> | ||
| + | |||
| + | [[File:des_routecall_treatments3.png|border|center|link=]] | ||
| + | |||
| + | <li>Add two '''Play Message''' blocks as child blocks of the condition blocks, and add an '''Assign Variables''' block at the end. Your shared module should appear as shown below:</li> | ||
| + | |||
| + | [[File:des_routecall_treatments1.png|border|center|link=]] | ||
| + | |||
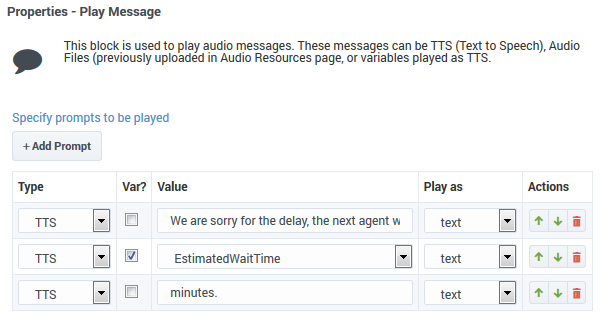
| + | <li>Configure the first '''Play Message''' block. An example is below:</li> | ||
| + | |||
| + | [[File:des_routecall_treatments4.png|border|center|link=]] | ||
| + | |||
| + | <li>Configure the second '''Play Message''' block. An example is below:</li> | ||
| + | |||
| + | [[File:des_routecall_treatments5.png|border|center|link=]] | ||
| + | |||
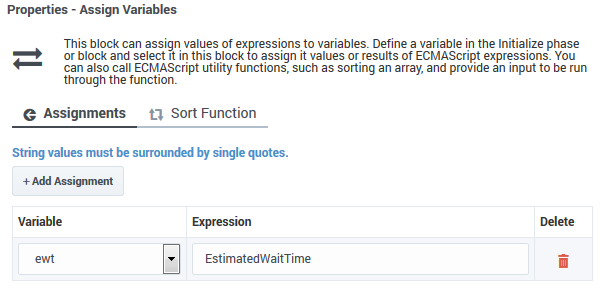
| + | <li>Configure the '''Assign Variables''' block as shown below:</li> | ||
| + | |||
| + | [[File:des_routecall_treatments2.png|border|center|link=]] | ||
| + | |||
| + | <li>In your application, select the '''Route Call''' block and click the '''Treatments''' tab.</li> | ||
| + | |||
| + | <li>Click '''Add Module'''. A child '''Shared Module''' block appears beneath the '''Route Call''' block.</li> | ||
| + | |||
| + | <li>In the child '''Shared Module''' block, select the shared module that you created in Step 2.</li> | ||
| + | |||
| + | </ol> | ||
| + | |||
| + | The application passes '''ewt''' to the shared module, along with the system variables, which includes '''EWT'''. The shared module compares '''ewt''' and '''EWT''' in the '''Segmentation''' block and executes a '''Play Message''' block, depending on which variable is larger. At the end, the shared module sets '''ewt''' to '''EWT''' before returning to the application. | ||
| + | |||
| + | ==Routing Priority tab== | ||
| + | ====Use Priority during Routing==== | ||
| + | Enable this check box to use priority-based routing, which prioritizes your calls depending on your business requirements. | ||
| + | |||
| + | To prioritize calls, you must segment calls and assign the name of that segment to a variable. You must select this variable in the '''Lookup Priority table based on this variable''' drop-down menu. | ||
| + | |||
| + | You can customize this table with your own segment definitions to fit your business needs. If the specific segment is not found, then the value specified for '''Initial priority''' is used. Enter a value in '''Increment size''' to increase the priority of a call that remains in a queue over time. The priority increment is defined for each segment, but a default increment is configurable with the '''Increment Size''' property. | ||
| + | |||
| + | ====Increment Priority every ___ seconds==== | ||
| + | Enable this check box to specify the time interval between priority increments. If you enable the other check box beside the field, you can select a variable that specifies the overall '''Routing Timeout''' and '''Priority Increment Interval''' properties. | ||
| + | |||
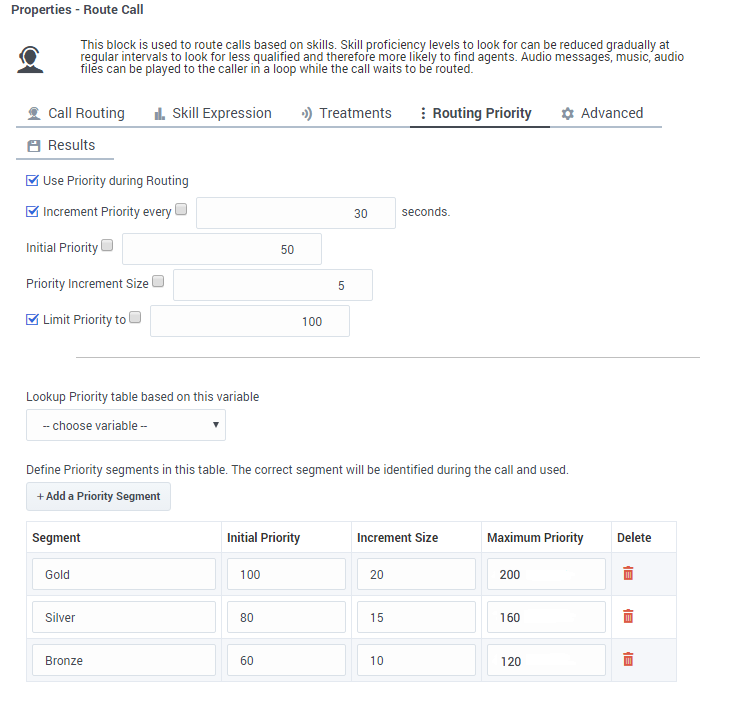
| + | ====Limit Priority to==== | ||
| + | If the '''Increment Priority every ___ seconds''' option is enabled, you can use this option to set a maximum priority value. For example, if the initial priority is <tt>50</tt>, you can use this option to not let the priority value increase beyond <tt>100</tt>, as shown here: | ||
| + | |||
| + | =====Example===== | ||
| + | [[File:des_routecall_routingpriority2.png|border|center|link=]] | ||
| + | |||
| + | If you enable the other check box beside the field, you can select a variable for this option. | ||
| + | |||
| + | ==Advanced tab== | ||
| + | ===Targeting section=== | ||
| + | ====Clear targets from queue if this block times out==== | ||
| + | Enable this check box to specify whether the pending request for a target should be kept active or not after exiting this block on timeout. When the request is kept active (check box is disabled), an agent may be selected after the block times out if, for example, an agent with the matching criteria is ready after the block was exited. | ||
| + | |||
| + | ====Early exit from this block if no agents are logged in==== | ||
| + | Enable this check box to exit the block if no agents are logged in for the selected routing target (such as Agent or Agent Group, skill expression based, or skill based routing with relaxing criteria). | ||
| + | |||
| + | ====Route only to local agents==== | ||
| + | If you have selected '''Skill based routing with relaxing criteria''' or '''Skill expression based routing''', you can enable this option. When enabled, the call is routed to a local agent who matches the target skill. | ||
| + | |||
| + | {{NoteFormat|If you want to route to local agents as the preferred option, but then route to all agents if there are no local agents available with the required skill, you can set up cascaded routing. | ||
| + | |||
| + | Here's a way you can do that: | ||
| + | * Set up the '''Route Call''' block with '''Route only to local agents''' enabled, a short '''Overall timeout''' property value, and '''Clear targets from queue if this block times out''' deselected. | ||
| + | * Then, set up any '''Route Call''' blocks that are further down the application flow with '''Route only to local agents''' not selected. | ||
| + | |||
| + | You can watch this video to see a short demonstration of how to set this up. | ||
| + | |||
| + | {{#widget:Vimeo|id=260131385}} | ||
| + | |||
| + | You might also want to modify skill relaxing settings to run faster on routing blocks that target local agents.|2}} | ||
| + | |||
| + | ====Threshold Expression==== | ||
| + | This option enables you to use an ECMAScript (or JavaScript) expression to further refine a routing threshold for the specified target(s). Threshold expressions for the '''Route Call''' block can be used for the following routing types: | ||
| + | * Skill | ||
| + | * Skill Expression | ||
| + | * Agent Group | ||
| + | * Agent | ||
| + | * Campaign Group | ||
| + | * Direct Number | ||
| + | Threshold expressions can contain variables or reference queue-specific values, such as ''sdata(target, statistic)'' or ''callage()''. Strings must be enclosed in single quotes. For | ||
| + | example: | ||
| + | |||
| + | [[file:des_route_call_thresh_exp.png]] | ||
| + | |||
| + | For more information about using ECMAScripts in Designer, see [[Variables#AssignVar|Assigning values to variables]]. | ||
| + | |||
| + | {{NoteFormat|For routing types that have multiple targets (such as Agent Group or Agent), the script defined in '''Threshold Expression''' applies to all targets.}} | ||
| + | |||
| + | ===Greetings section=== | ||
| + | Enable the check box beside '''Customer Greeting''' and/or '''Agent Greeting''' to play an audio file to that person while the call is being connected. | ||
| + | |||
| + | For customers, you might use this feature to play a legal disclaimer, or to announce that the call might be recorded (if you use call recording in your contact center). For agents, you might use a variable to announce the customer name or other relevant information. | ||
| + | |||
| + | After you enable '''Customer Greeting''' and/or '''Agent Greeting''', you can select an audio file to play by clicking the icon in the '''Announcement''' field. This is useful for customer greetings that play a static disclaimer audio file. | ||
| + | |||
| + | Optionally, enable the '''Var?''' check box to use a variable to dynamically select the audio file. This is useful for agent greetings that use a variable to provide call-specific information, such as the customer name. | ||
| + | |||
| + | Note that: | ||
| + | * The '''Customer Greeting''' plays continuously until the '''Agent Greeting''' finishes playing. | ||
| + | * When the '''Customer Greeting''' and '''Agent Greeting''' contain different prompt values, each prompt is played to the customer and the agent as specified. | ||
| + | * When only one option contains a value, the same prompt is played to both the customer and the agent. | ||
| + | * If the '''Customer Greeting''' or '''Agent Greeting''' cannot be played, the customer is immediately connected to the agent. No greetings are played. | ||
| + | |||
| + | ===Extensions section=== | ||
| + | Click '''Add Extension Data''' to add an extension as a key-value pair to this block. The value type can be a string or integer. | ||
| + | |||
| + | If you want to use a variable for the '''Key''' or '''Value''', select the '''Variable''' checkbox and then select a variable from the drop-down menu. If the '''Value''' is an integer, select the '''Integer''' checkbox. | ||
| + | |||
| + | {{NoteFormat|You do not need to enclose extension values in quotes. However, if the quote is part of the value, you must escape the quote character by using a preceding backslash. For example: | ||
| + | *Incorrect: <tt>Joe's Pizza</tt> | ||
| + | *Correct: <tt>Joe\'s Pizza</tt>}} | ||
| + | |||
| + | {{NoteFormat|Designer displays an error message if Extension Data is added, but the '''Key''' and '''Value''' settings are not defined.}} | ||
| + | |||
| + | This example shows a few different ways that key-value pairs can be added as extensions: | ||
| + | |||
| + | [[file:des_add_extension_example.png]] | ||
| + | |||
| + | ==Results tab== | ||
| + | Select a variable in the '''Store selected agent ID in this variable''' drop-down menu to keep track in a specific variable the ID of the agent selected as a result of this '''Route Call''' block execution. The '''SelectedAgent''' system variable is transparently assigned this same agent ID value. | ||
| + | |||
| + | You can also select a variable in the '''Store the outcome of the Route Call block in this variable''' drop-down menu to store the result of this '''Route Call''' block execution. | ||
| + | |||
| + | [[Category:V:PSAAS:Julie]] | ||
Latest revision as of 23:10, June 21, 2020
Route Call Block
You can use the Route Call block in the Assisted Service phase to route calls to an agent based on various criteria, such as Skills and Agent Groups.
You can sequentially place multiple Route Call blocks with different settings, so that if routing fails in one block, your application proceeds to the next block. When a Route Call block successfully routes the call to an agent, the application moves to the Finalize phase, ignoring any subsequent blocks in the Assisted Service phase.
Call Routing tab
Example

Treatments tab
Specify a busy treatment to execute while waiting for an agent to become available. You can choose to play audio and/or execute a shared module.
Click Add Module to add a Shared Module child block underneath this Route Call block. In the child block, you can select a shared module to execute.
A potential use case is to execute a shared module based on a specified set of conditions that can change over time and respond to external factors. For example, you might use a shared module that can play one announcement for callers if the estimated wait time (EWT) is beyond a certain threshold, and another announcement for when they are the next caller in the queue.
To set up this feature:
- In the application, create a user variable, ewt, and set its default value to 0.
- Create a Self Service type shared module.
- In the shared module, create a user variable, ewt, and set its default value to 0.
- In the Self Service phase of the shared module, add a Segmentation block. Add the conditions as shown below:
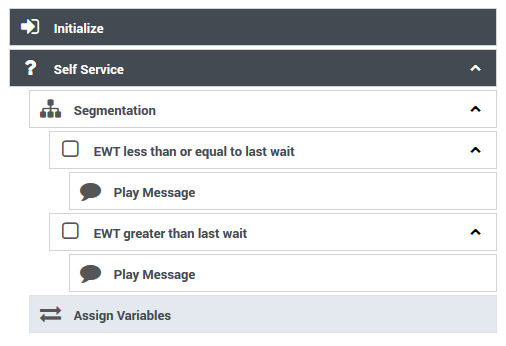
- Add two Play Message blocks as child blocks of the condition blocks, and add an Assign Variables block at the end. Your shared module should appear as shown below:
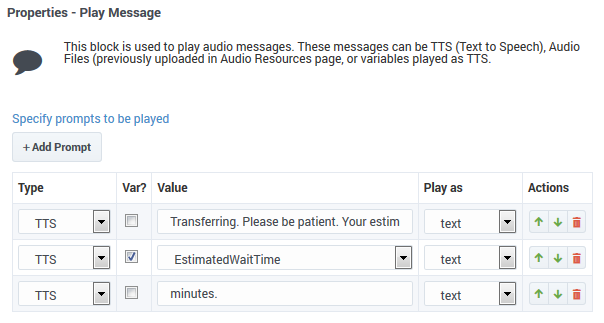
- Configure the first Play Message block. An example is below:
- Configure the second Play Message block. An example is below:
- Configure the Assign Variables block as shown below:
- In your application, select the Route Call block and click the Treatments tab.
- Click Add Module. A child Shared Module block appears beneath the Route Call block.
- In the child Shared Module block, select the shared module that you created in Step 2.
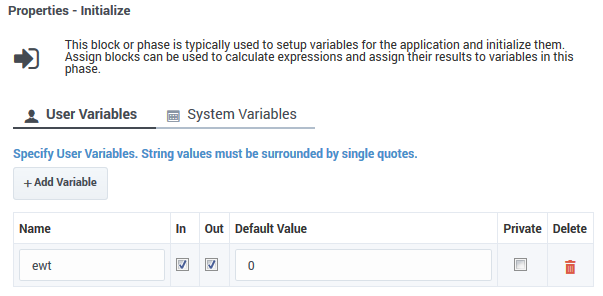
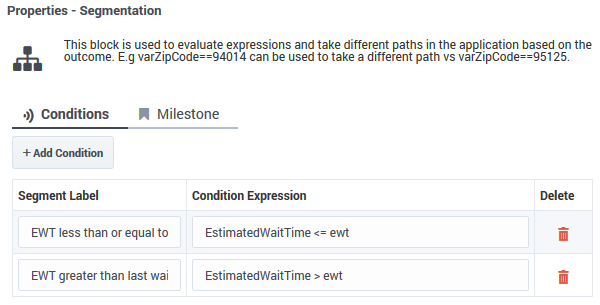
The application passes ewt to the shared module, along with the system variables, which includes EWT. The shared module compares ewt and EWT in the Segmentation block and executes a Play Message block, depending on which variable is larger. At the end, the shared module sets ewt to EWT before returning to the application.
Routing Priority tab
Use Priority during Routing
Enable this check box to use priority-based routing, which prioritizes your calls depending on your business requirements.
To prioritize calls, you must segment calls and assign the name of that segment to a variable. You must select this variable in the Lookup Priority table based on this variable drop-down menu.
You can customize this table with your own segment definitions to fit your business needs. If the specific segment is not found, then the value specified for Initial priority is used. Enter a value in Increment size to increase the priority of a call that remains in a queue over time. The priority increment is defined for each segment, but a default increment is configurable with the Increment Size property.
Increment Priority every ___ seconds
Enable this check box to specify the time interval between priority increments. If you enable the other check box beside the field, you can select a variable that specifies the overall Routing Timeout and Priority Increment Interval properties.
Limit Priority to
If the Increment Priority every ___ seconds option is enabled, you can use this option to set a maximum priority value. For example, if the initial priority is 50, you can use this option to not let the priority value increase beyond 100, as shown here:
Example
If you enable the other check box beside the field, you can select a variable for this option.
Advanced tab
Targeting section
Threshold Expression
This option enables you to use an ECMAScript (or JavaScript) expression to further refine a routing threshold for the specified target(s). Threshold expressions for the Route Call block can be used for the following routing types:
- Skill
- Skill Expression
- Agent Group
- Agent
- Campaign Group
- Direct Number
Threshold expressions can contain variables or reference queue-specific values, such as sdata(target, statistic) or callage(). Strings must be enclosed in single quotes. For example:

For more information about using ECMAScripts in Designer, see Assigning values to variables.
Extensions section
Click Add Extension Data to add an extension as a key-value pair to this block. The value type can be a string or integer.
If you want to use a variable for the Key or Value, select the Variable checkbox and then select a variable from the drop-down menu. If the Value is an integer, select the Integer checkbox.
- Incorrect: Joe's Pizza
- Correct: Joe\'s Pizza
This example shows a few different ways that key-value pairs can be added as extensions:
