(Created target blank page For Version: PSAAS:Public) |
(Modified comment string {{Template:PEC_Migrated| with __NOINDEX__ {{Template:PEC_Migrated|) |
||
| (9 intermediate revisions by 3 users not shown) | |||
| Line 1: | Line 1: | ||
| − | + | = Search, display, manage and update workitems= | |
| + | |||
| + | __NOINDEX__ | ||
| + | __NOINDEX__ {{Template:PEC_Migrated| | ||
| + | |||
| + | Target=[https://all.docs.genesys.com/PEC-IWD/Current/Administrator/IWDGTL Search, display, manage and update workitems]}} | ||
| + | |||
| + | |||
| + | |||
| + | {{CloudStep_Stack | ||
| + | |title=Search for workitems | ||
| + | |text= | ||
| + | *Search for a '''specific workitem''' by entering its ID in the '''Search''' field at the top of the '''Workitems''' tab and clicking return. | ||
| + | *Search for any '''list of workitems''' by entering a text string in the '''Search''' field and clicking return. | ||
| + | *Search the '''workitems database''' directly by using the Lucene query syntax described {{#Widget:ExtLink|link=https://www.elastic.co/guide/en/elasticsearch/reference/6.7/query-dsl-query-string-query.html#query-string-syntax|displaytext=here}} (vendor document). | ||
| + | *Clear the current search citeria by clicking '''X''' in the '''Search''' field. | ||
| + | *Create a new Category from the current search criteria by clicking the '''Category''' button in the '''Search''' field. | ||
| + | |media1=CloudGTLSearch2.png | ||
| + | }} | ||
| + | |||
| + | {{CloudStep_Stack | ||
| + | |title=Filter by Category | ||
| + | |text= | ||
| + | Select a Category on the collapsible '''Categories''' tab to quickly filter by workitems that match the selected Category or sub-Category only. | ||
| + | |media1=CloudGTLCatQuery_2.png | ||
| + | }} | ||
| + | |||
| + | {{CloudStep_Stack | ||
| + | |title=Using the Filter & View tab | ||
| + | |text= | ||
| + | Use a saved or favorited filter/view on the collapsible '''Filter & View''' tab to quickly apply filtering and view settings to workitems list. If you have previously selected a Category, any Category defined inside the filter/view overrides the earlier Category selection. If '''All Categories''' is selected inside the filter/view, any previous selection of Category is cleared. | ||
| + | |media1=CloudGTLPreQuery_2.png | ||
| + | }} | ||
| + | |||
| + | {{CloudStep_Stack | ||
| + | |title=Search by time interval | ||
| + | |text= | ||
| + | Use the time interval button (which shows the currently selected time interval) to display either: | ||
| + | *Quick search using predefined time ranges | ||
| + | *Absolute date/time ranges for customized time intervals | ||
| + | |||
| + | You can click '''DAY START''' and '''DAY END''' selectors to select the day start and end times configured for your contact center or you can use the '''SPECIFY TIME''' selector to open a clock-style drag-and-drop selector in which you can click the displayed time, then change the '''From''' and '''To''' hour values. Drag the selector to select a new hour and minute value, then, on the second selector displayed, a new minute value. | ||
| + | |||
| + | {{NoteFormat|You must select a minute value, even if it is <tt>00</tt>, to register the selection. |2}} | ||
| + | |||
| + | If you have a Category selected, only workitems in that Category are displayed. | ||
| + | |media1=CloudGTLTimeButton_2.png | ||
| + | }} | ||
| + | |||
| + | {{CloudStep_Stack | ||
| + | |title=Save filters and views | ||
| + | |text= | ||
| + | Use the '''Views''' button to do the following: | ||
| + | *Select a view for the '''State''' column. | ||
| + | *Save/reset filters (Category + query) and views (columns + sorting): | ||
| + | **Save the current filter and/or view for future use (Supervisors, Business users and Administrators only). | ||
| + | **Reset the filter to clear the filtering details from the page. | ||
| + | **Reset the table view to the default. | ||
| + | *Restore the list of preconfigured filter and view states. | ||
| + | |||
| + | |media1=ViewMenu.png | ||
| + | }} | ||
| + | |||
| + | ===Extended States=== | ||
| + | The table below describes the meanings of the extended state symbols. | ||
| + | {| border="1" | ||
| + | |- | ||
| + | ! '''Extended''' | ||
| + | <!--! '''Colored'''--> | ||
| + | ! '''Description''' | ||
| + | |- | ||
| + | | [[File:StateSymbol1.png]] | ||
| + | <!--| [[File:StateNewColor.png]]--> | ||
| + | | New | ||
| + | |- | ||
| + | | [[File:StateSymbol2.png]] | ||
| + | <!--| --> | ||
| + | | Not yet distributed | ||
| + | <!-- | ||
| + | |- | ||
| + | | | ||
| + | | [[File:StateClassifiedColor.png]] | ||
| + | | Classified--> | ||
| + | <!-- | ||
| + | |- | ||
| + | | | ||
| + | | [[File:StateQueued.png]] | ||
| + | | Queued--> | ||
| + | |- | ||
| + | | [[File:StateSymbol3.png]] | ||
| + | <!--| [[File:StateHeldColor.png]]--> | ||
| + | | Held | ||
| + | |- | ||
| + | | [[File:StateSymbol4.png]] | ||
| + | <!--| [[File:StateRoutingColor.png]]--> | ||
| + | | In routing state, not yet assigned | ||
| + | |- | ||
| + | | [[File:StateSymbol5.png]] | ||
| + | <!--| [[File:StateAssignedColor.png]]--> | ||
| + | | Being processed by an agent | ||
| + | |- | ||
| + | | [[File:StateSymbol6.png]] | ||
| + | <!--| [[File:StatusCompletedColor.png]]--> | ||
| + | | Completed but not assigned to an agent | ||
| + | |- | ||
| + | | [[File:StateSymbol7.png]] | ||
| + | <!--| [[File:StateExpired1.png]]--> | ||
| + | | Expired but not assigned to an agent | ||
| + | |- | ||
| + | | [[File:StateSymbol8.png]] | ||
| + | <!--| [[File:StateCompleted2.png]]--> | ||
| + | | Completed and has been processed by an agent | ||
| + | |- | ||
| + | | [[File:StateSymbol9.png]] | ||
| + | <!--| [[File:StateExpired2.png]]--> | ||
| + | | Expired and has been processed by an agent | ||
| + | <!--|- | ||
| + | | | ||
| + | | [[File:StateDeletedColor.png]] | ||
| + | | Workitem has been deleted | ||
| + | |- | ||
| + | | | ||
| + | | [[File:StateErrorColor.png]] | ||
| + | | Workitem has an error--> | ||
| + | |} | ||
| + | |||
| + | |||
| + | |||
| + | {{CloudStep_Stack | ||
| + | |title=Display and update workitem attributes | ||
| + | |text= | ||
| + | ===For individual workitems=== | ||
| + | Select a workitem and/or click one of its attributes to display all its attributes. | ||
| + | |||
| + | Toggle the display of specific fields in the summary display by clicking the symbols indicated. | ||
| + | |||
| + | Expand a field with more than 200 characters by clicking the dynamic expand symbol next to the field label. | ||
| + | |||
| + | To update the attribute values of a workitem, click the value you want to change, add the new value, then click the '''Update''' button. System properties of the workitem are protected, so you can't update them. | ||
| + | |||
| + | You can add an attribute to the display by clicking '''Add attribute...''' at the bottom of the first panel of attributes. | ||
| + | |||
| + | You can also search for other workitems corresponding to a specific attribute value by clicking the search symbol next to the attribute. | ||
| + | |||
| + | ===For multiple workitems=== | ||
| + | To make an identical value change to one or more attributes of multiple workitems, select the workitems by checking their checkboxes or by filtering workitems using a search query, click the value you want to change, add the new value(s), then click the '''Bulk Update''' button. | ||
| + | |||
| + | System properties of the workitem are protected, so you can't update them. | ||
| + | |||
| + | |media1=CloudGTLDisplayTasks_2.png | ||
| + | }} | ||
| + | |||
| + | |||
| + | {{CloudStep_Stack | ||
| + | |title=Manage workitems | ||
| + | |text= | ||
| + | Use the control buttons at the top of the '''Workitems''' window to do the following to either individual or multiple workitems: | ||
| + | |media1=GTLTaskMgr_2.png | ||
| + | }} | ||
| + | *Activate workitem(s)—Select a workitem(s) that has been assigned an activation date in the future, and click '''Activate''' to activate it immediately. | ||
| + | *Hold workitem(s)—Select a workitem(s) and click '''Hold'''. Held workitems can't be reprioritized or distributed, but you can cancel, restart or resume them. | ||
| + | *Resume workitem(s)—Select a held workitem(s) and click '''Resume''' to resume processing. You can only resume held workitems. | ||
| + | *Cancel workitem(s)—Select a workitem(s) and click '''Cancel''' to permanently cancel it. You can't cancel a workitem if it's been completed, canceled, or rejected. But you can cancel a workitem that has already been assigned to an agent. Canceled workitems remain in iWD for an amount of time that's configured in the '''Keep completed workitems for''' field (by Genesys only) before being deleted. Workitems can only be completed through the source system or the API, so Genesys recommends canceling any of the workitems that you no longer want matched with an employee. | ||
| + | *Restart workitem(s)—Select a workitem(s) to send it back to the beginning of the process, where it will be treated as if it was new. | ||
| + | |||
| + | Any action can be applied to one or many individually selected items (checked in the table) or to all the items that satisfy the current query, including time frame and any applied Category filter. | ||
| + | |||
| + | Workitems that are in the '''Default''' category have not been segmented by any of the existing Categories. Genesys recommend that administrators monitor these workitems to decide whether a category should be established to segment them. | ||
| + | |||
| + | |||
| + | [[Category:V:PSAAS:Public]] | ||
| + | |||
| + | [[Category:V:PSAAS:Public]] | ||
Latest revision as of 08:56, November 9, 2020
Contents
[hide]Search, display, manage and update workitems
Search for workitems
- Search for a specific workitem by entering its ID in the Search field at the top of the Workitems tab and clicking return.
- Search for any list of workitems by entering a text string in the Search field and clicking return.
- Search the workitems database directly by using the Lucene query syntax described here (vendor document).
- Clear the current search citeria by clicking X in the Search field.
- Create a new Category from the current search criteria by clicking the Category button in the Search field.
Filter by Category
Using the Filter & View tab
Use a saved or favorited filter/view on the collapsible Filter & View tab to quickly apply filtering and view settings to workitems list. If you have previously selected a Category, any Category defined inside the filter/view overrides the earlier Category selection. If All Categories is selected inside the filter/view, any previous selection of Category is cleared.
Search by time interval
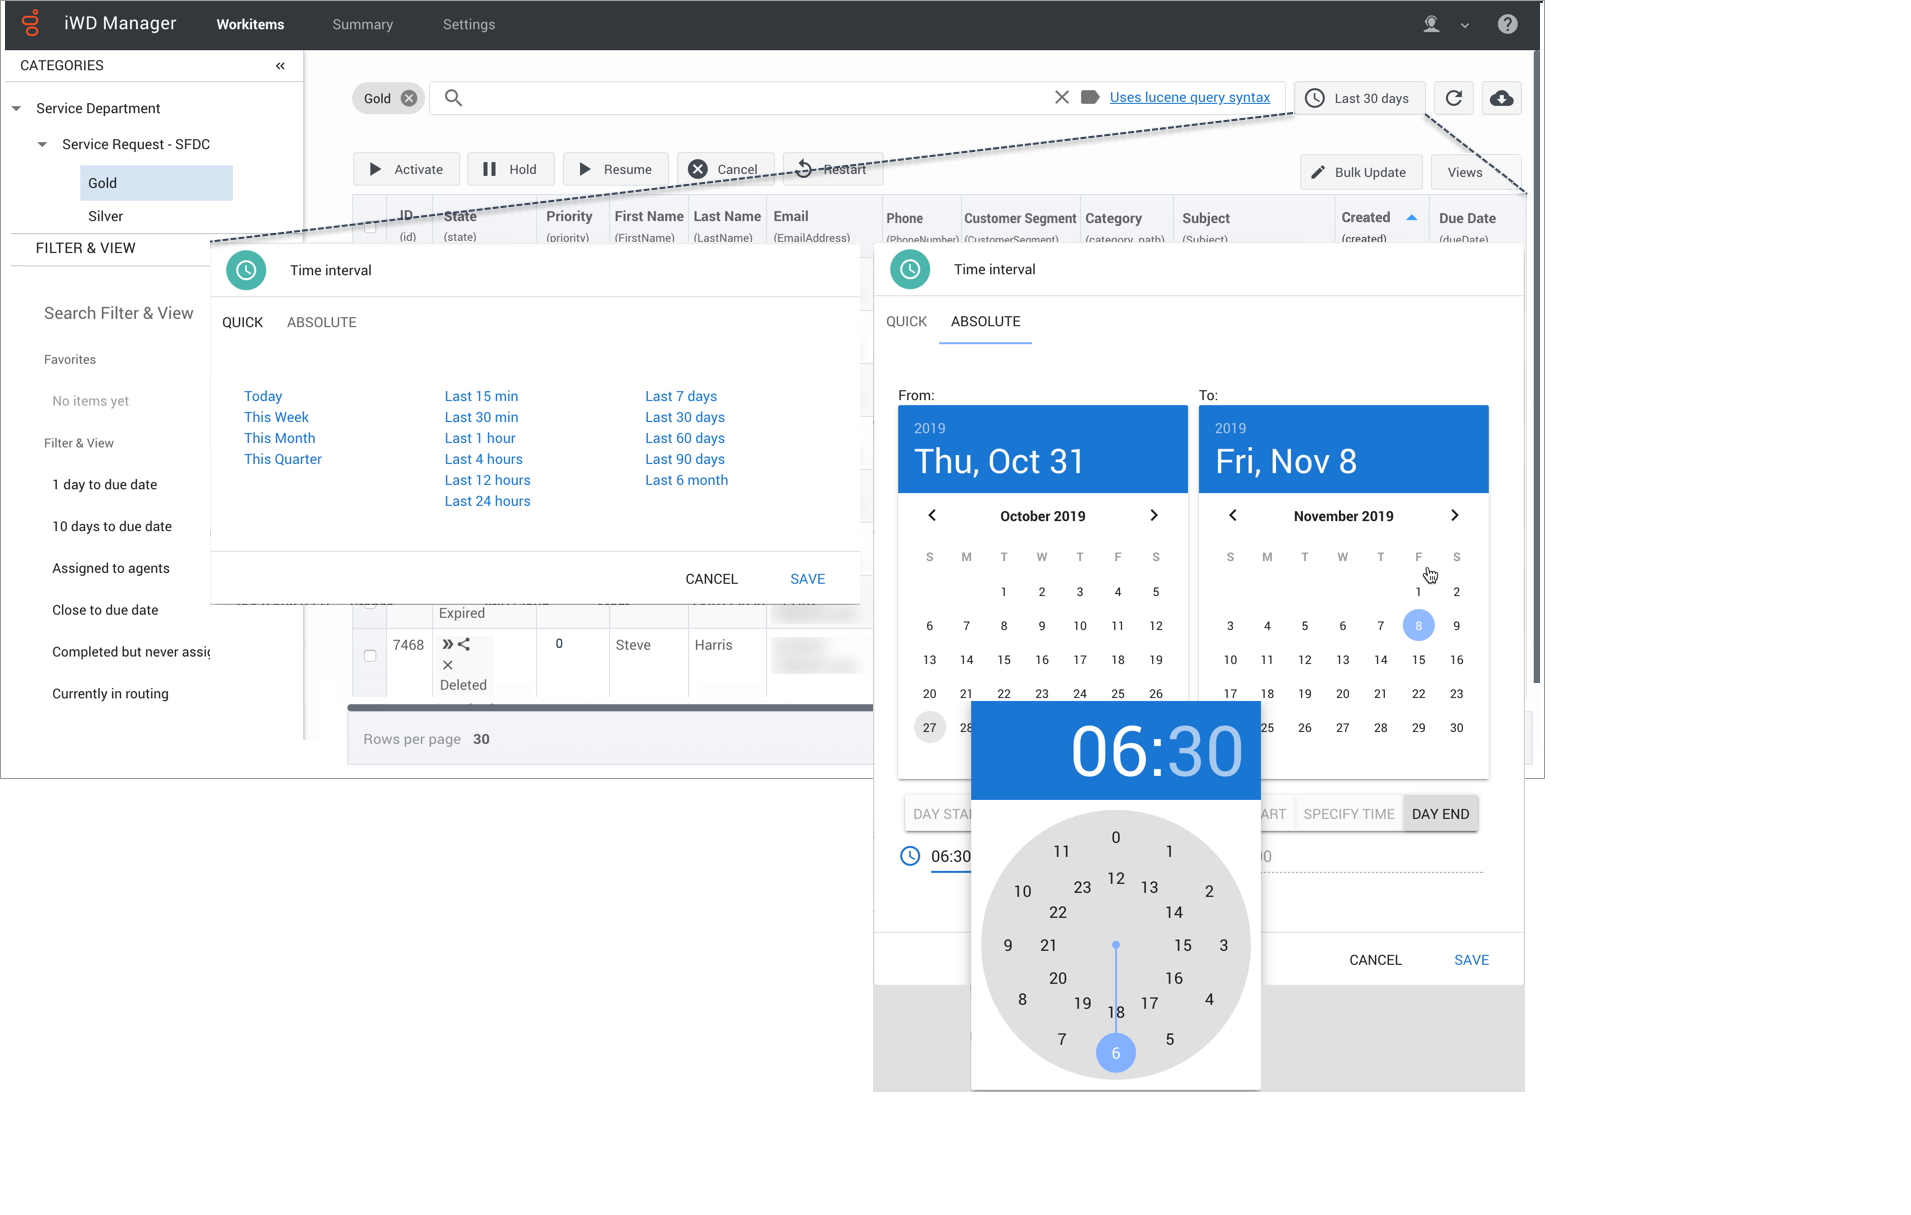
Use the time interval button (which shows the currently selected time interval) to display either:
- Quick search using predefined time ranges
- Absolute date/time ranges for customized time intervals
You can click DAY START and DAY END selectors to select the day start and end times configured for your contact center or you can use the SPECIFY TIME selector to open a clock-style drag-and-drop selector in which you can click the displayed time, then change the From and To hour values. Drag the selector to select a new hour and minute value, then, on the second selector displayed, a new minute value.
If you have a Category selected, only workitems in that Category are displayed.
Save filters and views
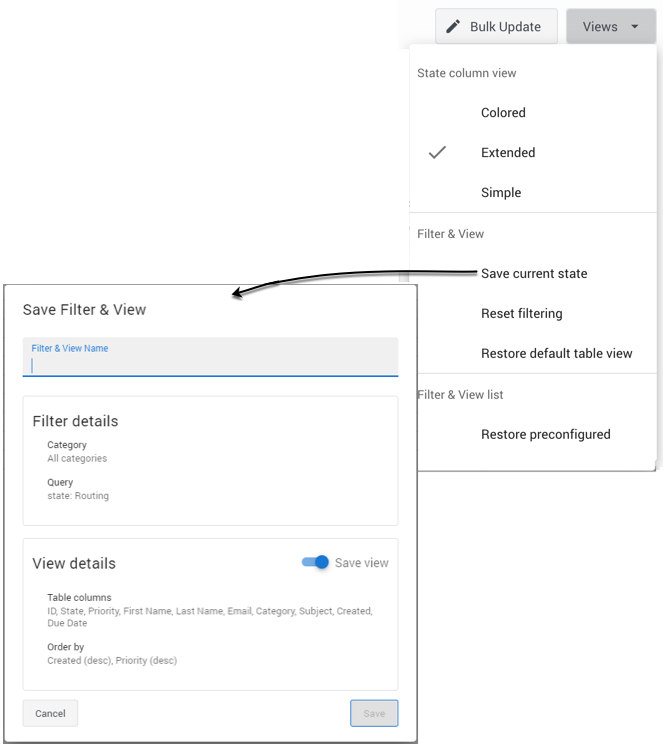
Use the Views button to do the following:
- Select a view for the State column.
- Save/reset filters (Category + query) and views (columns + sorting):
- Save the current filter and/or view for future use (Supervisors, Business users and Administrators only).
- Reset the filter to clear the filtering details from the page.
- Reset the table view to the default.
- Restore the list of preconfigured filter and view states.
Extended States
The table below describes the meanings of the extended state symbols.
Display and update workitem attributes
For individual workitems
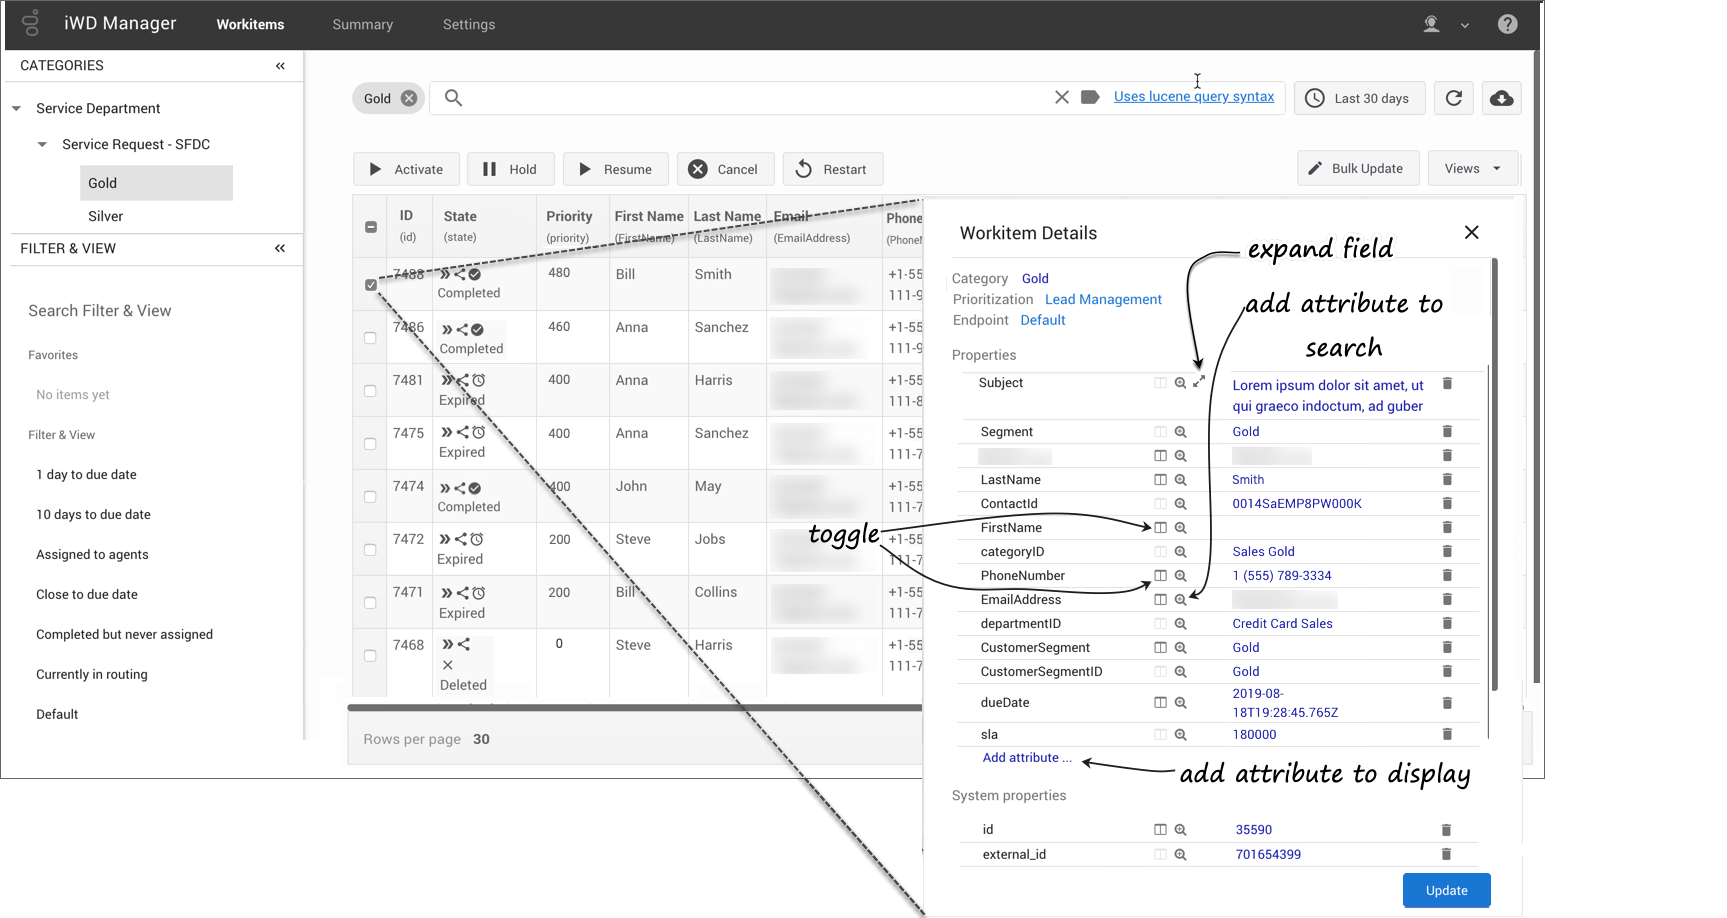
Select a workitem and/or click one of its attributes to display all its attributes.
Toggle the display of specific fields in the summary display by clicking the symbols indicated.
Expand a field with more than 200 characters by clicking the dynamic expand symbol next to the field label.
To update the attribute values of a workitem, click the value you want to change, add the new value, then click the Update button. System properties of the workitem are protected, so you can't update them.
You can add an attribute to the display by clicking Add attribute... at the bottom of the first panel of attributes.
You can also search for other workitems corresponding to a specific attribute value by clicking the search symbol next to the attribute.
For multiple workitems
To make an identical value change to one or more attributes of multiple workitems, select the workitems by checking their checkboxes or by filtering workitems using a search query, click the value you want to change, add the new value(s), then click the Bulk Update button.
System properties of the workitem are protected, so you can't update them.
Manage workitems
Use the control buttons at the top of the Workitems window to do the following to either individual or multiple workitems:
- Activate workitem(s)—Select a workitem(s) that has been assigned an activation date in the future, and click Activate to activate it immediately.
- Hold workitem(s)—Select a workitem(s) and click Hold. Held workitems can't be reprioritized or distributed, but you can cancel, restart or resume them.
- Resume workitem(s)—Select a held workitem(s) and click Resume to resume processing. You can only resume held workitems.
- Cancel workitem(s)—Select a workitem(s) and click Cancel to permanently cancel it. You can't cancel a workitem if it's been completed, canceled, or rejected. But you can cancel a workitem that has already been assigned to an agent. Canceled workitems remain in iWD for an amount of time that's configured in the Keep completed workitems for field (by Genesys only) before being deleted. Workitems can only be completed through the source system or the API, so Genesys recommends canceling any of the workitems that you no longer want matched with an employee.
- Restart workitem(s)—Select a workitem(s) to send it back to the beginning of the process, where it will be treated as if it was new.
Any action can be applied to one or many individually selected items (checked in the table) or to all the items that satisfy the current query, including time frame and any applied Category filter.
Workitems that are in the Default category have not been segmented by any of the existing Categories. Genesys recommend that administrators monitor these workitems to decide whether a category should be established to segment them.


