
Configuring SpeechMiner
This topic explains how to configure SpeechMiner after it is installed. Most of the configuration is performed in the SMConfig application. This is a Windows application that can be installed on any machine on your network. Once it is installed, it can be used, from any machine on which it is installed, to configure the entire SpeechMiner system. (For information about installing SMConfig, see Installing the Components.)
Required Permissions
The user account from which SMConfig is opened must have read, write, and modify permissions on the local installation folder and files.
For most of the configuration changes you can perform using SMConfig, you will need Administrator privileges on the current machine or on other machines. For each configuration task described below, the required permissions are listed. If you are running SMConfig as a non-administrator user, and errors are generated during the configuration process, make sure that you have the right permissions for the task.
In Windows Vista and later versions of Windows, if User Access Control is enabled, SMConfig will automatically require you to run it with administrator privileges. If User Access Control is disabled, it is recommended to manually run SMConfig with administrator privileges. To do this, right-click the SMConfig icon, and then select Run as administrator.
For more information on the permissions required for the other SpeechMiner component, see Configuring Permissions.
Encrypting the Connection to the Database
The connection between SMConfig and the database can be encrypted to ensure that confidential data cannot be intercepted and viewed by unauthorized people. This option is configured by the system administrator on the SQL database server. Three encryption settings can be defined there:
- Always use encryption
- Never use encryption
- Use encryption when the user requests it
If the latter setting is implemented in your system, you can choose to use an encrypted connection when you log into SMConfig. If the database server is configured to always encrypt or not to encrypt at all, you cannot change this option when you log into SMConfig, and selecting one of the options has no affect.
Configuring the Browser
End users of SpeechMiner access its browser-based interface from Internet Explorer or Google Chrome, which connects to the SpeechMiner Web server through the local network. In order for the SpeechMiner interface to work properly, you must configure each user's browser as explained below. The configuration changes that must be implemented are to allow pop-ups from the SpeechMiner domain, to treat the SpeechMiner domain as part of the local intranet (or as a trusted site), and to enable automatic updating of cached web pages.
In addition, if Internet Explorer is running on a Windows Server 2008 machine or Windows Server 2012 machine, the Enhanced Security Configuration feature should be turned off.
Refer to the Turning Off the Enhanced Security Configuration Feature on Windows Server 2008 / Windows Server 2012 section below.
Configuring Internet Explorer
- In the Internet Options dialog box, in the Security tab, select Local Intranet.
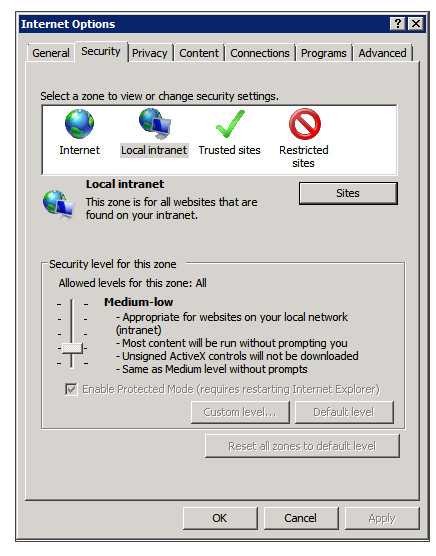
- Add the SpeechMiner domain to the list of web sites in the Local Intranet zone.
- Click Sites > Advanced and add *.genesyscloud.com to the list of safe websites.
- Click Custom Level to customize the local intranet zone security.
- Under Miscellaneous > Access data sources across domains, select Enable.
- In the Privacy tab, add the SpeechMiner domain to the list of web sites that are permitted to open pop-ups.
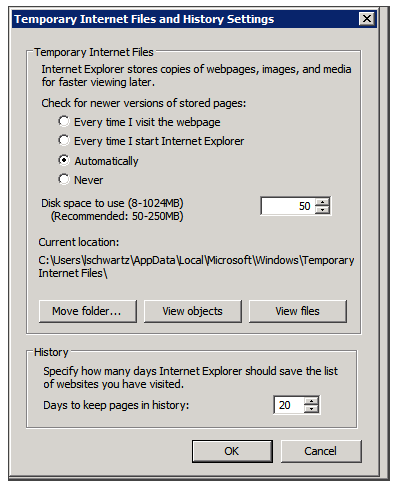
- In the General tab, under Browsing history, select Settings.
- Under Check for newer versions of stored pages, select Automatically.
- Click OK to save the changes.

Selecting Enable makes Screen Recording playback possible because it allows access from the browser to HTCC.


Turning Off the Enhanced Security Configuration Feature on Windows Server 2008 / Windows Server 2012
- In the Server Manager, in the home page (the top level), expand the Security Information section. The current settings for the Enhanced Security Configuration feature appear under IE Enhanced Security Configuration (ESC).
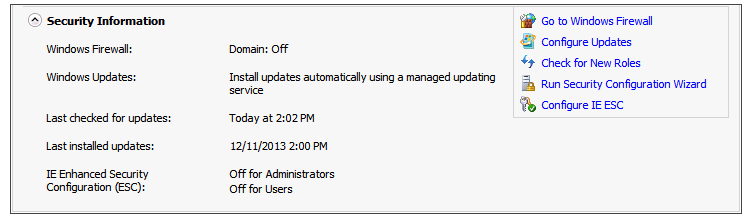
- If the current settings are not Off for Administrators and Off for Users, click Configure IE ESC. The Internet Explorer Advanced Security Configuration dialog box opens.
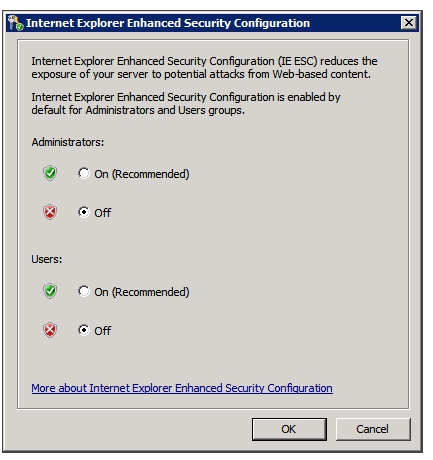
- For both Administrators and Users, select Off.
- Click OK to save the changes.


Configuring Chrome
- In the Chrome browser, click the Chrome menu
 , and select Settings.
 - Under Privacy, click Content Settings....
- Under Pop-ups, verify that Allow all sites to show pop-ups is selected. If it is not selected perform the following:
- Click Manage exceptions....
- In the field provided, type *.genesyscloud.com and select the Allow behavior.
- Press Enter and click Done.
Verify that Java Script is Enabled
- In the Chrome Browser, navigate to Chrome Settings > Show Advanced Settings > Privacy > Content Settings.
- Under Java Script, select Allow all sites to run Java Script (recommended).
For more information about enabling Java Script, see the following example https://support.google.com/adsense/answer/12654.
Starting SMConfig
SMConfig can be run on any machine in your system in which it is installed. During installation, an SMConfig icon is placed on the desktop of the machine.
You can log into SMConfig in one of the following ways:
- Using a SpeechMiner user account
- Using the Windows account you used to log onto the PC
- Using a Genesys user account and connecting to a Genesys configuration server for confirmation
To open SMConfig:
- On the desktop of the computer, double-click the
 icon. The SMConfig - Login dialog box appears.
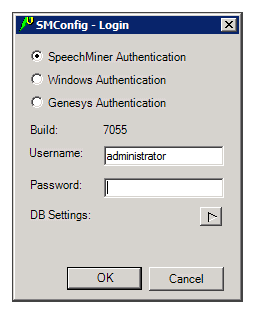
- Select the type of user account you want to use to log into SpeechMiner:
- SpeechMiner Authentication: Use a username and password that are managed by SpeechMiner.
- Windows Authentication: Use the username and password you used to log into Windows.
- Genesys Authentication: Use a Genesys username and password.
ImportantIf you are not sure which option to choose, consult your system administrator. - In the Username and Password fields, type your username and password.
ImportantIf you are logging in using Windows Authentication, your username and password are inserted automatically, and the username is in the form domain\username.
- If this is the first time you are opening SMConfig on this computer, or if you want to change the existing database settings, click the DB Settings arrow. The Login dialog box expands and displays the database settings.
ImportantIf you do not need to set or modify the database settings, skip this and the next step.
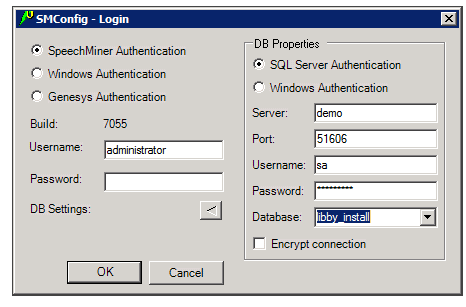
- Fill in the fields as follows:
Field Description SQL Server Authentication / Windows Authentication Select SQL Server Authentication if the username and password for accessing the database are managed on the SQL server. SelectWindows Authentication if you log into the database using the same username and password you used to log into Windows. Note: If you are not sure which option to choose, consult your system administrator.
Server The name of the database server Note: If the database is a named instance on the server, enter both the server name and the instance name, in the format server_name\instance_name.
Port The port to use to connect to the database server Note: This should normally be left as <default>, even if the database is a named instance.
Username The username to use to connect to the database Note: This field is not available when Windows Authentication is selected. In this case, the username is automatically taken from the username used to log into Windows.
Password The password to use to connect to the database Note: This field is not available when Windows Authentication is selected. In this case, the password is automatically taken from the username used to log into Windows.
Database The name of the database Encrypt connection If encrypting the connection to the database is optional in your system, select this option to activate encryption. Note: If encryption is always turned on in your system, selecting or clearing this option will have no effect. If encryption is always turned off in your system, selecting this option will prevent SMConfig from connecting to the database server and you will not be able to log in. In this case, an error message stating, Could not connect to database. Please check database settings, will appear when you click OK.
- If you have chosen to log in using Genesys authentication, an additional option, Configuration Server Settings, appears below DB Settings. If this is either the first time you are opening SMConfig on this computer, or you want to change the existing Genesys configuration server settings, click the Configuration Server Settings arrow. The Login dialog box expands and displays the configuration-server settings.
ImportantIf you do not need to set or modify the Genesys authentication settings, skip this and the next step.
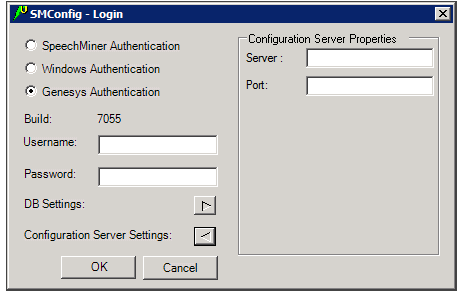
- Enter the name of the server and the port to use to verify the user information, as follows:
- Server—Enter the name of the configuration server.
- Port—The port to use to connect to the configuration server in order to verify the user information.
- Click OK. You are logged into the system, and the SpeechMiner Configuration Tool (SMConfig) window opens with the first screen, Sites and Machines, displayed.
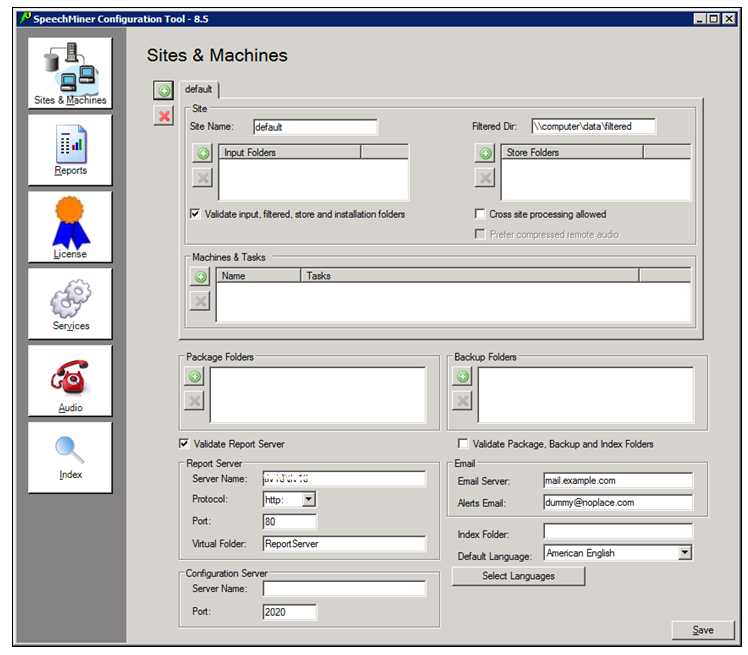


The SMConfig interface contains panels (Sites and Machines, Reports, etc.) in which various categories of configuration settings can be accessed.
To open a panel:
- On the left side of the window, select the icon of the panel. The panel opens on the right side of the window.
Saving Changes
Changes you make in one panel of SMConfig are saved temporarily if you open a different panel. Nonetheless, you must click Save in each panel to save the settings in that panel.
After you click Save, before the settings are actually saved, some settings go through a validation process. Validation ensures that the locations specified for folders and files exist and can be accessed, and checks that certain important parameters are configured properly. Certain key settings are always validated when Save is selected; you can choose to have the system validate certain others if you wish.
During the validation process, a Progress window is displayed. The window lists the stages of the validation process as they are completed, with an icon indicating the status of each stage.
| Icon | Description |
|---|---|
| Success: Validation of the stage was successful. | |
| Warning: Validation of the stage was successful, but some problematic issues were detected. | |
| Failure: Validation of the stage failed, because of the problems indicated. No changes to the configuration were saved. |
When the process is complete, the Close button at the bottom of the window becomes active. If validation was successful, the last line of the log says Done. If the Progress window contains any stages that failed (indicated by ![]() ), the entire save process is cancelled. The following screenshots depict examples of each status:
), the entire save process is cancelled. The following screenshots depict examples of each status:


To see details about a warning or failure:
- In the Progress window, select the item. Details are displayed at the bottom of the window.

After the configuration changes are successfully saved, a Restart Services message appears.

Select Yes to restart all of the services, or No if you prefer to restart them later (either after you make additional configuration changes, or manually from the Services panel.)
The first panel of the SMConfig application, Sites & Machines, is used to configure the layout of the system as well as some other system-wide parameters.
This tool enables you to configure sites, machines and tasks, and system index searches.

Reports
If you want to use any of the SpeechMiner reports, you must deploy both the MRS Library, which is a DLL that provides support for various report features, and all the required reports, on the report server. You can do this from the Reports panel of SMConfig. The DLL and the reports will be deployed on the machine that is identified in the Sites & Machines panel, specified as the Server Name parameter under the Report Server panel.

Required Permissions
To check if the MRS Library has been deployed on the report server, and to deploy the MRS LIbrary, SMConfig reads the report server's Registry to locate the report server’s bin folder and then accesses the folder using the $ share. Therefore, to deploy the MRS Library and any or all of the reports, the user account used to log into SMConfig must have administrator permissions on the report server.
Deploying the Reports
To deploy reports on the report server, you must first deploy the MRS Library on the server, and then deploy the required report templates. You can perform both actions simultaneously by selecting both options in the Reports panel. Once the MRS Library is deployed on the server, you can deploy additional reports without redeploying the library.
To deploy reports on the report server:
- In the Reports panel, fill in the fields as follows:
Field Description Validate Report Server Select this option if you are configuring SpeechMiner to use a report server. SMConfig will check that the parameters are correct. Note: If you select this option, SMConfig will try to validate that the user who is running SMConfig has access to the report web service and can call methods using this web service. Therefore, the user account that was used to run SMConfig must have the Content Manager role on the report server (see Configuring Permissions for UPlatform). Folders Select this option if you want SMConfig to check whether the Package, Backup, and Index folders exist and are configured properly.
Report Server Fill in the fields in this area as follows: - Server Name: The name of the machine on which the report server is installed
- Protocol: The protocol SpeechMiner must use to connect to the report server
- Port: The port SpeechMiner must use to connect to the report server
- Virtual Folder: The folder of the reports on the report server—usually named ReportServer. If the database is a named instance, enter both the folder name and the instance name, in the format <virtual report folder name>_<instance_name>.
Note: If you plan to use the report server, select Validate Report Server.
Set reports caching time If you chose to use report caching in the Sites & Machines panel, specify how long report results should be cached, in minutes. The results of reports that are included in active users' Views pages will be saved for the specified period of time. Users who open their Views pages during that time period will see the cached results. The recommended time period is 24 hours (i.e., 24*60=1440 minutes), because the report caching runs once every 24 hours. Deploy MRSLibrary If the MRS Library has not yet been deployed on the report server, select this option. Note: If this option is not selected, but the checkboxes in the Report/Resource list below are active, this means that the MRS Library is already deployed on the machine. In this case, it is not necessary to select this option.
Deploy reports Enter the location of the reports folder. This folder is called reports, and is located in the SpeechMiner installation folder. For example, if SpeechMiner was installed in c:\Program Files (x86)\Genesys\Software, the path to enter would be c:\Program Files (x86)\Genesys\Software\reports. Select\Unselect All Select the checkbox to select all of the reports in the Report/Resource list below for installation. Clear it to clear all of the selections in the list. Note: If this option is not available, this means that the MRS Library has not yet been deployed on the machine. In this case, select Deploy MRSLibrary, and this option will become available.
Report/Resource Select the reports you want to deploy on the report server Note: If this option is not available, this means that the MRS Library has not yet been deployed on the machine. In this case, select Deploy MRSLibrary, and this option will become available.
- Click Save. The system begins to deploy the reports on the report server, and the Progress window opens and shows information about the deployment process.
Licenses
For the system to process calls, enter the licenses you received from Genesys must be entered in the Licenses panel. The licenses are not included in the SpeechMiner installation folder.

To update the licenses:
- Copy the text of the SpeechMiner license that was supplied.
- In SMConfig, in the Licenses panel, paste the license text into the SpeechMiner License field.
- Copy the text of the Nuance license that was supplied.
- In SMConfig, in the Licenses panel, paste the license text into the Nuance License field.
- Click Save.
Services
The Services panel is used to manage the SpeechMiner services. You can use it to:
- Register all the SpeechMiner services on each machine in the system
- Update the SpeechMiner configuration files on each machine
- Start, restart, and stop services
You must perform these actions at the end of the installation process, and also whenever you add, change, or remove services or machines to or from the system. You can also use the Services panel to restart or stop services whenever necessary.

After you install SpeechMiner and configure its components in SMConfig, you must register all of the SpeechMiner services, update the SpeechMiner configuration files on each machine, and start all Uplatform servers. In addition, whenever you make changes to the system, you should follow the same procedures, as explained below. To configure the services in your system:
- In the Services panel, fill in the fields as follows:
Field Description Create performance counters Select this option to configure the performance counters on each of the selected machines. Note: Performance counters should normally be configured only once for each machine. Select this option for all machines when you first install SpeechMiner. Then, if you add new machines to the system, select this option for the new machines.
Register services Select this option to register the relevant services on each of the selected machines. When you select this option, the Credentials area becomes active. Enter the credentials of the Windows user that will run the services (typically, SMUSER).
Notes:
Service registration should be performed once for each machine when SpeechMiner is first installed. It should be performed again if the credentials of the Windows user account running the services are changed. Select this option for all machines when you first install SpeechMiner. Then, if you add new machines to the system, select this option for the new machines. If the credentials given are for a local user on each machine rather than a domain user, under Domain, enter a "." (dot). The Uplatform service will be registered but the user will not have the "Run as Service" role. You will have to manually go to the Windows services management tool on each machine, enter the password, and click Apply.Update IIS application pools Select this option to configure the Application Pools identity for SpeechMiner Web and Interaction Receiver with an SMUSER Account. Update config files Select this option to update the SpeechMiner configuration files on each of the selected machines. When you select this option, the Credentials area becomes active. Enter the Windows user that will run the services(typically, SMUSER). In addition, the encryption options become active. Select the required options.
Note: Updating of configuration files should be performed once for each machine when SpeechMiner is first installed. It should be performed again if the credentials of the Windows user account running the services are changed. Select this option for all machines when you first install SpeechMiner. Then, if you add new machines to the system, select this option for the new machines.Restart Services / Stop Services All the Uplatform services must be restarted after the installation and configuration processes are completed. To do this, under Restart Services and, select change status to run. Then, under Machine, make sure all servers on which Uplatform is installed are selected.
Note: The restart and stop options in this panel should also be used whenever you need to restart or stop any of the SpeechMiner servers (see Starting and Stopping the System).
Update Nuance license server If your Nuance license servers are installed on central machines, enter the list of servers and ports in this box. This will update the selected machines' environment variables so that they point to these license servers. Separate entries with semi-colons (;).
If you want SMART to access a central license server, add this environment variable to the machine on which SMART is installed: SWILicenseServerList-port@server
Notes:
- Select this option for all machines when you first install SpeechMiner. If you relocate the license server to a different machine, add additional servers, or remove existing ones, run this option and select all the machines in your system.
- If you are updating the Nuance license servers on remote machines, the Remote Registry service must be running on those machines. If it is not running on one of the machines, the error "Failed to update Nuance license on [MACHINE NAME]. The network path was not found." will appear in the Progress window.
- If you want a machine to work with a local license server, clear the text box, verify that the check box is selected and save.
Select/Deselect all Select the checkbox to select all of the machines in the list below for updating. Clear it to clear all of the selections in the list. Machine Select the machines for which you want to implement the options you selected on the left side of the panel. Set master password 1. Select a machine from the list provided.
2. Select Set master password and enter the Master password used in the Audio panel, so that the platform/web for the selected machine can decrypt audio files.
- Click Save. The system begins to implement the settings you selected, and the Progress window opens and shows information about the implementation process.
The user account used to log into SMConfig must have the required permissions in order for SMConfig to perform the actions selected in the Services panel. Some of the requirements are for permissions on the local machine (the machine on which SMConfig is currently running); others are for permissions on the selected remote machines. The various options in the panel have different permission requirements, as explained in the following table:
| Option | Required Permissions | Additional Details |
|---|---|---|
| Create Performance Counters |
|
|
| Register Services | Administrator privileges on the selected machines. | Administrator privileges on the selected machines are required in order to register the Uplatform service. These privileges are required for running remote commands on the selected machines and for registering the services using the Windows Services API. |
| Update Config Files | Administrator privileges on the local machine and on all selected machines. | Administrator privileges on the selected machines are required in order to update the configuration files on the local machine and on the remote machines. These privileges are required for accessing the files using the $ share and for encryption and decryption (if Encrypt config files is selected). |
| Restart/Stop Services |
|
|
| Update Nuance license server |
|
Administrator permissions are required in order to update the registry key that controls the Nuance environment variables. |
You can start, restart, or stop SpeechMiner services in SMConfig in the Services panel. One case in which you must use this feature to start the Uplatform services is after the initial installation and configuration of the system (see Initial Configuration). You can also use these features to change the status of a service from run to idle, or vice versa, or to completely stop a service.
To start, restart, or stop SpeechMiner services:
- In the Services panel, clear the Create Performance Counters, Register Services, and Update Config Files checkboxes.
- Select one of the following options:
- Restart Services and leave status as is: Restarts the selected services, and leaves them in the mode they were in previously
- Restart Services and change status to run: Restarts the selected services, and puts them into "run" mode
- Restart Services and change status to idle: Restarts the selected services, and puts them into "idle" mode
- Stop Services: Stops the selected services
- In the list of machines, select the servers you want to restart or stop.
- Click Save. The system begins to implement the options you selected, and the Progress window opens and shows information about the implementation process.
Audio
The Audio panel of SMConfig is used to configure the call-audio recognition and playback formats, retention periods for each format and site, and playback rates. Below is a summary of the audio formats that are supported for each audio function.

Configuring the Audio Settings
The Audio panel contains the basic audio setting options for the system.
To configure call-audio settings:
- In the Audio panel, fill in the fields as follows:
Field Description Select the audio format for recognition Select the format of the call audio that must be used by SpeechMiner during the recognition process. If the audio received from the recording system is not in the format selected here, the fetchers will automatically convert it to this format (after they retrieve it from the input folders) before they save it in the store folders to await processing by SpeechMiner. If the system is used in the Recording UI mode or Recording and Analytics mode, the format must be set to WAV_PCM. Create compressed audio file Select the format of the call audio that must be used by SpeechMiner for playback in the web-based interface. After the audio of a call is processed, an additional compressed copy is made in this format and saved in a file in the store folders.
If the system is used in the Recording UI mode, or Recording and Analytics mode, this must be set to Do Not Generate.
If compress format not available Select one of the SpeechMiner actions to be performed if a user initiates playback of a call for which no compressed audio file is available. (If compressed audio is available, it is automatically used for playback.): - Play recognition file: The player plays the recognition audio file directly without any format conversion.
- Convert the recognition file on-the-fly to: The player first converts the recognition audio file to the format selected here, and then play it for the user.
For Internet Explorer users, select the Convert the recognition file on-the-fly to MP3 option.
Retention Policies Specify the retention policy, per site, for each of the audio/text formats selected. Call data is deleted from the store folder automatically when it has been in the folder as long as the specified retention period. The values chosen should be based mainly on the disk space available for storing the interaction file. Bear in mind that 1 MB of disk space can contain roughly one minute of uncompressed data or 15 minutes of compressed data. Default values are automatically entered for each site in the system, with separate retention periods for each of the formats selected under Recognition Audio Format and Playback Audio Format, in hours. You can manually adjust the retention period for each item, as required. To do so, double-click the item, or select it and then select
 . The Retention Period dialog box opens. Modify the value in the text field, and then click OK.
If the system is used in the Recording UI mode or Recording and Analytics mode, set the retention policy of WAV_PCM to 0.
Notes:
- Selecting these options prevents the creation of unnecessary files and the storage of files for longer than is necessary.
- The recognition files of interactions that have not been processed yet, and of interactions that are included in Static Call Lists, are not deleted even when the retention period is over.
- If you do not want data to be deleted from the store folder automatically, enter the value -1. This value should only be used in static systems where the number of interactions is limited and does not grow continuously.
Encrypt audio files Select this option to encrypt the audio files. Note:
- If you do not have a key, Generate new password is automatically selected to generate a key. In this case, you must enter a Master password and confirm it.
- If you want to generate a new key, select Generate new password, enter the Master password and confirm it. The Master password must be the same as the original Master password. The Master password is always the same.
- The new Master password is not saved in the database. For that reason, you must save the Master password in a location of your choice.
- The Master password is required for the machines selected in the SMConfig > Services panel. For additional information, refer to the Set master password description in the Services panel page.
- Click Save. The system implements the settings, and the Progress window opens and shows information about the process.
Summary
The Audio panel summary lists the preferred formats that SpeechMiner supports:
| Item | Function | Description |
|---|---|---|
| Input folder expects | Fetcher | Audio formats supported by fetchers; call audio that is retrieved from the external recording system by UConnector must be saved in the input folder in one of these formats. |
| Recognition priorities | Recognition | Preferred audio formats for the recognition process, in order of preference; call audio that is processed by the Recognizers should ideally be in one of these formats. |
| Playback priorities | Playback | Preferred audio formats for the SpeechMiner media player, in order of preference; call audio that is played back should ideally be in one of these formats. |
Index
The Index panel enables you to manage index-related tasks: backup, restore, and index optimization.

Backing up the Index
You can back up the index automatically on a daily basis or manually as required. Note that no incremental backup is available; every time the backup is started, all of the index files are copied to the backup folder.
Daily Backup
You can set a time and specify a backup folder, and SpeechMiner will automatically back up the index every day at the specified time to the specified folder.

To set up a daily backup of the index:
- In the Index panel, in the Daily Index Backup region, fill in the fields as follows:
- Select Save. The changes are saved, and a Progress window shows information about the saving process.
| Field | Description |
|---|---|
| Backup every day at | Select the checkbox to activate the automatic daily backup, and then, in the time field, select the time at which you want to the backup to begin. Note: The backup time will be saved in the database as UTC time. |
| Keep only last... | Select the number of backups to keep. Older backups will be deleted automatically. |
| Daily backup folder | Select the folder in which to store the backup data. |
Manual Backup
You can select a folder and back up the index to that folder manually as necessary.

To run a backup of the index manually:
- In the Index panel, in the Manual Index Backup region, fill in the fields as follows:
- Select Backup Now. The backup is performed, and a Progress window shows information about the backup process.
| Field | Description |
|---|---|
| Backup to folder | Select the folder in which to store the backup data. |
| Use different credentials | If different credentials are required to access the index folder, select the Use Different Credentials check box, and then enter the required user credentials. |
Restoring the Index
Restoring the index can be done in two different ways:
- Restoring the index from a backup, using SMConfig
- Creating_a_New_Index_from_Scratch|Deleting the existing index and creating a new one from scratch
Restoring the Index from a Backup
If you have a backup of the index, it is generally preferable to restore the index from it. Restoring the index from a backup is generally a much quicker process than creating it from scratch, especially if the database is large. The index task re-indexes the database at a pace of about 3,500 calls per minute. If you restore the index from a backup, only those calls that were indexed after the backup was created must be re-indexed. Calls that are included in the backup do not have to be re-indexed. As a result, you can start using the index almost immediately.
Two alternative methods for restoring the index from a backup are available:
- Use the backup folder as the current index folder.
- Restore the index from the backup folder to a new index folder.
In either case, you should not restore the index folder manually. Instead, use SMConfig to perform the restoration. Using SMConfig ensures that the process is performed properly, and, in addition, SMConfig also takes care of re-indexing all the calls that were indexed after the backup was created.
To restore the index from a backup:
- In SMConfig, in the Index panel, select Restore Index Folder. The Restore Index Folder dialog box opens.
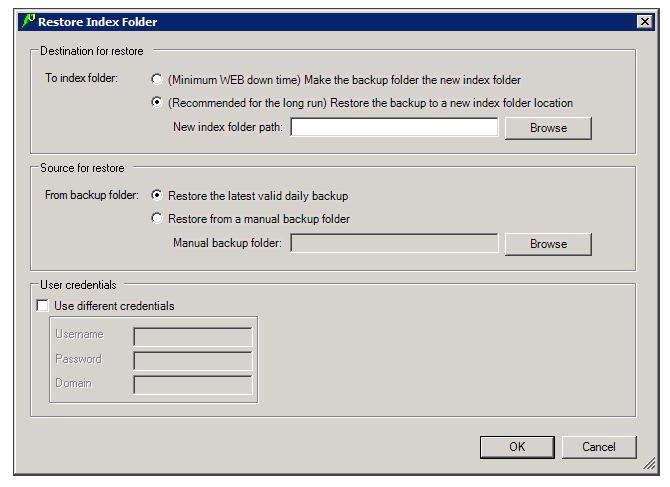
- Fill in the fields as follows:
Field Description To index folder Select (Minimum WEB down time) Make the latest valid backup folder the new index folder to use the backup folder as the new index folder, or (Recommended for the long run) Restore the backup to a new index folder location to create a new folder to use as the index folder. If you chose the second option, under New index folder path, select the folder to use as the new index folder. Note that this folder must be empty when you begin the restoration process.
From backup folder Select Restore the latest valid daily backup to restore the index from the folder that contains the automatically generated backups of the index (specified in the Index panel under Daily Backup Folder), or Restore from a manual backup folder to use a manually generated backup. If you select the second option, under Manual Backup Folder, select a SpeechMiner backup folder with the following name: SpeechMinerBackup_#year#_#month#_#day#_#hh#_#mm#.
Use Different Credentials If different credentials are required to access the index folder, select the Use Different Credentials checkbox, and then enter the required user credentials . - Click OK. The index is restored to the new index folder, and a Progress window shows information about the restoration process.
During the process, SMConfig will also do the following:- Checks the validity of the new index folder, and, if it is not valid, abort the process.
- Inserts indexing requests into the index queue for all the calls that were processed or updated after the backup was created.
- Notifies the Web servers that the index folder was changed.
- When the restoration process is finished, restart the platform servers.

Creating a New Index from Scratch
If you do not have a backup of the index, you can restore it by deleting the existing index and creating a new one. In addition, if the database is quite small, you may prefer to restore the index in this way even if you do have a backup.
Restoring an index by creating it from scratch is generally a much slower process than restoring it from a backup, especially if the database is large. The index task re-indexes the database at a pace of about 3,500 calls per minute. If you re-create the index from scratch, all of the calls in the database must be indexed.
To create a new index:
- Stop all the Uplatform services that run index tasks.
- Run the following SQL command: truncate table indexq
- Delete all of the files in the index folder.
- Run the following stored procedures in the database:
- To re-index the calls, run exec dbo.sp_reindexCallsByParams 3,0,0,''
- To re-index the text interactions, run exec dbo.sp_reindexTextDataByParams 3,0,0,''
ImportantRe-indexing the text interactions is only relevant in SpeechMiner versions from 7.3 and on, and only if your system handles text interactions as well as calls. - Restart the Uplatform services that you stopped before. After a minute or two, the index task will start to index the calls. Newer calls will be indexed first.
Optimizing the Index
The Index Optimization task optimizes the index files of the system, thus reducing their size. It is recommended to configure it to run at a time when the system is not in use, such as Sunday at midnight.
To configure the system to optimize the index:
- In SMConfig, in the Index panel, in the Weekly Index Optimization region, select the Optimize every week at checkbox.
- Select the day of the week on which to perform the optimization, and specify the time to begin the process.
Note: The selected time will be saved in the database as UTC time. - Click Save. The setting is saved, and the Progress window opens and shows information about the saving process.
High Availability is an automatic process for restoring an index backup. When the High Availability feature is selected in the SMConfig Index panel, the system will detect when the Index folder is not accessible and perform the following:
- Switch the roles of the Index folder and the Daily Backup folder, so that the current backup becomes the primary folder and the current index becomes a secondary backup folder.
- Re-index all the interactions that were indexed after the latest daily backup was created.
Indexing will take place on the new primary folder.
Whenever the primary folder becomes inaccessible, the folder roles will change.
The time between when the index is detected as inaccessible and when the switch over is performed can be configured in the High Availability section of the Index Tab. (That is, Switch after # minutes)
Setting the Date and Time
The webServiceParam table has two fields for configuring the date and time display:
- globalDateFormat which configures the date format, for example: MM/dd/yy
- globalDateTimeFormat which configures the time format, for example: hh:mm tt
For additional information about the options available, see http://www.w3.org/TR/NOTE-datetime.
When SpeechMiner's Spanish interface is used for the Web interface, the only formats supported for globalDateTimeFormat are the following 24-hour formats: H:mm:ss or H:mm.
Configuring a VMWare Server
If you are installing SpeechMiner on virtual machines and using VMWare Server VSphere4, it is recommended to use the Scheduling Affinity feature, which dedicates specific logical CPUs for the virtual CPUs of particular VMs. Doing this can improve Recognition performance.
To use the VMWare Scheduling Affinity feature:
- For each active Virtual Machine, check the VM Settings to see how many CPUs are configured for the machine.
- In Setting\Resources tab\Advanced CPU\Scheduling Affinity, enter the serial numbers of the VMWare server's logical CPUs.
Additional Configuration for Recording Modes
If using Recording modes, the following additional database configuration is required:
- In the configServer table, set the RcsUri value to the RCS URL, in the format: http://host:port/rcs, or https://host:port/rcs.
- In the cmrsParams table, set the RP_Authorization and MCP_Authorization values to the user and password that are configured for each of these components, respectively. Use the format user:password.
- In systems whose licenses are Call Recording Mode, or Call Recording and Analytics Mode, the Program ID is normally assigned to calls by the recording processor, which adds it to the call’s metadata. If the call arrives in the Interaction Receiver input folder without a Program ID, SpeechMiner assigns the default Program ID to it. The default Program ID is defined in the database, in the cmrsParams table, with the value of DEF_PROGRAM_EX_ID. By default, this value is default. If you want to change this default value to some other value, you can do so as follows:
- For Call Recording and Analytics Mode licenses, in SMART, create a Program with the name you want to use for the default Program, and apply it. Finally, in the cmrsParams table, set DEF_PROGRAM_EX_ID to the Program's external ID.
- For Call Recording Mode licenses, in the database, in the cmrsParams table, set DEF_PROGRAM_EX_ID to the Program ID you want to use. (In this case, the Program ID and the Program Name are identical).