
Configuring SpeechMiner
This topic explains how to configure SpeechMiner after it is installed. Most of the configuration is performed in the SMConfig application, which can be installed on any machine on your network. Once it is installed, it can be used, from any machine on which it is installed, to configure the entire SpeechMiner system. (For information about installing SMConfig, see Installing the Components.)
The following sections describe the necessary steps to perform before you can begin working with SMConfig:
Required Permissions
The user account from which SMConfig is opened must have read, write, and modify permissions on the local installation folder and files.
For most of the configuration changes you can perform using SMConfig, you will need Administrator privileges on the current machine or on other machines. For each configuration task described below, the required permissions are listed. If you are running SMConfig as a non-administrator user, and errors are generated during the configuration process, make sure that you have the right permissions for the task.
In Windows Vista and later versions of Windows, if User Access Control is enabled, SMConfig will automatically require you to run it with administrator privileges. If User Access Control is disabled, it is recommended to manually run SMConfig with administrator privileges. To do this, right-click the SMConfig icon, and then select Run as administrator.
For more information on the permissions required for the other SpeechMiner component, see Configuring Permissions.
Encrypting the Connection to the Database
The connection between SMConfig and the database can be encrypted to ensure that confidential data cannot be intercepted and viewed by unauthorized people. This option is configured by the system administrator on the SQL database server. Three encryption settings are defined there:
- Always use encryption
- Never use encryption
- Use encryption when the user requests it
If the latter setting is implemented in your system, you can choose to use an encrypted connection when you log into SMConfig. If the database server is configured to always encrypt or not to encrypt at all, you cannot change this option when you log into SMConfig, and selecting one of the options has no affect.
Starting SMConfig
SMConfig can be run on any machine in your system in which it is installed. During installation, an SMConfig icon is placed on the desktop of the machine.
You can log into SMConfig in one of the following ways:
- Using a SpeechMiner user account
- Using the Windows account you used to log onto the PC
- Using a Genesys user account and connecting to a Genesys configuration server for confirmation
To open SMConfig:
- On the desktop of the computer, double-click the
 icon. The SMConfig - Login dialog box appears.
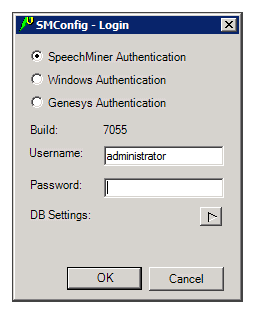
- Select the type of user account you want to use to log into SpeechMiner:
- SpeechMiner Authentication: Use a username and password that are managed by SpeechMiner.
- Windows Authentication: Use the username and password you used to log into Windows.
- Genesys Authentication: Use a Genesys username and password.
ImportantIf you are not sure which option to choose, consult your system administrator. - In the Username and Password fields, type your username and password.
ImportantIf you are logging in using Windows Authentication, your username and password are inserted automatically, and the username is in the form domain\username.
- If this is the first time you are opening SMConfig on this computer, or if you want to change the existing database settings, click the DB Settings arrow. The Login dialog box expands and displays the database settings.
ImportantIf you do not need to set or modify the database settings, skip this and the next step.
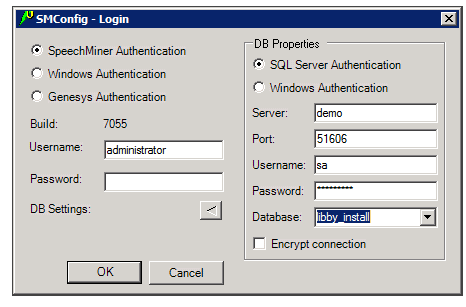
- Fill in the fields as follows:
Field Description SQL Server Authentication / Windows Authentication Select SQL Server Authentication if the username and password for accessing the database are managed on the SQL server. SelectWindows Authentication if you log into the database using the same username and password you used to log into Windows. Note: If you are not sure which option to choose, consult your system administrator.
Server The name of the database server Note: If the database is a named instance on the server, enter both the server name and the instance name, in the format server_name\instance_name.
Port The port to use to connect to the database server Note: This should normally be left as <default>, even if the database is a named instance.
Username The username to use to connect to the database Note: This field is not available when Windows Authentication is selected. In this case, the username is automatically taken from the username used to log into Windows.
Password The password to use to connect to the database Note: This field is not available when Windows Authentication is selected. In this case, the password is automatically taken from the username used to log into Windows.
Database The name of the database Encrypt connection If encrypting the connection to the database is optional in your system, select this option to activate encryption. Note: If encryption is always turned on in your system, selecting or clearing this option will have no effect. If encryption is always turned off in your system, selecting this option will prevent SMConfig from connecting to the database server and you will not be able to log in. In this case, an error message stating, Could not connect to database. Please check database settings, will appear when you click OK.
- If you have chosen to log in using Genesys authentication, an additional option, Configuration Server Settings, appears below DB Settings. If this is either the first time you are opening SMConfig on this computer, or you want to change the existing Genesys configuration server settings, click the Configuration Server Settings arrow. The Login dialog box expands and displays the configuration-server settings.
ImportantIf you do not need to set or modify the Genesys authentication settings, skip this and the next step.
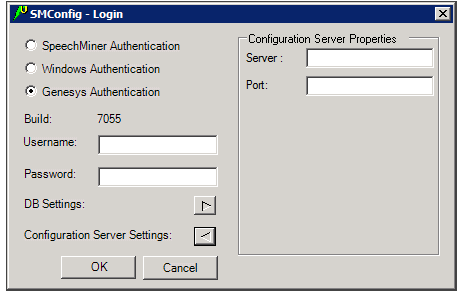
- Enter the name of the server and the port to use to verify the user information, as follows:
- Server—Enter the name of the configuration server.
- Port—The port to use to connect to the configuration server in order to verify the user information.
- Click OK. You are logged into the system, and the SpeechMiner Configuration Tool (SMConfig) window opens with the first screen, Sites and Machines, displayed.
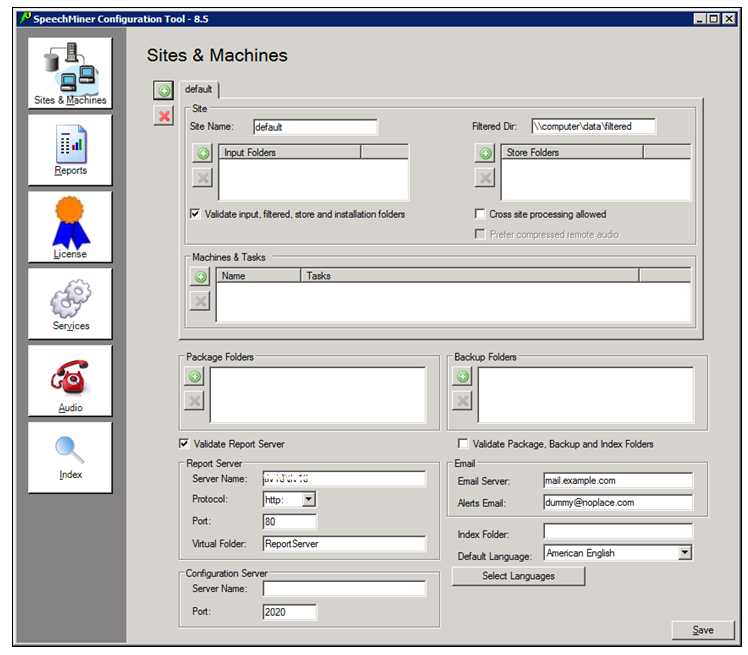


The SMConfig interface contains panels (Sites and Machines, Reports, etc.) in which various categories of configuration settings can be accessed.
To open a panel:
- On the left side of the window, select the icon of the panel. The panel opens on the right side of the window.
Saving the Changes in SMConfig
Changes you make in one panel of SMConfig are saved temporarily if you open a different panel. Nonetheless, you must click Save in each panel to save the settings in that panel.
After you click Save, before the settings are actually saved, some settings go through a validation process. Validation ensures that the locations specified for folders and files exist and can be accessed, and checks that certain important parameters are configured properly. Certain key settings are always validated when Save is selected; you can choose to have the system validate certain others if you wish.
During the validation process, a Progress window is displayed. The window lists the stages of the validation process as they are completed, with an icon indicating the status of each stage.
| Icon | Description |
|---|---|
| Success: Validation of the stage was successful. | |
| Warning: Validation of the stage was successful, but some problematic issues were detected. | |
| Failure: Validation of the stage failed, because of the problems indicated. No changes to the configuration were saved. |
When the process is complete, the Close button at the bottom of the window becomes active. If validation was successful, the last line of the log says Done. If the Progress window contains any stages that failed (indicated by ![]() ), the entire save process is cancelled. The following screenshots depict examples of each status:
), the entire save process is cancelled. The following screenshots depict examples of each status:


To see details about a warning or failure:
- In the Progress window, select the item. Details are displayed at the bottom of the window.

After the configuration changes are successfully saved, a Restart Services message appears.

Select Yes to restart all of the services, or No if you prefer to restart them later (either after you make additional configuration changes, or manually from the Services panel.)
Configuring the Browser
End users of SpeechMiner access its browser-based interface from Internet Explorer or Google Chrome, which connects to the SpeechMiner Web server through the local network. In order for the SpeechMiner interface to work properly, you must configure each user's browser as explained below. The configuration changes that must be implemented are to allow pop-ups from the SpeechMiner domain, to treat the SpeechMiner domain as part of the local intranet (or as a trusted site), and to enable automatic updating of cached web pages.
In addition, if Internet Explorer is running on a Windows Server 2008 machine or Windows Server 2012 machine, the Enhanced Security Configuration feature should be turned off.
Refer to the Turning Off the Enhanced Security Configuration Feature on Windows Server 2008 / Windows Server 2012 section below.
Configuring Internet Explorer
- In the Internet Options dialog box, in the Security tab, select Local Intranet.
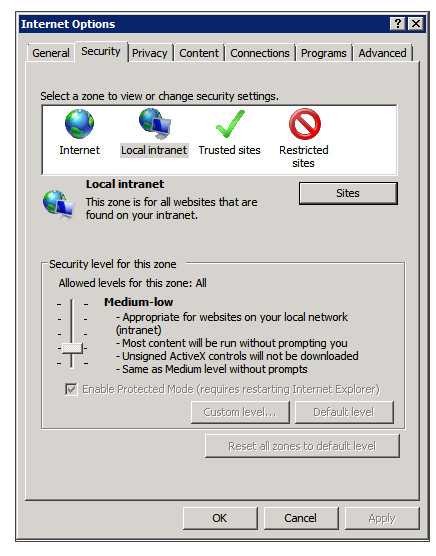
- Add the SpeechMiner domain to the list of web sites in the Local Intranet zone.
- Click Sites > Advanced and add *.genesyscloud.com to the list of safe websites.
- Click Custom Level to customize the local intranet zone security.
- Under Miscellaneous > Access data sources across domains, select Enable.
- In the Privacy tab, add the SpeechMiner domain to the list of web sites that are permitted to open pop-ups.
- In the General tab, under Browsing history, select Settings.
- Under Check for newer versions of stored pages, select Automatically.
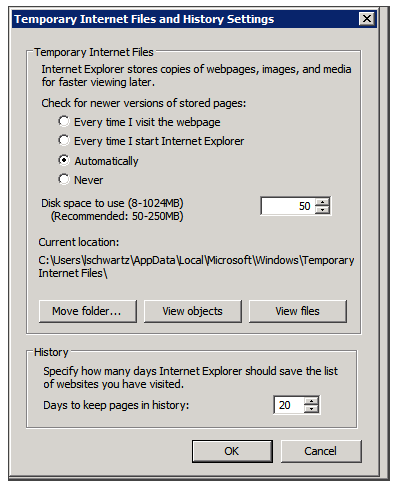
- Click OK to save the changes.

Selecting Enable makes Screen Recording playback possible because it allows access from the browser to HTCC.


Turning Off the Enhanced Security Configuration Feature on Windows Server 2008 / Windows Server 2012
- In the Server Manager, in the home page (the top level), expand the Security Information section. The current settings for the Enhanced Security Configuration feature appear under IE Enhanced Security Configuration (ESC).
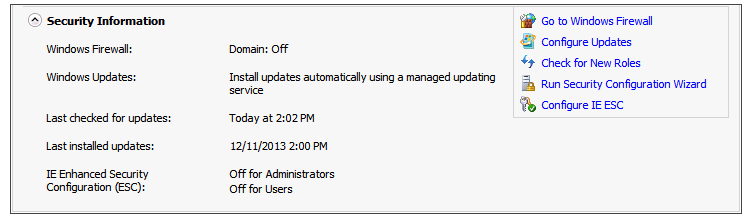
- If the current settings are not Off for Administrators and Off for Users, click Configure IE ESC. The Internet Explorer Advanced Security Configuration dialog box opens.
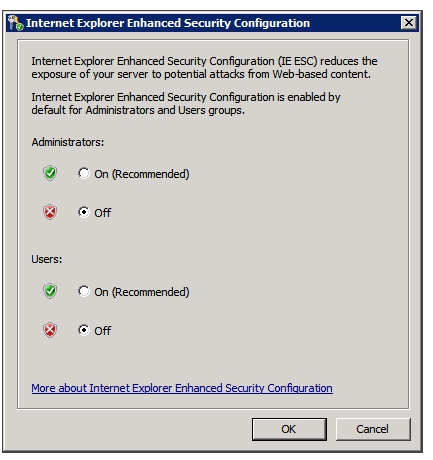
- For both Administrators and Users, select Off.
- Click OK to save the changes.


Configuring Chrome
- In the Chrome browser, click the Chrome menu
 , and select Settings.
 - Under Privacy, click Content Settings....
- Under Pop-ups, verify that Allow all sites to show pop-ups is selected. If it is not selected perform the following:
- Click Manage exceptions....
- In the field provided, type *.genesyscloud.com and select the Allow behavior.
- Press Enter and click Done.
Verify that Java Script is Enabled
- In the Chrome Browser, navigate to Chrome Settings > Show Advanced Settings > Privacy > Content Settings.
- Under Java Script, select Allow all sites to run Java Script (recommended).
For more information about enabling Java Script, see the following example https://support.google.com/adsense/answer/12654.
This section describes how to use SMConfig to configure the Enterprise.