
Changing Your Status
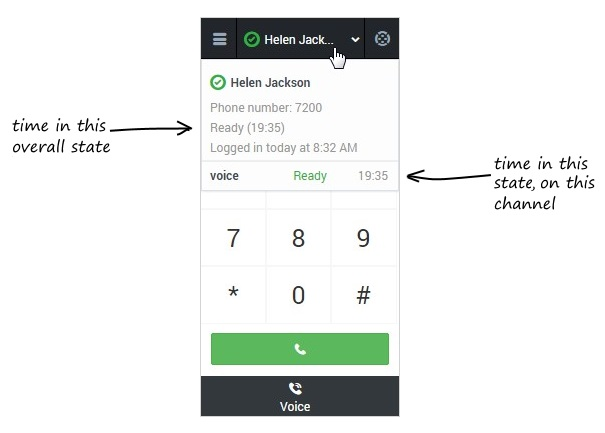
You can view your status in the Gplus Adapter for Salesforce at any time just by looking at the agent status bar. Hover over it with your mouse for even more details about login time, phone number, overall state, and media channel state:
As you saw in the diagram above, you can have more than one status: your overall state and your state on a particular media channel (currently only voice is available). This means there are also multiple ways to change your status:
- To update your overall status, just click the agent status bar and select a new status. Note: If you're logged in to multiple channels, selecting a new status here changes the status across all your channels.

- To update your state for a particular media channel, click the main menu and select Channels. You should see a list of media channels. To change your state, click the white agent state box and select a new status from the list.
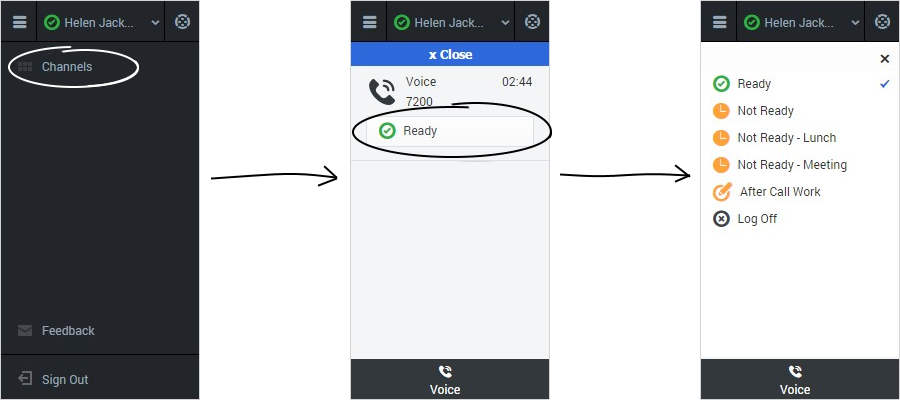

Agent Status Menu
The title bar of the Main View displays your status icon and your login status, and provides a button that enables you to log out.
Select the Agent Status icon on the right-hand side of the Main View title bar to open your status menu.
Place the mouse pointer over the Agent Status icon to view your status summary. The status summary includes your login name, phone number, overall state and time in that state, and the logged in date/time.
If you are logged in to more than one channel, detailed status for each channel is displayed; otherwise, only your Ready state is displayed.
Your status is also displayed in the My Channels tab of the Main View. You can manage your status and forward calls from the My Channels tab.
If, while you are handling an interaction for a given channel, you set your status to either Not Ready, Not Ready - <reason>, or After Call Work (ACW) the system does not display the amount of time that you are in that state until the interaction is complete. This feature enables your break or ACW time to be displayed according to recorded statistics.
Your environment might be configured to automatically change your status from After Call Work to Ready, Not Ready, or some other value, when you click Mark Done, or you might have to manually set your status to Ready, or some other value, after you complete your after call work.