Installing and Configuring the Screen Recording Service
The Screen Recording Service must be installed on your desktop so you can capture what is happening on your screen at the time of an active interaction. This page will help you to install the client, and help you to verify that is it working properly.
If you are an experienced user, and want to create and install your own certificates, or if you want to add more parameters to the Screen Recording Service's local configuration file, see the Configuration for the Advanced User section.
If you want to upgrade to a new version of the Screen Recording Service, see the Upgrading the Screen Recording Service section.
The following steps show how to download, install, configure and test the Screen Recording Client. You can also watch this video for a short demonstration.
Before you can install and use the Screen Recording Service on your desktop, you must have some information ready at hand. Your IT department can help you get this information.
- Windows 7 64-bit Operating System with admin privileges
- The Web Services URL—for example, https://mywebservices.com:80
- Access to Workspace Web Edition from your Genesys Hub
- The software (minimum version 8.5.205.00 - build 306)
- Agent Login credentials
Getting Your Software
Find the email you received from Genesys with the details about your software (it will look similar to the example on the left), and using your favorite FTP client—for example, Filezilla, connect with the credentials listed in the email.
Download the zipped file to a temporary folder on your computer.
Installing Your Software
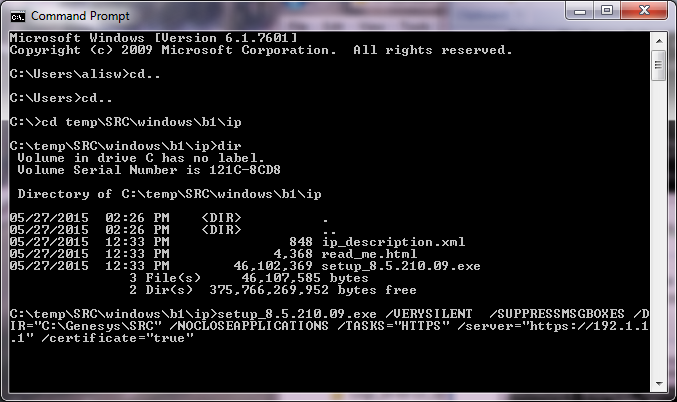
Open a command prompt, and type dir to change directories to the installation folder.
At the prompt, enter the following command:
setup_<version>.exe /VERYSILENT  /SUPPRESSMSGBOXES
/DIR="C:\Genesys\SRC" /NOCLOSEAPPLICATIONS /TASKS="HTTPS"
/server="<URL for your Web Services server>" /certificate="true"
Important
Remember to replace <version> with the actual number that you found when you typed
dir, and the correct URL for your Web Services server.
And then press Enter.
To debug problems with the installation, you can add the /LOG="logfilename" command to the installation path.
For example, setup_<version>.exe /VERYSILENT /SUPPRESSMSGBOXES /DIR="C:\Genesys\SRC" /NOCLOSEAPPLICATIONS /LOG="C:\src_setup.log".
Remember: If you are using Workspace Web Edition, the desktop requires a secure connection (the URL has https:// as the prefix) to Web Services server. The Screen Recording Service is also required to support a secure connection with Workspace Web Edition, so it can accept credentials to Web Services.
Important
This installation generates a unique self-signed certificate for your workstation which is automatically added to the Windows certificate store. For other security options, see the
Configuration for the Advanced User section, or a Genesys Professional.
Verifying the Installation
Use Windows Explorer to locate the directory where you installed the software (in this example, it is in the C:/Genesys/SRC folder).
Once you see the folder is there, restart your computer. This will ensure that the service starts automatically.
Testing the Service
You can test the service to see if the Screen Recording Client is running on the PC. Using Windows Services, on the Services tab, search for Genesys SR Service. If the status is Started, the Screen Recording Service is working. If the status says anything else, contact your Genesys Professional to help troubleshoot the issue.
Use your Agent Desktop to place a test call. For information on how to use the Agent Desktop, see Agent's User Guide.
Upgrading the Screen Recording Service
Use the following steps to update your Screen Recording Service software to a new version.
Make sure you have the latest hot fix version before proceeding.
Tip
Before you start, identify where your Screen Recording Service is installed. The following procedures assume that the sofware is installed in the
C:\Genesys\SRC directory. Replace the path as necessary.
Manual Upgrade
- Make a back up copy of the C:\Genesys\SRC directory. Name the backup directory C:\Genesys\SRC.backup.
- Delete the C:\Genesys\SRC\VLC sub directory (all other directories are not touched).
- Unzip your new software in a temporary directory.
- Make sure you are in that temporary directory and type the following command in a command prompt window:
Setup_<version>.exe /LOG /VERYSILENT /SUPPRESSMSGBOXES /NOCLOSEAPPLICATIONS
For example,
Setup_8.5.2.361HotFix.exe /LOG /VERYSILENT /SUPPRESSMSGBOXES /NOCLOSEAPPLICATIONS.
- Restart your computer.
- Check that the installation is successful.
Install a Previous Version
If you want to install a previous version of the Screen Recording Service:
- Make a back up copy of the C:\Genesys\SRC directory. Name the backup directory C:\Genesys\SRC.hotfix. (This directory may be needed for subsequent troubleshooting purposes).
- Delete the C:\Genesys\SRC directory.
- Install the previous Screen Recording Service version.
- Rename the C:\Genesys\SRC.backup to C:\Genesys\SRC.
- Restart your computer.
- Check that the installation is successful.
Validate the Installation
To validate that your installation is successful:
- Open the C:\Genesys\SRC\GSR.log file, and make sure that something similar to the following lines are included (with the version reflecting the new version you've just installed):
Starting HTTP Authentication server on 127.0.0.1:443
Recorder: Version:8.5.2.36x, IP:xxx, OS:win32
- Make sure that the C:\Genesys\SRC\GSR.log file contains no errors or exceptions.
- Make a test call.
- Review the C:\Genesys\SRC\GSR.log for the following line:
Uploader: Upload of file <file-name-of-media> was successful
Tip
If your installation is unsuccessful, contact your Genesys Care representative.
Configuration for the Advanced User
You can customize your Screen Recording Client with advanced options, or create/install your own certificates, review the next sections.
Tip
For bulk roll-out to a number of agent computers, you might want your IT department to script the installation using the "single-step silent installation" referred to in the
previous steps. Contact your IT professionals for information about the options which might exist in your organization.
Creating Self-Signed Certificates
If you did not use the /TASKS="HTTPS" parameter to install the Screen Recording Client, you can create self-signed certificates. [+] Show the Steps
- Open a command window as an Administrator.
- Navigate to the <install_dir>\Certificates\Self-Signed directory.
- Run the create_certificates.bat file. This creates a set of unique self-signed certificates.
- Run the install_certificates.bat file. This installs the new self-signed certificates to windows trusted certificates store.
Important
You can also execute these files at any time to create and/or install new self-signed certificates for the Screen Recording Client to use.
Installing Your Own Certificates
You can also provide your own certificates without any configuration changes.
[+] Show the Steps
- Provide a certificate for the IPv4 host, 127.0.0.1, in the <install_dir>\Certificates\server.pem file.
- Install the .pfx form of this certificate to the local certificates store as a "Trusted Root Certification Authority" file.
- Provide a certificate for the IPv6 host, [::1], in the <install_dir>\Certificates\serverIp6.pem file.
- Install the .pfx form of this certificate to the local certificates store as a "Trusted Root Certification Authority" file.
- The PEM certificate files should include both the private RSA key and the certificate itself and should have the following form:
----BEGIN RSA PRIVATE KEY----
.
.
.
----END RSA PRIVATE KEY----
----BEGIN CERTIFICATE----
.
.
.
----END CERTIFICATE----
Important
If the .pem certificates are to be protected by a password, you must use
genesysscreenrecording for that password.
Advanced Configuration Options
Now, if you want to customize the Screen Recording Client to suit you, you can add options to the
config.json file that was installed in the SRC installation directory.
[+] Show the Options
Use the Your value column to track your option values.
| Name
|
Is this Option Mandatory?
|
Description
|
Default value
|
Your value
|
| server
|
Y
|
The server base url. The default port is 80; to use a different port, use the url:port format. This must be configured at installation. For example, https://<web services host>:80
|
Empty
|
|
| authenticationCertificate
|
N
|
The relative or full path to the authentication server's PEM certificate. If a value is available, the authentication server uses it for the HTTPS connection to the agent's desktop.
Note: This parameter is not needed in the default Screen Recording Client installation. The Screen Recording Client uses the default self-signed certificate (%install_dir\Certificates\server.pem) automatically.
|
%install_dir\\Certificates\server.pem
|
|
| authenticationCertificateIp6
|
N
|
The relative or full path to the authentication server's PEM certificate for IPv6. If a value is available, the authentication server uses it for the HTTPS connection to the agent's desktop.
Notes:
- This parameter is not needed in the default Screen Recording Client installation. The Screen Recording Client uses the default self-signed certificate (%install_dir\Certificates\server.pem) automatically.
- Each host requires a unique certificate.
|
%install_dir\\Certificates\serverIp6.pem
|
|
| authenticationPort
|
N
|
The port used for internal communication with Web Services.
|
If using HTTP, the port is 8080. If using HTTPS, the port is 443.
|
|
| authenticationPortIp6
|
N
|
The port used for internal communication with Web Services.
|
If using HTTP, the port is 8080. If using HTTPS, the port is 443.
|
|
| certificate
|
N
|
Indicates how the screen recording client validates the server TLS certificate. If set to false, the screen recording client will not validate the certificate. If set to true, the client will validate the certificate using the Windows certificate store when the server is using a certificate from the public CA. If set to a file path (for example, C:\\Automation\\server.pem), the screen recording client will validate the certificate using a self-signed certificated when the server is using a private self-signed certificate.
|
false
|
|
| certificatePassword
|
N
|
The password for the PEM certificate's private RSA key.
|
Empty
|
| certificatePasswordIp6
|
N
|
The password for the IPv6 PEM certificate's private RSA key.
|
Empty
|
|
| credentialsTimeout
|
N
|
The timeout duration, in minutes, between the keep alive (GET/Ping) requests from the agent's desktop and the Screen Recording Client. When the timeout expires, the agent's credentials are deleted from the Screen Recording Client's cache.
|
35
Note: This value must be longer than the Web Services session timeout duration for the agent's desktop. By default the Web Services session timeout is 30 minutes, and the credentialsTimeout is 35 minutes. The latter must be increased if the Web Services session timeout is increased.
|
|
| ip6
|
N
|
Indicates whether to support IPv6 in addition to IPv4 for communication with Web Services.
|
true
|
|
| password
|
N
|
The HTTP authentication password. If provided, the value of the password is used until new authentication credentials are provided by the Agent desktop.
|
Empty
|
|
| statusTimeout
|
N
|
The timeout duration, in seconds, between the keep alive GET/Ping requests from the agent's desktop and the screen recording client.
|
60
|
|
| userName
|
N
|
The HTTP authentication username. If provided, the value of the userName is used until new authentication credentials are provided by the Agent desktop.
|
Empty
|
|