
Recording Certificate Management
Contents
Overview
The Genesys Interaction Recording Key Management System has three responsibilities:
- Provision public and private keys for voice and screen recordings.
- Store the private key securely in encrypted form in a database.
- Decrypt the recorded audio or screen recording file using the encrypted session key that is associated with the recording.
This section describes how to manage the Recording Certificates in your Genesys Interaction Recording solution.
Certificate Requirements
Before you can encrypt certificates for voice and screen recordings, you must generate the following keys and certificates:
- A recording private key in .pem format.
Align encryption strength requirements with your IT Security.
RSA Encryption strength (2048 bit or higher). - Self-Signed Recording certificate (also known as public key) in .pem X.509 RSA format.
The certificate validity period will determine when the next certificate should be generated for renewal.
Note: It is the customer's responsibility to track this and install a new certificate prior to expiry.
DN Fields (Typical)
The system prompts for DN fields to be filled in. Fill in all the fields. See the table below for the details.
| DN Field | Description | Example |
|---|---|---|
| Common Name (CN) | The name of your recording solution. | Genesys Recording |
| Country (C) | A two letter country code. | US |
| State or Province (ST) | The full state or province where your organization is legally located. | California |
| Organization (O) | The exact legal name of your organization. Do not abbreviate your organization name. | Genesys |
| Organization Unit (OU) | The organization department. | Information Technology |
| City or Locality (L) | The city where your organization is located. | Dale City |
Generating a Self-Signed Certificate Key Pair using OpenSSL
The following OpenSSL command to generate certificate signing request and private key is an example:
openssl genrsa –out tenant.key 2048 <br>
openssl req –new –x509 –key tenant.key –out tenant.pem –days <validity period> –subj “/CN=<common name>/C=<Country>/ST=<State>/O=<Organization>”<br><br>

Example:<br>
openssl genrsa –out tenant.key 2048 <br>
openssl req –new –x509 –key tenant.key –out tenant.pem –days 3650 –subj “/CN=Genesys Recording/C=CA/ST=California/O=Genesys”<br>
As a result of this command, the following two files are created:
- private_key.pem— the private key that is used to decrypt the recordings. It must be kept safe and should not be shared.
- tenet.pem; a self-signed recording certificate and the public key.
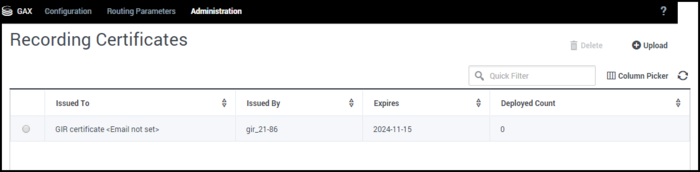
Recording Certificates Screen for Uploading Keys
The Platform Administration section of the Genesys Hub is the tool you use to manage your recording certificates (public keys), and private keys.
The Recording Certificates screen displays the list of defined Recording Certificates. To refresh the list at any time, click ![]() .
.

Click a Recording Certificate in the list to display its details.

To filter the contents of this list, type the name or partial name of the object in the Quick Filter field.
To sort the Recording Certificates, click on a column heading. Click the heading a second time to reverse the order.
You can perform the following tasks on this screen:
- Upload new certificates.
- Delete certificates.
ImportantDeleting these certificates or keys will make these uniquely-encrypted recordings unplayable. Losing this private key will result in a loss of recordings. If you must delete a certificate or key, contact Genesys Customer Care.
All of the following steps should be performed by an administrator at the customer's site
Encrypting Voice Recordings
The following steps describe how you can configure encryption for voice recordings.
Uploading Recording Certificates
To upload a new certificate:
- From the Genesys Hub, select Platform Administration, and log in as the user with permissions to create certificates.
- Select the GAX tenant, and navigate to Administration > Certificates.
- On the Recording Certificates panel, click Upload.
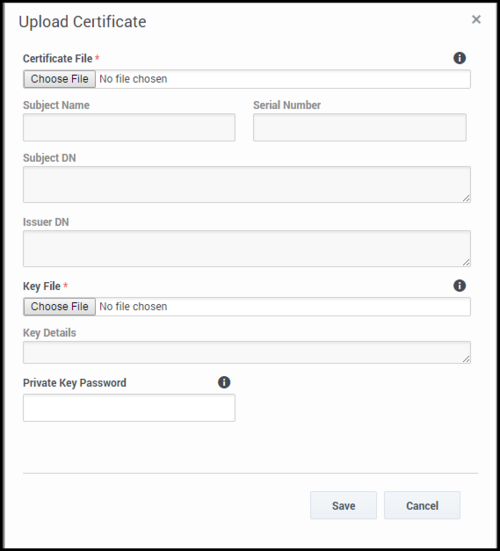
- On the Upload Certificate panel, in the Certificate File section, click Choose File.
- Select the recording certificate. This file must contain an X.509 RSA certificate in PEM format. The Subject Name, Serial Number, Subject DN, and Issuer DN fields automatically populate.
- In the Key File section, click Choose File.
- Select the private key. The file must contain an RSA private key in PEM format. The encoding can be in either Openssl RSA private key or PKCS8 format. The Key Details field automatically populates.
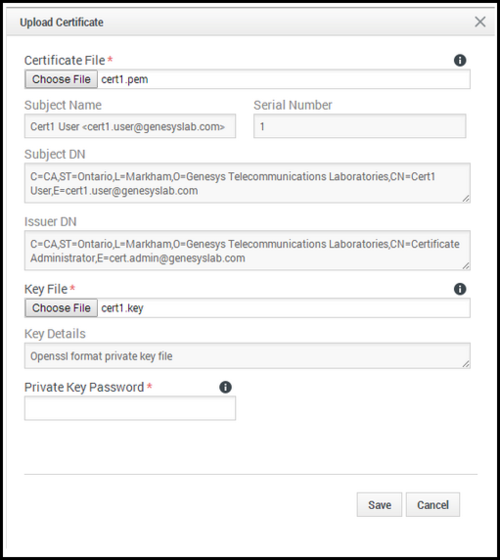
- If the private key file is encrypted, enter the Private Key Password.
- Click Save.


Now, that you have uploaded the recording certificates, you must contact Genesys and ask to have the certificate assigned to your IVR Profile to enable encryption for voice calls. You must also provide Genesys with the CA certificate (or the recording certificate if it is self-signed).
To enable encryption for screen recordings, follow the instructions below (after completing the upload step above).
Encrypting Screen Recordings
The following steps describe how you can configure encryption for screen recordings.
Screen Recording Certificates List
The Screen Recording Certificates page enables you to manage the certificates for screen recording encryption. You can perform the following actions:
- Assign new certificates.
- Remove certificates.

Assigning Screen Recording Certificates
To assign a new certificate:
- In the header, go to Administration > Screen Recording Certificates.
- On the Screen Recording Certificates panel, click Add.
- From the Select Certificate window, perform one of the following actions:
- Select the check box next to the appropriate certificate, and click Add.
- Click Cancel to discard any changes.
- Perform one of the following actions:
- Click the Save button to accept the changes.
- Click the Cancel button to discard the changes.
Removing Screen Recording Certificates
To remove a Recording Certificate, perform the following actions:
- In the header, go to Administration > Screen Recording Certificates.
- On the Screen Recording Certificates panel, select the check box next to the certificate that you want to remove.
- Click Remove.
- Perform one of the following actions:
- Click the Save button to accept the changes.
- Click the Cancel button to discard the changes.
- If you remove a certificate from the Screen Recording Certificates, you will turn off encryption, and screen recordings will no longer be encrypted.
- If encryption is turned off, existing recording files are not modified, allowing for decryption of those existing files to continue.