Contact center settings
A key factor in a well-configured contact center is how well the global contact centers are configured. This very important task ensures that your customers are routed to the correct agents and that the agents have the correct tools available to them as they handle customer interactions.
On the various screens, you select the check boxes next to the options that you want to enable. Each check box has three states:
 The option is inactive. To activate the option, click the check box once. The option is then set to the default setting as specified in the description in the tool tip.
 A check mark indicates that the option is enabled. You can click once to disable the option.
 No check mark indicates that the option is disabled. You can click once to enable the option.
After you configure all your objects, such as skills, dispositions, agent states, you can easily manage user accounts, because all the correct options will be available to you.
Desktop Settings
Configuring your Agent Desktop settings involves customizing the available options to meet the specific needs of your contact center. For information, see Agent Desktop settings
Skills
The first thing you should consider doing with configuring a contact center is create a list of skills that you can assign to Agent Groups. See Skills.
Desktop Options
High level intro to Desktop Options. See Desktop Options.
CRM Adapter settings
To configure options for the Gplus Adapter, click Contact Center Settings > CRM Adapter. For more information, see CRM Adapter settings.
Agent groups
After you create a set of Skills, you can create Agents Groups, which are logical groupings of agents. Agent groups are typically set up to provide particular sets of contact-center services. See Agent Groups.
Transactions
Use the Transactions tab to manage business attribute overrides that are applied at a transactional level, such as a call or a chat. You can configure the following business attributes at the transaction level:
- Dispositions
- Favorites
- Case Data
- Toast Data
- Caller IDs
Select Transactions in the navigation menu to access the Transactions tab. The Transactions tab main view lists the transactions only by name. Click the link for the transaction to view the details.
Use the following procedures create and configure transactions:
[+] How do I add a transaction?
Adding a transaction
Type a unique name in the Transaction name field, select a folder to store the transaction configuration, and then click Add. If you do not select a folder, the transaction is stored in the /default directory.
Tip
You can manage folders from this page. When you select the
Folder option, a drop-down list box is displayed where you can select a folder or click the add folder icon

to create a new folder.
Note that the name of the transaction is prefixed with the name of the folder. For example, UserPreference/<TransactionName>. At this point, configuration is not complete. You need to add business attributes to the transaction.
[+] How do I add business attributes to a transaction?
Adding business attributes to a transaction
To edit a transaction, click the link in the Name column. If the transaction has no configured business attributes, as is the case when you add a new transaction, you are prompted to complete the configuration. Follow the prompts to add Dispositions, Favorites, Case Data, Toast Data and Caller ID business attributes. After you add the business attributes, you can define them.
This image depicts the steps to add a Disposition business attribute.
[+] How do I manage dispositions?
Managing dispositions
Dispositions are the descriptions of the final outcome of the call. These codes are used to flag calls for reporting purposes. To learn more about how to manage dispositions, see Managing dispositions.
[+] How do I manage favorites?
Managing favorites
On the Favorites screen, you can create list of agents, agent groups or external contacts that agent group members frequently dial. This list provides a click-to-call list of these numbers on Agent Desktop. To learn more about how to manage favorites, see Global Favorites.
[+] How do I manage case data?
Managing case data
On the Manage Case Data screen, you can specify the information to be displayed to the agent when an interaction is transferred to them. To learn more how to manage case data, see Managing case data.
[+] How do I manage toast data?
Managing toast data
On the Manage Case and Toast Data screen, you can specify the information to be displayed to the agent hen they receive a call, chat, or other interaction. To learn more how to manage toast data, see Managing toast data.
[+] How do I manage caller IDs?
Managing caller IDs
You can allow agents to select from a predefined list of caller IDs; the selected caller ID is then displayed to the person receiving the call when the agent consults, conferences, or transfers a call. To learn more about how to manage caller IDs, see Managing caller IDs
[+] What should a configured transaction look like?
In this example, the transaction includes the following business attributes:
Disposition codes:
- Transaction complete
- Needs follow-up
Case and Toast Data
- First name
- Last name
- Subject
Caller ID
- ABC Customer Support
- ABC Shipping
Use Case
In Agent Desktop, you have the ability to override desktop options by setting the value of a KVP to the name of a transaction list object. The desktop option is interaction.override-option-key that is configured in Channels and Options. In the inbound or outbound routing application, you set the value of the identified key to the name of the transaction list object and the desktop options in the transaction list object are used instead of the WWE application or agent group objects.
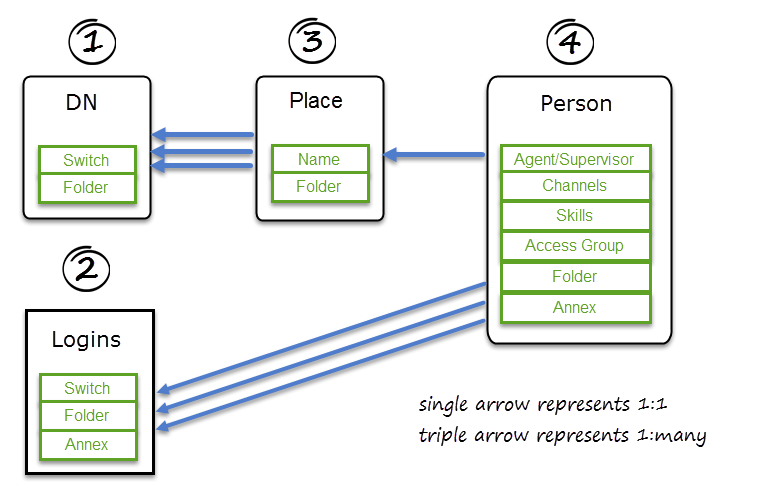
Templates
Templates allow you to create a set of configuration options that you can apply to agent accounts when you add an agent. The following diagram shows the relationship between the templates and the sequence in which the templates must be created:
To access the Manage Templates page, click Contact Center Settings, and then click Templates.
To add a template, select a template type, and then click Add. For each template that you create, ensure that you give the template a unique name.

Click the following links to learn how to configure each template type:
[+] Click to show DN template
DN template
DN Templates specify switch and folder where the DN needs to be created.
[+] Click to show Login template
Login template
Agent Login Templates specify switch, folder, and annex options.
In the Agent Login Name field, you can use a variable to specify the contents of the field, for example, {{person.userName}}.
[+] Click to show Place template
Place template
Place Templates must contain one or more DN Templates.
If your contact center has requirement to specify unique place names for different business groups or regions, type a place name variable. For example, the place name might be the same as the agent's phone number or as the agent user name. Place names can contain the following variables:
- {{person.userName}}
- {{person.emailAddress}}
- {{phone.number}}
- {{phone.description}}
- {{phone.index}}
You can also combine variables. For example: {{person.userName}}-{{phone.index}} creates JohnAppleseed-1 and JohnAppleseed-2 if JohnAppleseed has two phone numbers.
[+] Click to show Person template
Person Templates define properties such as Channels, Skills, Access Groups, Annex options, folder, and Supervisor role for newly created agents. You also need to select a place template and one or more login template. Then you can select the channels, skills, annex, and access groups that you want to apply to this template. Before you save the Person template, select the folder where the user is created.


