Agent accounts
On the Users tab, you can manage agent accounts, including adding new accounts, importing agent accounts from an external file, and exporting agents.
After you log in to Agent Setup interface, the first screen that you'll see is the Users tab. If your contact center already has agents assigned to it, you see a list of configured agents. In a fresh installation, you might see an empty list. Regardless, as part of your regular maintenance on your contact center, you need to add agents.
How do I add a single agent?
Click the Add User link. You can select a template from the Template drop-down list box if you configured one or more templates. A template automatically selects some of the options on the Add User screen.
Complete all the required fields on the screen. If you make an error, a message is displayed to tell you the correct format for a field. Most fields are self-explanatory, such as the name and employee ID fields.
This video demonstrates how to add a single agent.
Use the following table for advice on how to fill in the fields:
[+] Click to show table
| Option
|
Description
|
| Folder
|
From the drop-down list box, select the business group to which you want to assign the user.
|
| First Name
|
Type the first name of the user.
|
| Last Name
|
Type the last name of the user.
|
| Username
|
Type the username for the user.
|
| Login Code
|
Optional. Type a login code for the user. An example of a login code is the user's employee ID.
Important The Login Code option is hidden by default, therefore, it might not be displayed on your screen. If you require the Login Code option, contact Genesys Professional Services to request that they enable the User.AgentLoginCode.canView configuration option.
|
| Email
|
Optional. Type the user's email address.
|
| Reset Password
|
When selected, this option specifies that when the next time that the user logs in, he or she will be prompted to change the password. This option only applies to agent user accounts.
|
| Password
|
Type a default password for the user..
|
| Password confirm
|
Type the password again.
|
| Employee ID
|
Optional. Type the user's employee ID.
|
| External ID
|
Optional. Type the user's external ID.
|
| State enabled
|
Enables or disables the user account.
|
| Multimedia Only Agent
|
Specifies that this agent is only enabled for multimedia (non-voice).
|
| Phone Number
|
In addition to the default phone number, you can assign additional phone numbers to the agent. The agent has the opportunity to select the number when they log in to accept calls.
For example, if you type hjackson in the Username field, when you type a phone number in the Number field of the first row, the Place Name field displays hjackson. If you type a number in the second row, the associated Place Name field displays hjackson2 and the place name in the first row changes to hjackson1. If your contact center has requirement to specify unique place names for different business groups or regions, you can overwrite the default place name.
|
| Place Name
|
The value that you type in the Username field automatically populates the Place Name column. If you don't want to use the username as a place name, clear the Use check box.
|
| Use
|
The Use option specifies that the username is to be used for the associated phone number. This option is selected by default. When you clear the Use check box, the phone number is used as a place name.
|
| Wrap Up Time
|
You can configure wrap up time for an agent. Wrap up time is the amount of time the agent is allotted to complete after-call tasks, such as typing notes or selecting a disposition. The wrap-up time is measured in seconds. To disable wrap up time, type 0.
|
| Agent Voice Mail
|
Type the voice mail box extension number for the agent to use.
|
| Softphone
|
Select this check box if this user will use a softphone.
|
| SIP Phone Type
|
when you enable Softphone, you must select a softphone type.
|
| Supervisor
|
Select this option if this agent has a supervisory role.
|
| Caller ID
|
Click Caller ID and add at least one identifier to be displayed on a receiver's call display. If you add more than one, the agent has the option to choose which caller ID they want to display. You can also enable the agent to use an anonymous caller ID.
|
| Skills
|
Select the skills that you want to assign to the agent, assign a skill level, and click Add. With many skills to choose from, you can filter the list of skills by using the search box.
|
| Agent Group
|
Assign this agent to an agent group, which is a logical grouping of agents that provide particular sets of contact center services. For more information about agent groups, see Managing Agent Groups.
|
| Access Groups
|
Assign this agent to an access group, which is a logical grouping of agents that are provided specific access permissions.
|
| Favorites
|
Personal Favorites is a list of Agents, Agent Groups or external contacts that group members frequently dial. This list provides a click-to-call list of these numbers on Agent Desktop. Personal favorites are configured the same way as Global Favorites. See Global Favorites. |
| Switches
|
Select the switches where DNs and Agent Logins should be provisioned.
|
| Filter
|
For each agent group, you can control what information that group can see from other agent groups in the Team Communicator, Favorites, and Statistics. After you select an agent group on the Agent Groups window, select the Filter option on the menu bar. In the list of agents groups, you can choose to restrict or exclude agent groups by selecting the appropriate check boxes. You can also manage filters on the Desktop Options page. For more information, see Desktop Options.
|
| Switches
|
Assign the agent to one or more switches in your contact center.
|
| Recording
|
Allows agents to access their interaction recordings. Click the Recording icon, select the Recording Hierarchy check box, and then type the heirarchy string for the level of access you want to grant. A value of / means that agents have access to all recordings. We recommend that you type /Customer_Name/AgentName, so that each agent has access to only their recordings.
|
| Desktop Options
|
Assign channels and other options to the agent by clicking Desktop Options and then selecting from the listed options. You can select more than one option. For a detailed look at what options you can configure for an agent, see the Desktop Options.
|
| CRM Adapter
|
CRM Adapter: Use the CRM Adapter tab to configure the Gplus Adapter option settings for the agent group. For information, see CRM Adapter options.
|
Editing agents
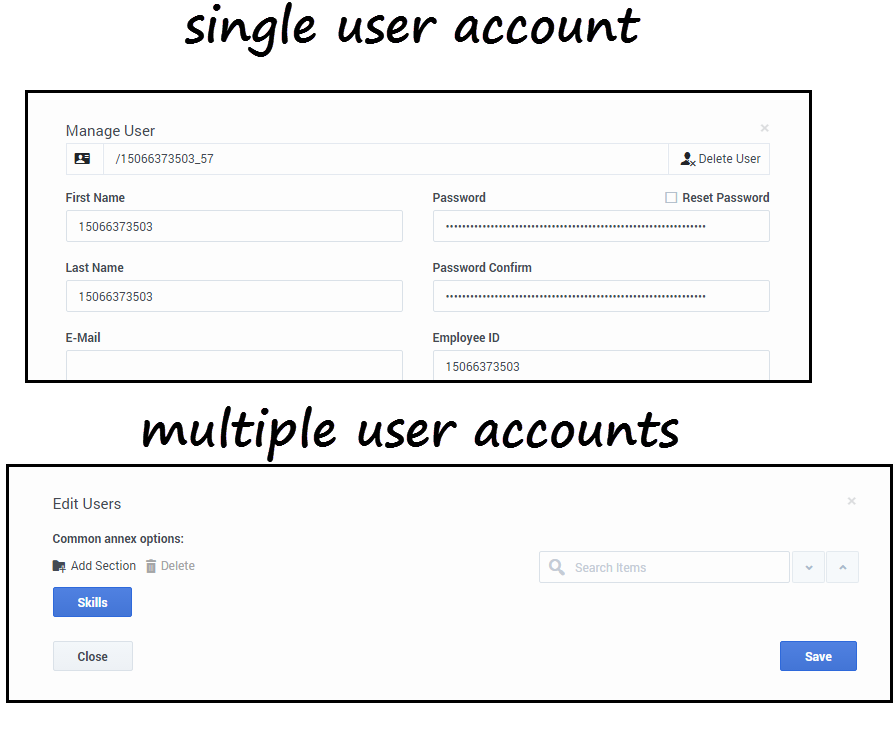
You can edit a single agent or a group of agents. When you edit a single agent, you can edit any of the agent's details. For a group edit, the two options available for you to edit are Annex and Skills.
When you edit one agent, click the agent's name in the Name column. In the Manage User window, you can make your updates.
To edit multiple users at once, select the agents that you want to edit, click Edit Users, and then make your changes in the Edit Users window. When you edit multiple users, consider the following:
- You can add Annex options or modify existing options. You can only delete Annex options that are identical for all selected agents.
- Only values that are common for the selected users are shown for Skills and Annex. For example, if:
- Agent 1 has Russian skill level of 10 and English skill level of 5
- Agent 2 has Russian skill level of 10 and English skill level of 7
You will see the Russian skill level of 10 and English skill level is blank on the Edit Users screen under Skills.
This video gives you a demonstration on how to update multiple agents.
Importing agent accounts
When you need to add a large number of agent accounts, you can use the Bulk Import tab in Agent Setup. By importing a large number of agent accounts at one time, you won't need to add the accounts one at a time and you can apply a template to configure options, such as DN, place, person, and login options, to all accounts.
How do I import a file that contains agent accounts?
Before you can import agent accounts , you must have a .CSV file that has all the required data.
The values from the imported file overwrite corresponding values that are specified in the template. For example, the value for the Skill parameter in the imported file takes precedence over the value for the Skill parameter that is specified in the template.
When you are ready to import the file, click Choose File, select the file from your local device, and then click Import. If you want, you can validate the file to ensure that it is structured correctly.
About CSV files
The .CSV file must be a text file in a comma-separated format. In the source file each line represents a single user or agent.
When you import a .CSV file, each parameter value is updated according to the following rules:
- If value is present, the new value replaces the previous value.
- If an empty value is encountered, no change is made.
- If the value includes /d , the attribute is deleted.
- If no corresponding record is found, an error message is logged and the updated continues to process.
[+] Show .CSV file parameters
| Property
|
Type
|
Mandatory?
|
Description
|
| Username
|
String
|
Yes
|
The unique username of the agent or user.
|
| First Name
|
String
|
Yes
|
The first name of the agent or user.
|
| Last Name
|
String
|
Yes
|
The last name of the agent or user.
|
| Email
|
String
|
No
|
The agent or user's email address.
|
| Extension
|
String
|
No
|
The extension #1 of the agent. A place is also created if extension specified.
|
| Extension2
|
String
|
No
|
The extension #2 of the agent. A place is also created if extension specified.
|
| Extension3
|
String
|
No
|
The extension #3 of the agent. A place is also created if extension specified.
|
| Folder
|
String
|
No
|
The folder path respectively to root folder (Persons) where new agent or user is created. For example, Company/Department/Team.
|
| Place Name
|
String
|
No
|
The place name #1 of the agent. Place name with the name of Extension is used if not specified.
|
| Place Name2
|
String
|
No
|
The place name #2 of the agent. Place name with the name of Extension2 is used if not specified.
|
| Place Name3
|
String
|
No
|
The place name #3 of the agent. Place name with the name of Extension3 is used if not specified.
|
| Default Place
|
String
|
No
|
The name of the Default Place.
|
| Enabled
|
Boolean
|
No
|
Y specifies that the agent account is enabled.
N specifies that the agent account is disabled.
|
| Is Agent
|
Boolean
|
Yes
|
Y specifies that this user is an agent.
|
| External ID
|
String
|
No
|
Any external ID that used to identify the user.
|
| Login ID
|
String
|
No
|
The user's login ID.
|
| Is Supervisor
|
Boolean
|
No
|
Y specifies that this user is a supervisor.
|
| Is Admin
|
Boolean
|
No
|
Y specifies that this user is an administrator.
|
| Wrap Up Time
|
Numeric
|
No
|
The number of seconds agent remains in ACW after call is disconnected. This field is used only for voice calls.
|
| VoiceMail.MailBox
|
String
|
No
|
If specified, populate the following option to the Annex of all associated Agent Logins:
AgentLoginAnnex:TServer/gvm_mailbox. valid values: numerical (12345)
|
| Recording Hierarchy
|
String
|
No
|
If specified, populate the following option to the Agent's Annex: [recording] agent_hierarchy.
|
| SIP Phone Type
|
String
|
No
|
The type of SIP phone the agent is using as a softphone.
|
| Skill:<skill_name>
|
Numeric
|
No
|
The number that identifies the agent's skill level for the specified skill.
|
| Switch:<switch_name>
|
Boolean
|
No
|
Y means that a DN and Agent Login are created for agent on the specified switch.
|
| AgentG:<agent_group_name>
|
Boolean
|
No
|
Y means that the agent is added to the specified agent group.
|
| Employee ID
|
String
|
Yes
|
The employee identifier of the agent.
|
| Password
|
String
|
Yes
|
The password to be used with the Username.
|
| Reset Password
|
Boolean
|
No
|
When selected, this option specifies that when the next time that the user logs in, he or she will be prompted to change the password. This parameter only applies to agent user accounts; it is ignored for administrative users.
|
| Action
|
String
|
No
|
ADD adds the agent.
UPDATE updates an existing agent.
DELETE removes an existing agent.
|
[+] Show an example
First Name,Last Name,Employee Id,Username,Is Agent,Is Supervisor,Is Admin,External Id,Login ID,Extension,Skill:English,Switch: San Fran,Switch: London,AgentG:Good,AccessG: Super,Action,Folder,Wrap Up Time,Enabled
Sarah,Lee,223344,sarahl@acme.com,N,Y,Y,ADD,Acme/Branch/Team 1,60 John,Doyle,223465,johnd@acme.com,Y,N,N,2233,1,Y,N,ADD,Acme/Branch/Team 2,0 Robert,Cook,244456,bobc@acme.com,Y,Y,Y,johnd@acme.com,5,Y,Y,ADD,Acme/Branch/Team 3,60,Y
How do I stop an import?
When you stop an import, a window is displayed in which you can confirm that you really want to stop the import. After you click Stop, agents records that were imported before you clicked  are retained and the import process does not proceed.
Exporting agent accounts
There may be circumstances where you need to create a backup file of all your agent accounts or you might want to export agent accounts to update them using another application and then import them back in. When you export agent records, a spreadsheet document is downloaded to your local computer.
On the Users page, you can export all users or a subset of users.
- Export All: Click the down arrow on the User Actions menu and select Export All.
- Export Selected: To select a subset of users, select the users and then select Export Selected from the User Actions menu. You can select the users by:
- Click the check boxes next to the users you want to export.
- Filter the list of users by using the search boxes at the top of the Users list and then click Select All or individually select the users you want to export.
How do I select the fields that I want to export?
On the Export user fields window, you can give your exported file a custom name. This makes it easier for you to locate on your local system after you export. You can either accept the default selections or customize the list. If you want to export all fields, select the check box at the top of the list, next to the Field label.
Important
- If you are exporting your user accounts as a means to modify the records and then import them back in, select the Import Action field. If you don't select this field, the .CSV file will not import correctly.
- Passwords cannot be exported. When you edit an exported .CSV. you need to manually add passwords to the .CSV file before you import the file back in. If you don't add the passwords, Agent Setup displays an error message saying that the Password field is missing in the .CSV file.
Where did my export go?
The progress bar at the top of the Export user fields window reaches 100%, the document is completely downloaded to your local computer. How you access your downloaded files varies by operating system. In general, you can open your Downloads folder, and look for the .csv file the corresponds to the file name that you specified.
You can then double-click the file to open it and view the exported data.
Important
If you use Microsoft Excel, the program automatically truncates all leading zeros from numbers in CSV files when you open the file by double-clicking on its name. You need to change at least the columns where the leading zeros occur to text format. For more information on how to resolve this issue, see this
FAQ.
Locating agent accounts
What you see in the Agent Setup interface is determined by your account's permission settings. You can only see agents, users, and objects that you are permitted access to.

Important
If you see a red check box next to an agent account, this means that the agent's account is not valid due to some missing information. Hover your mouse over the check box to see what information is missing. For example, if a voice agent does not have a configured default
Place Name field and your contact center is not configured to prompt the agent to enter place when he or she logs in, the agent's account is considered invalid until you update the agent account to supply the missing information.
You can filter the list of agents to view only
Valid or only
Not Valid agents by selecting the appropriate option from the
State drop-down list box.
Note the following options that you can use to locate specific agents on the list:
- Search by Name/Username: Use this field to type an agent name or username, or part of an agent's name, to filter the list to display only agents that match your search words.
- Agent Groups: Use this field to type the name of an agent group. All agents that are assigned the specified agent group will be listed.
- Roles: Use this drop-down list box to filter the list to display only agents that are assigned a specific role.
- Skills: Use this drop-down list box to filter the list to display only agents that are assigned a specific skill.
- State: Use this drop-down list box to filter the list to display only enabled or disabled agents.
- Page navigation: To scroll through the list pages, use the back and next narrow next to the page number at the bottom of the page.


