Applications and Modules
Important
Information in this chapter is dependent on your user role. The following restrictions apply:
- Application Designer can create applications and modules and add all types of blocks to a callflow.
- Application Maintainer can only add Message, Menu, Phone, Link, Interceptor, and End blocks to a callflow.
Applications, menu modules and pre-built modules all allow callers to perform specific self-service tasks over the phone. Callers dial into the application, rather than into individual modules. The application holds all the defaults, global commands, reusable prompts and error-handling paths (as well as the agent path).
This main application is based on the Standard Application Template. This template allows you to call into a menu module or a pre-built module. Menu modules can also call into pre-built modules, as illustrated in the graphic below:
Applications, menu modules and pre-built modules can all have their own error-handling, global commands, callflow defaults and reuseable prompts. However, except from callflow defaults, you cannot change these settings for pre-built modules.
Creating applications and modules
You can create an application or module from the following locations:
- Show Graphical View – Click Create New Module in the toolbar.
- Applications view – Click Create a new ... in the desired section. For example, to create a new menu module, go to the Menu section and click Create a new Menu.
Selecting a template
Next, you must select a template on which to base the module. Each template provides the framework that brings together common elements, such as Start blocks, links to other modules, and more.
After you select a template, a panel appears on the right in which you can enter a name and description for your module.
- Menus - These allow you to set up your own callflow using the Callflow Editor.
Important
You cannot edit the callflow of the
Tree View Submodule Template. This template is designed to deal with large numbers of menu options. Refer to the
Using the Tree View Submodule Template section below.
- Security Modules, Business Processes, or Utility Modules - You cannot edit the callflow of these modules. However, when you view these modules in the Callflow Editor you might see additional tabs that allow you to configure the default behavior of the callflow.
Using the Tree View Submodule Template
[+] Click to show section
The Tree View Submodule Template differs from other menu templates in that it does not use the drag-and-drop method described in the Callflow Editor section. Instead, the Callflow Editor displays in a tree-view structure, seen below.
Important
You cannot change default behavior and preferences for the Tree View Submodule Template. If your business needs require these to be changed, contact your Genesys representative.
The Tree View Submodule Template allow you to quickly add multiple questions and answers to a callflow. For example, your company might have 30 different events running throughout the year, and you expect customers to call in to ask for information and make bookings for each of these events. You can use this template and its streamlined interface to quickly set up 30 different menu options to account for each event.
To add questions and answers using the Tree View Submodule Template:
- Go to the Applications view.
- In the Menus section, click the Tree View Submodule Template to open it. The Question section appears first:
- In the Question Name field, enter the name of the first question you want to ask callers.
- Update the Initial, Retry, Timeout and Help prompts for the first question.
- Click Update.
Important
If you make any changes to the Question or Answer prompts and configurations, you must click
Update to save the changes. Likewise, in the Callflow Editor in which the Tree View Submodule Template is used, you must click
Save to save the whole callflow.
- Click Add an Answer. The answer appears below the first question in the tree-view list on the left; on the right, the Answer section appears:
- In the Answer Name field, enter the name of this answer.
- Depending on how you asked the caller to respond to the question, you must complete one or both of the following:
- Recognition Phrases – Add any phrases you anticipate callers might say to select this answer. Add a carriage return after each phrase.
- DTMF – Enter the digit you want callers to press to select this answer.
- Specify what you want to happen when the caller selects this answer. Select one of the following options from the Action When This Answer is Chosen drop-down list:
- No Action – The module asks the caller to confirm this is the correct answer. If necessary, you can add click Add a Question to add a follow-up question.
Important
If you previously selected
Transfer to a Phone Number or
Link to Another Module for this question, you must first select
No Action and click
Update before the
Add a Question button becomes available.
- Transfer to a Phone Number – Enter the phone number to which you want to connect the caller. For example, you can configure this option to dial a sales agent to complete a transaction.
- Link to Another Module – Select the module to which you want to link the caller. For example, you might select the Payment with Full Balance module if you had asked if the caller wanted to buy a product or service.
- In the Prompts section, update Confirmation Prompt Wording and Information Prompt Wording.
- Click Update.
- (Optional) At this stage, you can:
- Click on the first question in the tree view and repeat the steps in the Answer section to add a new answer.
- Click Add a Question to add a sub-question for the first answer.
- Remove the answer by clicking Delete this Answer.
- Create a new question by following the steps in the Question section.
- Click Save.
Using the Callflow Editor
Callflows consist of the following:
- Blocks - These are the individual steps in a callflow. Blocks perform a single basic function. For example, a Start block signals the start of the application, and an End block signals the end of the application. You can use the following blocks:
- Paths - Each block on the callflow is linked by a path. A path can represent:
- A menu option that a caller must select to proceed to the next block (these paths are surrounded by quotation marksspeak or key-in in order to progress to the next block (these are surrounded by quotation marks). For example, "yes (1)" denotes a menu option in which the caller said "yes" or entered 1 on a keypad.
- An event that took place in order for the call to be routed in a certain direction (these do not have quotation marks). For example, success means this path is used if the previous block ended successfully, and hangup means this path is used if the caller hangs up.
You can click on the name of a block or path to view its properties. For example, in the Menu block shown below, you can change its title or description.
Tips for Using the Callflow Editor
[+] Click to show section
Important
This section does not apply to product-specific modules, as you cannot alter the callflow of these modules.
Dragging and dropping blocks
There are several methods you can use to add blocks to your callflow:
- Drag and drop a block from the toolbox onto a block on the callflow.
- Drag and drop a block which already exists on the callflow onto a block on the toolbox.
- Drag and drop blocks from the toolbox directly onto path names on the callflow.
- Drag and drop path names onto blocks in the toolbox.
- Drag and drop existing blocks in the callflow onto other blocks in the callflow.
<toggledisplay linkstyle font-size:larger showtext="[+] With GIFs" hidetext="[-] With GIFs">
Drag and drop a block from the toolbox onto a block on the callflow
Drag and drop a block which already exists on the callflow onto a block on the toolbox
Drag and drop blocks from the toolbox directly onto path names on the callflow
Drag and drop path names onto blocks in the toolbox
Drag and drop existing blocks in the callflow onto other blocks in the callflow
Removing blocks and paths
To remove a block from the callflow, drag and drop it onto the recycle bin icon  on the toolbox. The following outcomes are possible:
- If the block was the result of a caller input (the path name was surrounded by speech marks, such as "accounts"), the path is not deleted with the block. Instead, the path links back to the block from which it originates. You must then decide whether you want to link this path to another block, or remove it by dragging the path name to the recycle bin.
- If the deleted block was the result of an event path, such as success, the path is also deleted with the block.
To remove a Path from the callflow, drag and drop it onto the recycle bin icon on the toolbox. The following outcomes are possible:
- If you are deleting an event path, the block into which the path leads is also deleted.
- If you are deleting a caller input path, the block into which the path leads is not deleted. Instead, the block is isolated and moved to the top of the callflow.
Miscellaneous tips
- Clicking outside a dialog box is the same as clicking Cancel. For example, if you clicked a Message block in the callflow to edit its prompt, but then decide against the change, you can click outside the dailog box to close it and not save the changes.
- If required, the Default Behaviour callflow can be linked to the Application callflow.
</toggledisplay>
Configuring Paths
[+] Click to show section
Paths are shown as lines that connect blocks in the Callflow Editor.
You can edit path names depending on the needs of the callflow. For non-event paths, such as menu paths, you can also edit other options.
Consider the callflow shown in the graphic below:
You can do the following to configure the "yes" menu option path:
- Click on the "yes" path name in the callflow to view its properties.
- Depending on whether you asked the caller to respond by voice or DTMF, or both, you must complete one or both of the following:
- Recognition Phrases – Add phrases that the caller might say in answer to the menu question. Add a carriage return after each phrase.
- DTMF – Enter the digit that the caller must press to access this menu option.
- Click Update.
You can also apply the following settings to a menu option path:
| Setting
|
Description
|
| Recognition Weighting
|
Select the weighting to apply to the phrases you entered in the Recognition Phrases textbox. For example, consider you are configuring the callflow for a hospital that specializes in neurology, but it also has a minor nephrology department. Two possible paths from the preceding Menu block are "neurology" and "nephrology". If you might want to assign a higher weighting to the "neurology" path, because that's what most callers will choose, then assign a higher weight rating to the "neurology" path and a lower weight rating to the "nephrology" path.
|
| Confirmation Mode
|
Specify whether you want the system to confirm with the caller that the phrase or option collected is the correct one. Default confirmation prompts are inherited from the main application, but you can use this option to choose specifically for this menu option. You can choose:
- Never confirm - Callers never have to confirm their choice.
- Always confirm - Callers must always confirm their choice, regardless of the confidence score for speech recognition.
- Confirm if necessary - Callers only confirm their choice if their response falls below the high confidence threshold, but above the low threshold, for voice recognition.
Important You must set a confirmation prompt for Always confirm and Confirm if necessary. All the other confirmation prompts, such as confirmation retry prompt, are inherited from the main application. |
Prompts
[+] Click to show section
Prompts can be found in Menu, Message, or Phone blocks. You can play prompts using either TTS (Text To Speech) or pre-recorded audio files. Prompts always give precedence to uploaded audio files over TTS text. However, GAAP retains the TTS text so you can easily switch back and forth between TTS and pre-recorded audio, without having to re-type the TTS or re-upload the sound file.
Tip
If you use pre-recorded audio files, Genesys recommends that you also enter equivalent TTS text so system users can easily read the prompts and quickly identify issues when troubleshooting.
Variables and playback of dynamic data
You can add variables to your prompts using square-bracket notation. Variables are containers for storing data, and they are replaced with real data when the application executes. For example, consider the following prompt: "Your current balance is [currency:PaymentBalance]." When the application executes, the variable [currency:PaymentBalance] is replaced with the caller's payment balance value.
GAAP uses variable data in several locations. Pre-built modules can use them, such as in the payment balance example above, or they can be returned by web services, or set manually in Script blocks.
Every variable has a name and a formatter. The formatter indicates which sort of value the variable represents (for example: a digit, a date, or a currency).
GAAP sources variable data from several locations. Some pre-built modules create variable data automatically, whereas others are returned by web services and can be set manually in Script blocks.
The following variable formatters are available:
| Variable formatter
|
Description
|
| [var:myvariable]
|
Plays the value of myvariable as regular TTS.
|
| [digits:myvariable]
|
Plays the value of myvariable as a series of digits.
|
| [letters:myvariable]
|
Plays the value of myvariable as a series of letters.
|
- [currency:myvariable]
- [money:myvariable]
|
Plays the value of myvariable as units of money. The variable value must be formatted accordingly, such as GBP12.44 or EUR3.90, which is read out as "twelve pounds and forty four pence" or "three euro and ninety cents", respectively. You can also also provide negative amounts, such as GBP-12.44, which is read out as "twelve pounds and forty four pence in credit." The "in credit" portion refers to a standard prompt defined at the application level.
|
| [date:myvariable]
|
Plays the value of myvariable as a date. Values must be formatted as yyyy-mm-dd. For example, 2010-01-31 is read out as "the thirty-first of January, twenty-ten." You can omit part or all of the year (??10-01-31) to read out only a portion of the value. For example, to only say "the thirty-first of January", use ????-01-31.
|
| [time:myvariable]
|
Plays the value of myvariable as time. Values must be formatted as hh-mm. For example, a value of 13:59 is read out as "one fifty nine p m."
|
| [ccexpiry:myvariable]
|
Plays the value of myvariable in a manner consistent with credit card expiry dates. The value must be formatted in one of the following ways:
- mm/yy
- mm/yyyy
- mmm/yy
- mmm/yyyy
Important The format mmm refers to a three-letter month name, such as jan for January. |
| [pause]
|
Inserts a pause. You can control the pause length by including a duration in milliseconds, such as [pause:500]. The default pause duration is 750.
|
| [prompt:myvariable]
|
Plays the value of myvariable as an audio prompt. The value can be a string that points to the name of a prompt in the Prompt List tab, such as 0034 or Standard timeout apology prompt. If the value does not match an existing prompt reference, it create a temporary one and uses the variable value as both the name of a WAV file and as the fallback TTS.
|
| [prompt:myvariable;fallback tts]
|
Plays the value of myvariable as an audio prompt. The value can be a string that points to the name of a prompt in the Prompt List tab, such as 0034 or Standard timeout apology prompt. If the value does not match an existing prompt reference, it create a temporary one and uses the variable value as both the name of a WAV file and as the fallback TTS. Alternatively, you can add a semi-colon and some fallback TTS text to be used in case the WAV file does not exist.
Important If no variable called myvariable exists, it uses the actual string myvariable. For example, assume a variable exists called Manufacturer with the value Acme. If you use [prompt:Manufacturer], GAAP tries to use an audio file in the company's resources folder called Acme.wav. If the audio does not exist, it plays the word "Acme" using TTS. Alternatively, you can use [prompt:Manufacturer;an American manufacturer] in the same way, but if the file does not exist then GAAP uses TTS to say "an American manufacturer".
|
IS THIS PERSONAS?
Uploading concatenated prompt recordings
You can upload a set of audio files (in a single ZIP file) that deal with the playback of dynamic information such as digit strings, currency amounts, dates, and more. These prompts are shared across a company's applications. The server attempts to use these recordings for prompts, falling back to TTS if necessary.
GAAP ships with '"Basic'" and "'Full'" pre-defined sets of audio files. You can replace the files within these sets. The '"Basic'" file contains every file you need to play back dynamic data. The '"Full'" version sounds more natural because it uses longer sequences of strings as opposed to individual numbers and letters.
For example, there is a single recording for "sixty-one pounds" in the Full version, whereas the Basic version reads this out separately as three separate recordings: "sixty", "one", "pounds".
The Full prompt set also contains different intonations for strings. Any file name which ends in final or f is read as if it is at the end of a phrase/sentence, and any file ending in medial or m is read as if in the middle of a phrase/sentence.
As mentioned previously, you can replace the files within the Basic and Full prompt sets. To do so, you must copy and paste the new file(s) into the existing Basic of Full ZIP file. You then use the CPR Prompts tab (described below) to upload the updated ZIP file.
Important
- All of the prompts in the CPR Prompt list must be in the Basic and Full ZIP files. An error displays if a file is absent, or if you include a file that is not in the prompt list.
- Contact your Genesys representative for a recommendation of which prompts you might want to re-record.
Prompt List
GAAP enables you to easily make and test changes to audio files by calling the test number. You can also generate a Prompt List that you can send to the studio for recording. This list is generated based on the Prompt Ref labels seen under each prompt. If the studio labels its recordings based on the Prompt Ref labels, you can upload the audio files to the system and GAAP automatically updates the prompts according to the Prompt Ref labels.
To generate a Prompt List, go to the Prompt List tab Manage Prompts in the top-right corner.
Important
Standard prompts for transfers, confirmations, and more are automatically set up in the main application. These are used throughout any sub-modules linked to the main application. You can change these prompts using the
Prompt List tab.
Tips for writing prompts
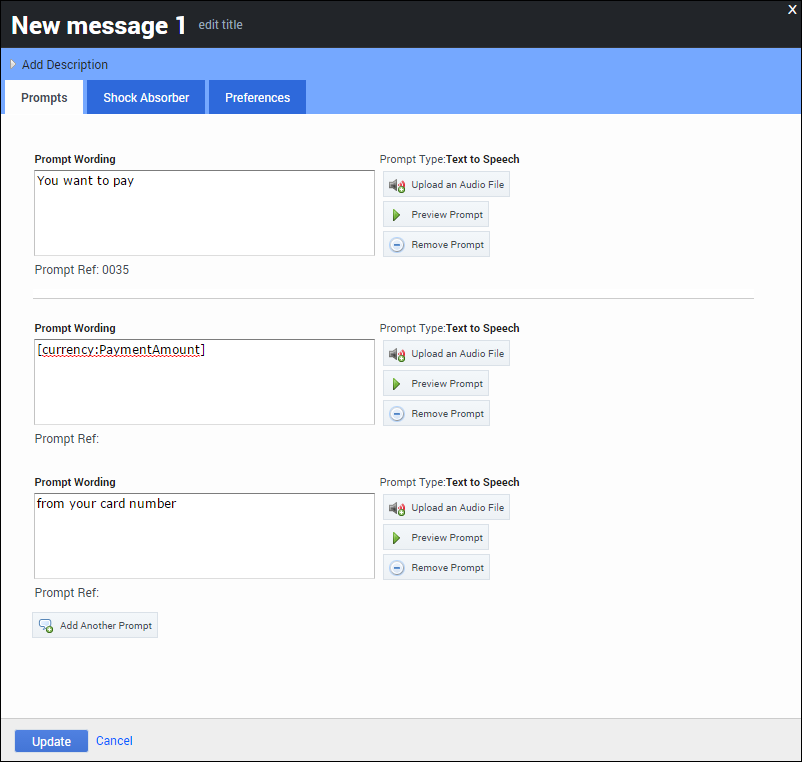
- You can add prompts in chunks, as shown below, to play back dynamic information (such as an address) in the middle of other prompts. Or, you can upload an audio file for the first section of the prompt and use TTS for the second.
- Always click Preview Prompt after you enter a TTS prompt to confirm the speech engine reads the prompt correctly. If the speech engine has difficulty pronouncing a word, try spelling the word phonetically.
- Ensure your menu options are in logical order. Group similar options together and place the most common ones near the top.
- When providing menu options, keep your prompt list as short as possible. Generally, three to five items are sufficient. If necessary, you can use a hierarchy, but ensure it's only two or three levels deep. If you have more than that, callers might become confused, unengaged, and frustrated.
- Put the DTMF option after the name of the person or department.
- Incorrect
- Press 1 for Sales
- Correct
- For Sales, Press 1
- Callers listen for their destination first, then how to get there. If you play the DTMF option first, callers are not as likely to associate the option with the department.
- Use consistent phrasing for menu options.
- Incorrect
- For Sales press 1. To reach the Service department, press 2.
- Correct
- For Sales, press 1. For Service, press 2.
- Use consistent ordering of nouns and verbs to avoid confusing the caller.
- Incorrect
- Which would you like: Sales, Faults, or Check an Order?
- Correct
- Which would you like: Sales, Faults, or Order Updates? (nouns only)
- Correct
- What do you want to do: buy something, report a fault, or check an order? (verb then noun)
Configuring standard prompts
You can view a list of standard prompts in the Prompt List tab, under the Other Prompts section. GAAP uses these default apology and confirmation prompts throughout your application. You can update these prompts as required by your business needs.
You can define the following standard prompts in your application and also have these prompts used in a sub-module.
| Prompt Name
|
Example Wording
|
Further Information
|
| Apology Prompts
|
| Standard apology nomatch prompt
|
Sorry, I didn't get that.
|
Played if the caller input is not recognized as part of the active grammar during collection. This is followed by a retry prompt.
|
| Standard apology timeout prompt
|
Sorry, I didn't hear you.
|
Played if the system receives no input from the caller. The timeout value is configured using the Before beginning of speech timeout parameter in Preferences. This is followed by a retry prompt.
|
| Standard apology wrong confirm prompt
|
My mistake.
|
Played if the caller specifies that the confirmation prompt played by the system is incorrect. This is followed by a retry prompt.
|
| Confirmation Prompts
|
| Standard confirmation help prompt
|
Help! I need to know if I got it correctly. Please say yes or no.
|
Played to the caller if they invoke the global "help" command while being asked to confirm an answer.
|
| Standard confirmation initial prompt 1
|
I think you said
|
Confirmation prompts are used to confirm that the system has correctly recognized the answer provided by the caller. The value as recognized by the system will be played between prompt 1 and prompt 2.
|
| Standard confirmation initial prompt 2
|
, is that correct?
|
| Standard confirmation retry prompt
|
Sorry, please say yes or no.
|
Played to the caller to confirm an option if the application thought the caller said something other than "yes" or "no" (or an active default menu option, such as "agent") during a confirmation step.
|
| Standard confirmation timeout prompt
|
Sorry, I didn't hear you. Please say yes or no.
|
Played to the caller if the system times out because the caller has either not provided an answer, or the input provided does not match anything in the grammar.
|
| Currency Prompts
|
| Standard negative currency prefix prompt
|
|
Played when playing back a negative currency (for example, GBP-12.45, or "prefix twelve pounds and forty five pence suffix", which translates as "twelve pounds and forty five pence in credit."
|
| Recovery Prompts
|
| Standard recovery prompt
|
I'm having trouble understanding you. If you want to try answering the question again press 1. Or, to speak with an advisor press 2.
|
This prompt is used as a method of returning the caller to the main menu to allow them to attempt the call again, therefore avoiding the failure path.
Important Contact your Genesys representative if you want to use Recovery Mode but your callflow does not have a standard recovery prompt. |
Configuring global commands and paths
[+] Click to show section
A global command refers to the commands often given by a caller during a call, such as:
- "back".
- "help".
- "repeat".
You enable global commands from your main application, using the Enable standard menu options option in Preferences.
The synonyms and weights for the commands are controlled by the following callflow preference settings:
- Standard ‘back’/‘help’/‘repeat’ menu option DTMF.
- Standard ‘back’/‘help’/‘repeat’ menu option synonyms.
- Standard ‘back’/‘help’/‘repeat’ menu option weight.
Configuring default behavior
Each callflow has a special type of block called Defaults. To view this block, click Show default behaviour at the top right-hand-side of the page.
You can attach paths from this block to your main application. These paths act as global behaviors throughout the application callflow and any sub-modules called from the main application. For example, you can configure what happens when the caller says "agent" during any part of a call.
In your main application, you typically include default paths for the following events:
- error.
- recognition failure.
- busy.
- no answer.
- agent.
For example, in the scenario shown below, this is what happens if the caller encounters an error during the call:
- The error path executes.
- The Error message block plays a message, such as "Sorry, there is a technical problem. You are being transferred to an agent."
- The call transfers to an agent.
You can also change default callflow preferences by clicking the Defaults block.
Understanding settings inheritance
Applications and modules inherit settings in the following order:
- Callflow preferences.
- Path and menu options.
Callflow preference inheritance
Callflow preferences are inherited in the following order:
- Current block.
- Current module defaults.
- Calling module defaults.
- Main application defaults.
- Current server settings page.
Understanding the inheritance order enables you to set useful defaults in your main application but override them in specific situations for a particular sub-module or block. For example, you might set the Maximum retry count at 1 in the main application but use a higher value for a particular Question block in a sub-module that asks a complex question that often takes callers a few attempts to answer. You might also have a particular "Yes/No" question within that sub-module that says, "If you don't know the answer just stay silent." To do so, set the Maximum no input count value to 0 for that specific Menu block.
Path and menu option inheritance
Paths and menu option settings are inherited in the following order:
- Current block.
- Current module defaults.
- Calling module defaults.
- Main application defaults.
Setting callflow preferences
[+] Click to show section
The Preferences tab in each block dialog box allows you to apply specific rules as to how a call is handled.
Important
- A block inherits settings from the application default preferences, or from the module to which it belongs (if this is not an application module). However, specific preferences set within a block take precedence over the default preferences.
- For more information on the inheritance of Preferences, refer to Section 6.4.1, ‘Callflow Preference Inheritance’ on page 38.
- An asterisk appears beside the Preferences tab label to indicate that preferences have been set up for that block.
The following table explains how to use the basic preferences:
| Name
|
Explanation
|
Example/Notes
|
Typical Value(s)
|
| ASR Language
|
Select the language for the speech recognizer to use to identify speech.
|
Select en-gb for British English.
|
|
| Before beginning of speech timeout
|
The time, in milliseconds, after which the system times out if no input is received from the caller. The timer starts counting after the prompt has finished playing. This triggers the standard apology timeout prompt, followed by a timeout prompt.
|
The number of times the timeout prompt plays to the caller is determined by the Maximum no input count parameter. If this limit is reached, GAAP transfers the caller somewhere else.
|
The default value is 5000 milliseconds.
|
| Collection barge-in
|
Specify whether callers can interrupt an announcement that is being played to them in order to collect information.
|
For example, you might set up the initial prompt in a callflow to ask the caller to select a department. If you enable this option, the caller can make the selection before the prompt finishes.
|
This option is often enabled for IVR applications, especially when long announcements are used and it is not necessary for a caller to hear all of the options.
|
| Confirmation barge-in
|
Specify whether callers can interrupt a confirmation announcement.
|
A confirmation announcement asks callers to confirm information gathered by the system is correct. For example, you might ask the caller to specify his or her full address, and GAAP plays back this information to confirm it was recognized correctly.
|
Enable this option for efficiency and speed of use. However, consider areas within the application in which this must be disabled (such as confirmation of a PIN number).
|
| Collection high confidence threshold & Collection low confidence threshold
|
Specify the upper and lower threshold, from 0.0 to 1.0, to evaluate the quality of the caller’s input during speech recognition. The speech-recognition engine generates this confidence score as an indicator of how closely the caller's utterance matches the phrases specified in the grammar. GAAP can initiate a confirmation or retry prompt if the score falls below the Collection low confidence threshold.
|
The speech-recognition engine awards a high confidence score when the application receives non-ambiguous input. In this case, the application usually accepts the response and continue on. However, if the caller's utterance is assigned a confidence score between the high and low thresholds set, GAAP can ask for confirmation ("Is this correct?").
Important You can set a menu option to Always confirm to confirm inputs regardless of the value set in the Collection high confidence threshold. |
Set these values depending on the type of information collected. For example, if the application asks the caller for feedback on the IVR experience, you can set a low value for the Collection high confidence threshold as it's not imperative that this information is verified. However, if the application asks for a credit card number, a high threshold can be used to ensure the information is correct.
|
| DTMF complete timeout
|
The time, in milliseconds, after which the system times out after the caller has stopped entering information in response to a DTMF question.
|
You might ask the caller to enter a five-digit account number. If this option is set to 0, the system proceeds to the next stage without delay after five digits have been collected.
|
You might set a low value to avoid a long pause after the last digit is entered.
|
| DTMF inter-digit timeout
|
The amount of time, in milliseconds, the system waits between each DTMF input character before interpreting the DTMF string.
|
You might ask the caller to enter a 16-digit credit card number, but the caller only enters 15 digits by mistake. GAAP waits the specified number of milliseconds before timing out and prompting the caller to re-enter the number.
|
This depends on the complexity of the question the caller was asked. For example, if you asked the caller to "press 1 for accounts and 2 for sales", no inter-digit time delay is required. However, with requests for longer, more complex information, you might want to give the caller extra time to finish entering digits.
|
| DTMF termination character
|
If specified, this is the DTMF character you want the caller to press when he or she has finished entering DTMF information. This termination character indicates the input is finished (for example #). You must inform callers to use this character in all prompts that require DTMF input. For example: "Please enter your 16-digit credit card number, followed by the # key."
Important If the caller does not press the terminating character, GAAP waits for the value you specified for DTMF complete timeout before accepting the input. Therefore, if you are using a termination character, you must increase the DTMF complete timeout value. |
If you want the caller to enter a five-digit account number, but you do not want a time delay after the caller has finished, you can ask the caller to enter the number, followed by the # key. This way, the system is sure the caller has finished entering data.
|
This depends on the nature of the data requested from the caller. If you are asking the caller to press one digit, a termination character might not be necessary. However, if you ask the caller to provide a string of digits, such as a credit card number, you might want to use a termination character.
|
| Input mode(s)
|
Specify which input modes to enable.
- DTMF
- Voice
- DTMF and Voice.
|
You can use DTMF to collect information relating to significant numbers, such as credit card numbers and account IDs. You might also want to use speech recognition at times when DTMF is not feasible (for example, asking the customer for a full postal address).
|
You might want to turn off voice recognition if you are expecting the caller to be calling from a noisy environment.
|
| Maximum help count
|
Specify the maximum number of times a caller can ask for help during a single Menu or Question block before they are rerouted.
|
You might want to route the caller to an agent if he or she asks for help several times during a call.
|
The default value is 2.
|
| Maximum no input count
|
The maximum number of times a retry prompt plays to a caller if no caller input is received. At this point the call transfers somewhere else.
|
If a caller finds a particular question to be confusing, he or she might not provide any feedback. If this option is set, the call routes to another number, such as an agent.
|
The default value is 2.
|
| Maximum recognition timeout
|
The maximum amount of time the system wait for the speech-recognition engine to recognize an utterance after it has detected speech. If this time is exceeded, you can initiate a retry prompt.
|
For example, if the caller is talking in a noisy environment, he or she might stop talking but the speech-recognition engine might think the caller is still speaking. This setting allows you to allocate a set amount of time for the engine to analyze the input.
|
This value depends on the type of question you have asked the caller. If you anticipate a complicated answer, give the speech-recognition engine a longer time to interpret the response.
|
| Maximum recording timeout
|
The maximum length of time to allow a caller to make a recording. This option is only relevant to Recording blocks.
|
GAAP can detect when the caller is speaking (without speech recognition) and continues onto the next block when the caller stops speaking. However, if the background noise is too loud, GAAP might confuse this with speech. Therefore, this parameter sets the absolute maximum time the recording can last.
|
This value depends on the type of question you have asked the caller. If you have asked an open-ended question, you must ensure that you leave enough time for the caller to give a proper answer. If you anticipate the answer to be short, a quicker timeout can be set. However, if you set a higher value, the caller might stop speaking after 10 seconds but GAAP hears noise on the line and thinks the caller is still talking.
|
| Maximum retry count
|
The maximum number of retries you want to allow a caller. A retry might be necessary if a digit entered was not recognized during a DTMF response, or if a low confidence is calculated by the speech-recognition engine during a spoken response.
|
You might ask the caller to enter an account number using the keypad. In this case, you might want to allow at least one retry in case digits are entered incorrectly. However, if you ask the caller to speak an account number, you might want to allow more than one retry in case speech recognition is more complicated.
|
This value depends on the difficulty of what you are asking the caller. The more difficult the question, the more retries you might allow. However, too many retry attempts might frustrate the caller. You can also ensure your retry prompt acknowledges the difficulty the caller might be experiencing.
|
| Recognition complete timeout
|
The length of silence, in milliseconds, after which the system times out after the caller provides an answer that matches something in the grammar.
|
If the caller provides a recognized response and then stops talking, this value specifies how long to wait before proceeding. However, if the response is not recognized in the grammar, the Recognition incomplete timeout parameter determines how long the system waits before timing out.
|
The longer the expected utterance is, the larger this value should be. This timeout setting can be set to the same value (or slightly shorter than) the Recognition incomplete timeout value. For example:
- "yes/no" question – 500
- menus – 1000
- speaking credit card numbers – 3000
This could be followed up by a confirmation prompt, depending on the confidence score attained by the caller’s answer.
|
| Recognition incomplete timeout
|
The length of silence, in milliseconds, after which the system times out if the caller stops talking but has not yet mentioned any required words or phrases.
|
For example, if a caller pauses in the middle of providing an answer, GAAP cannot match the utterance against the grammar. If the caller does not continue, GAAP waits the specified number of milliseconds before timing out. This value gives the caller time to provide the final piece of the answer.
|
This value should scale according with the expected length of the utterance. This timeout is normally followed by a retry prompt.
|
| Recording complete timeout
|
The amount of time to wait, in milliseconds, after a caller provides a recorded response to when GAAP accepts the recording and continues to the next block. This option is only relevant to Recording blocks.
|
If you have asked the caller for feedback during a questionnaire, you might want to set an amount of time to wait before proceeding to the next block after he or she has finished answering. This wait gives the caller time to think of whether there is anything else to add.
|
This value depends on the nature of the question. If it is an open-ended question, you might want to set this value higher in case the caller decides there is more to add. However, if it is a straight-forward answer that is only expected to have a one- or two-word response, you might want to set a lower value.
|
| Recovery mode enabled
|
Specifies whether or not recovery mode is enabled. Recovery mode uses Recovery prompts to return the caller to the start of the current question, allowing them to attempt the question again and avoid the failure path.
|
An example prompt might be: "I’m having problems understanding your response. Do you want to try again or speak to an agent?" A response of "Try again" returns the caller to the main menu.
|
This option is disabled by default.
|
| Sensitivity
|
Set the speech-recognition engine's sensitivity to noise during input recognition. The value entered must be between 0.0 (least sensitive to noise) and 1.0 (highly sensitive to quiet input). Thus, if you set the property to a low value, the recognizer is less sensitive to noise, but the user must speak more loudly in order to be recognized.
|
You can set the sensitivity level above 0.5 if you expect the majority of your callers to be in a quiet environment, such as their own home. However, set this value below 0.5 if you expect callers to be in a noisy environment, such a busy workplace.
|
The default value is 0.5. If you adjust this value, do so using small increments or decrements, one day or week at a time, to ensure the adjustment does not have a detrimental effect on your customers.
|
| Transfer timeout
|
The time, in seconds, to wait before a call exits with a result of no answer. If there are several phone numbers provisioned, this is the maximum time to wait for each one before timing out.
|
If you ask the caller to select a department, and no one in the department answers and no voicemail is available, the GAAP waits for the timeout before routing the caller to the receptionist to allow them to leave a message.
|
Choose a value that allows people a reasonable amount of time to answer the call – but not too long that the caller loses patience.
|
Important
- Contact Genesys for information on advanced preferences not mentioned in the table above.
- If a call exceeds maximum values specified in these parameters (apart from Maximum recording timeout), the block exits with a result of recognition failure. This usually results in the call being routed to an agent, but this behavior can be overridden.
- Getting your timeout values right is key to making your application as pleasant to use as possible. Shorter timeouts mean a snappier response to the caller, but may also mean that the caller gets interrupted by the system before he or she finishes speaking.
- GAAP enables you to quickly make small, incremental changes to these parameters and deploy these changes to production. You can monitor the resulting statistics over time and, if no improvement is obvious (or it is detrimental), roll back the changes to the previous value/version. All this can be done without having to make software changes, do extensive release/testing cycles, or take the application offline.
Opening Hours Rules
[+] Click to show section
GAAP uses Opening Hours Rules throughout an application. These rules allow you to specify at which time and on which days a call can be transferred to a specific number. For example, you can apply an Opening Hours Rule to a Phone block to specify what happens if your company is closed:
- Click the Opening Hours tab.
- Click Create a New Rule.
- Enter a name in the Rule Name field.
- In the Weekday Opening Hours section, specify which days of the week that your office is open. For each day, select either Open, Closed, or Timed. If you select Timed, specify the opening hours on that day.
- In the Special Dates section, specify special dates when the usual opening hours do not apply. For example, you can add New Year's Day and select Closed for status.
- In the Actions section, specify what you want to happen if the call occurs outside of the opening hours. Select one of the following options from the Suggested Action If Closed drop-down list:
- Transfer – Transfers the call to another telephone number. You can add several numbers, using a comma-separated list. The system moves on to the next number in the list until the call is answered, or until a no answer event.
- End the call – Ends the call and returns a system hangup result.
- Other – Specify another event to trigger (for example, main menu).
In Out of hours prompt, enter TTS text or upload an audio file to play to callers if they ring outside of opening hours.
- Click Save.
Deploying to Production
[+] Click to show section
After you make changes to a callflow, you can use GAAP to simultaneously deploy a complete IVR application and its associated sub-modules to your production environment, with the new callflows being applied to the very next call. You do not need to stop and restart GAAP to deploy changes. Any calls already in progress will be completed using the original callflow.
You can test changes before you deploy them to production. GAAP provides you with both a test IVR number and a production IVR number. The latter is used for the handling of live customer calls, while the test IVR number allows you to test applications before deploying them to production. You can test changes made to an application by dialling into the test IVR number, therefore enabling you to experience exactly how the application will perform in live operation.
After deployment, you can roll back the changes to a previous configuration. GAAP maintains a record of each new configuration with the option to retrieve a previous deployed configuration and use it as the basis for further configuration changes. For example, you might apply specific changes to the IVR to cope with changes in demand profile during a holiday period. Once this period has ended, the pre-holiday version of the IVR can be re-deployed as the basis for further changes.
To deploy an application:
- Perform one of the following options:
- In the Callflow Editor, click the Deploy to Production tab.
- In the Applications view, ensure Advanced Details is active and then click deploy now beside the application you want to deploy.
- Enter a description in the Reason for Deploying field. This description identifies the main change in this version of the application (for example, Updated welcome prompt wording).
- (Optional) Enable the Deploy this application's sub-modules as well to deploy the sub-modules linked to this Application.
Important
If you roll back an application, its associated sub-modules are not rolled back. You must roll back each sub-module individually.
- Click Deploy to Production Now.
The table at the bottom of the Deploy to Production tab lists all previous deployments, including the version currently in production. In the Actions column, you can choose:
- Delete - Delete a previous version of the application.
- Copy to Test Number - Copy this version to the test number so you can conduct tests. This will overwrite the current test version.
To roll back to a previous version:
- Click Copy to Test Number beside the version you want to restore.
- Click OK when asked if you want to overwrite the current test module.
- Place some test calls to ensure you are happy with the test version to which you have just rolled back.
- Repeat the steps to deploy an application.
Updating application or module details
Important
This section only applies to users with the role
Application Designer.
To update application or module details:
- In the Callflow Editor, click the Application Details or Module Details tab.
- Update the application or module name and description as needed.
- Click Save.
Deleting applications and modules
Important
This section only applies to users with the role
Application Designer.
To delete an application or module:
- Click Applications in the navigation bar.
- Click Advanced Details.
- Click delete beside the application or module that you want to delete.
When you delete an application or module, all accompanying data and prompts are also deleted.


