
Configuring Cassandra Security
You can follow this procedure to activate the JMX anonymous authentication and see your FS Cassandra nodes status in the FS UI.
Note: This feature is not available for versions anterior to 8.1.201.82.
- Edit the launcher.xml file and set the following parameters to true:
-Dcom.sun.management.jmxremote.authenticate=true - If missing, add the following parameter:
-Dcom.sun.management.jmxremote.password.file=./etc/jmxremote.password - Copy: jmxremote.password.template
from: /jdk_install_location/jre/lib/management/
to: <FS Installation directory>/etc/
then rename it: jmxremote.password - Edit the <FS Installation directory>/etc/jmxremote.password file to add the following username:
fsadmin yourpassword - Change the ownership of jmxremote.password to the user you run FS with and change permission to read only.
For Linux,
chown fsadmin:fsadmin <FS Installation directory>/etc/jmxremote.password
chmod 400 <FS Installation directory>/etc/jmxremote.password
For Windows, FLAT file system,
cacls <FS Installation directory>/etc/jmxremote.password /P fsadmin:R
or Follow
https://docs.oracle.com/javase/8/docs/technotes/guides/management/security-windows.html
- Enable read and write permission to the FS user /jdk_install_location/lib/management/jmxremote.access:
fsadmin readwrite
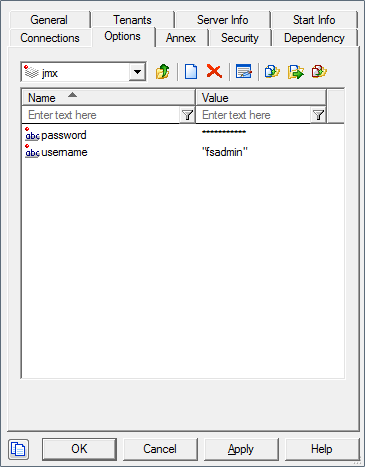
- Edit your FS configuration and create the following options in the Options tab:
Section jmx
username=fsadmin
password=yourpassword
- Start FS. You can see the status of the Cassandra nodes in:
http://<FS_HOST>:<PORT>/fs/admin#system/cassandra/FS_JMX_Security_cluster.pngCassandra JMX TLS
Cassandra monitoring and management can be done using a Java Management Extensions (JMX) tool. The JMX access must be protected to avoid any remote managing on the FS embedded Cassandra.
- To protect JMX access, edit the launcher.xml file and change the parameters as follows:
-
-Dcom.sun.management.jmxremote.port=9192
-Dcom.sun.management.jmxremote.ssl=true
-Dcom.sun.management.jmxremote.authenticate=true
-Dcom.sun.management.jmxremote.registry.ssl=true
- Set up Transport Layer Security (TLS). See Genesys Security Deployment Guide.
- Create keystore in <FS Installation directory>/etc/ and upload the custom-generated server certificates to keystore. See http://docs.oracle.com/javase/7/docs/technotes/guides/management/toc.html.
Note: If FS HTTPS is enabled already with a server certificate, same keystore and certificate can be used to secure JMX port also.
- Edit and configure the following JVM options in launcher.xml.
- /etc/keystore
- Type trust store password: <trust store password>
- ./etc/keystore
- Type keystore password: <keystore password>
- /etc/keystore
- Restart the FS to enable secure JMX connection with embedded Cassandra.
- To protect JMX access, edit the launcher.xml file and change the parameters as follows:

Comments or questions about this documentation? Contact us for support!