Contents
SMART Inbound Voice Routing Application
The SMART Inbound Voice Routing application is a baseline application designed to operate with multiple profiles that you can define and manage using Business Controls.
At a basic level, the SMART Inbound Voice Routing application works as follows:
- A customer calls your contact center.
- The application checks the defined business controls (hours of business, special days, and emergency flags) and plays a corresponding message.
- The customer selects an option from a menu, which the application then uses to route the call to an appropriate agent.
You can use the application "as is", with the default profile, or create and customize additional profiles to offer a unique experience for a particular customer segment or line of business.
The application package includes several Designer object resources, such as shared modules, data tables, and media resources. You can learn more about the resources that are used by the SMART application here.
Creating a new application profile
The application profiles are contained in the M1 Profiles data table. While the default profile can be used for many business scenarios, the SMART Inbound Voice Routing application is structured to let you quickly create new application profiles that can be customized for your own business needs.
Keep in mind that the new application profile can only support settings that are available for SMART-type applications. It's best if the new application serves a similar business purpose or requires a similar type of flow as the original baseline application.
To create a new application profile, add a new row to the M1 Profiles data table and configure the settings for each of the columns. To edit the data table, go to Business Controls > Data Tables and select the M1 Profiles data table for editing.
Here are some recommendations and guidelines:
Profile ID and Profile Name
These must be unique. The ID could be a line of business (LOB), department name, DNIS, or another unique value that has business significance (for example, don't use the department name as an ID if you are setting up more than one application profile for it). The profile name will be used for reporting purposes, so you should give it a name that distinguishes it from any other profiles.
HOOPS Service ID
If the profile shares HOOPS (Hours of Operation) checks with another profile, you can just reuse the same HOOPS row and specify the ID. If not, add a new HOOPS row to the M1 HOOPS Services data table and specify its ID.
IVR Menu Service ID
If offering a menu, specify its ID from the M1 IVR Menus table. If not, leave it blank.
Routing Service ID
Specify the ID of a Routing Service from the M1 Routing Services table to use if the IVR Menus do not specify a routing service.
Assuming the new application profile uses existing HOOPS, IVR Menus, and Routing Services, it is ready to go. But you will also need to change the application initialization logic to select this newly created profile based on your criteria.
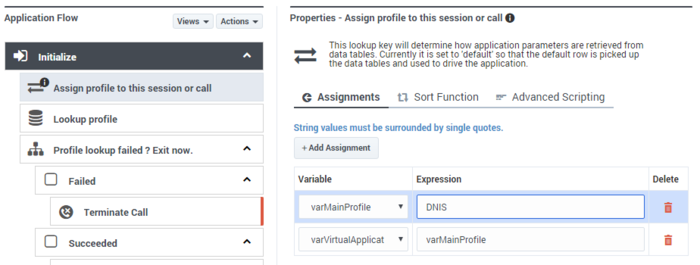
For example, if the profile ID is a DNIS, select the Assign profile to this session or call block and set varMainProfile = DNIS, as shown here:
For reporting purposes, in the Analytics dashboards, the application profiles are associated with the baseline SMART application, but each profile has reporting data associated with its assigned name.
To create a new menu service, go to Business Controls > Data Tables and select the M1 IVR Menus data table for editing.
Add a new row and specify the Menu Name, Menu Audio, and Menu Level. Set the other values according to how the menu will be used.
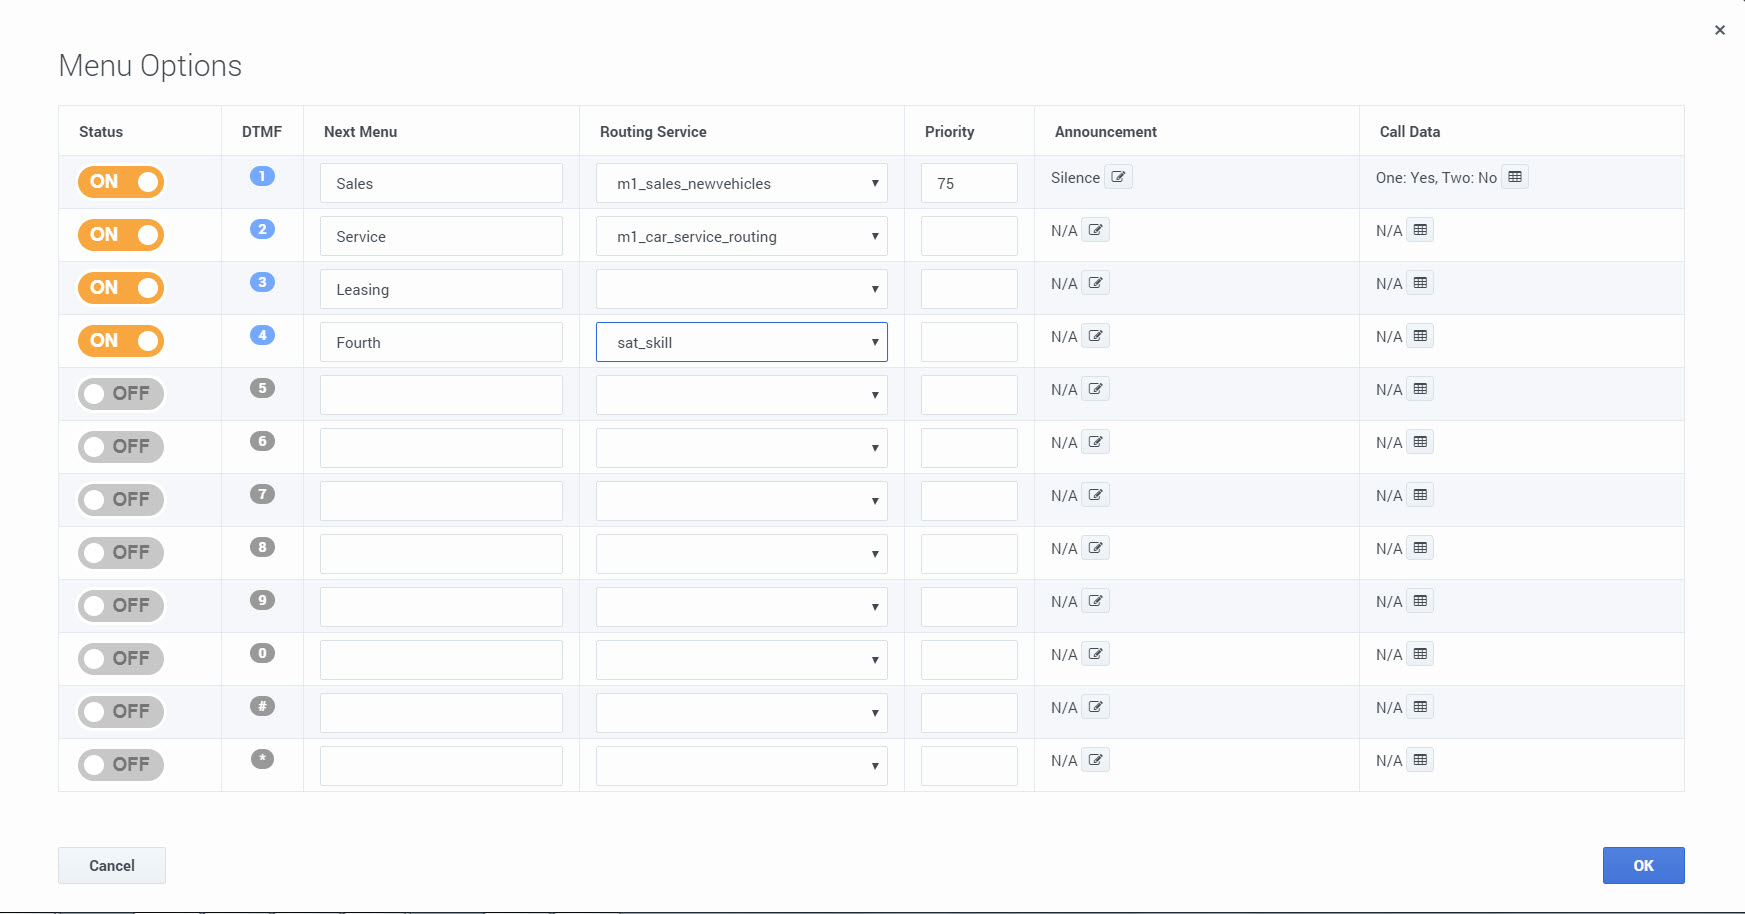
For example, if this menu is to be offered if the caller presses 2 from the first-level menu, you would set it up like this:
- In the first-level menu row, set Menu Options to use the new menu name. Let's say we've called it Leasing.
- In the example below, the Next Menu for DTMF option 3 has been set to Leasing, which becomes the second-level menu. If a caller presses 3 when the first-level menu is offered, they are offered the Leasing menu next.
- For this particular scenario, we don't want to specify a Routing Service for the Leasing option. If we do, the M1 IVR Menus module will end and the application will start routing the call according to the specified service. So it is left blank.
- All related menus must have the same IVR Service ID, so make sure that both the first-level menu option and the newly-defined second-level menu option have the same IVR Service ID value. Otherwise, they will not be treated as related menu levels.
Application resources
The following Designer objects are included as part of the SMART Inbound Voice Routing application package:
Application
- SMART M1
- This is the main application. The flow has been structured to provide some of the most common functions of a Designer application, such as calling modules to check for various conditions (like holidays or emergencies), offer self-service menus, and route calls to designated targets, while still allowing for some customization.
Shared modules are smaller application "chunks" that work with their related data tables to perform various functions within the main application, such as checking for certain conditions, offering menus, or routing calls.
- M1 HOOPS Checks
- Checks for various conditions that can trigger an early-exit from the application. For example, it checks if there is an emergency flag, a holiday, or if the call is outside the scheduled hours of operation.
- M1 IVR Menus
- Presents a series of menu choices to a caller and then routes the call according to how the caller responds.
- M1 Routing
- Used for routing a call to an intended target (such as a Skill Expression, Agent Group, or Direct Number).
Data Tables
Data tables contain data values that are used by the related modules and other application objects. You can edit the data tables directly to add or make changes to various options.
M1 Profiles
Each row in this data table is a profile that influences how the application behaves and processes the incoming call. You can think of a profile as being like a virtual application, as each application profile will handle calls in a different way. To add a new application profile, simply add a new row to this table (see Creating a new application profile).


