screen-recording.client.address
Section: interaction-workspace
Default Value: 127.0.0.1
Valid Values: String corresponding to the Screen Recording Client ip address or host name
Changes Take Effect: After the next platform configuration refresh interval.
Introduced: 9.0.000.31
Specifies the IP address or host name on which Screen Recording Client listens for credentials.
Deploying the Screen Recording Service
Contents
- 1 Deploying the Screen Recording Service
- 1.1 Prerequisites
- 1.2 Installation considerations
- 1.3 Screen Recording Service - operating systems
- 1.4 Recommended screen resolutions
- 1.5 Get your software
- 1.6 Installing your software for the first time
- 1.7 Verify the installation
- 1.8 Enable Screen Recording
- 1.9 Test the service and validate the installation
- 1.10 Upgrading the Screen Recording Service
- 1.11 Rollback to a previous version
- 1.12 Uninstalling the Screen Recording Service
Genesys Interaction Recording (GIR) requires that a Screen Recording Service (SRS) be installed on each Agent's desktop to enable the Agent to capture what is happening on the screen at the time of an active interaction.
The procedures on this page show how to download, install, configure and test the Screen Recording Service.
- For blended agents that are configured to support the handling of both voice and non-voice interactions, GIR will perform screen recording of voice interactions only.
- If the Screen Recording Service is restarted while a recording is in progress or when trying to close a recording, an extra vlc.exe process might be left running in the system. If this happens, use Task Manager to stop any remaining vlc.exe processes.
Prerequisites
The following list provides you with the requirements you need to successfully deploy the Screen Recording Service (SRS):
- Before you can install and use the SR Service on your desktop, you must have the following information ready at hand. Your IT department or Genesys Professional can help you get this information.
- Access to Workspace Web Edition (WWE) or Workspace Desktop Edition (WDE)
- The software (minimum version 8.5.302.10)
- When the Interaction Recording Web Services (or Web Services if you're using version 8.5.210.02 or earlier) server is deployed with a GoDaddy, without including the G2-to-G1 cross certificate (that is, the intermediate certificate), you must perform one of the following manual workarounds:
- Download the G2-to-G1 certificate from https://certs.godaddy.com/repository/gd_bundle-g2-g1.crt.
- Include the G2-to-G1 cross certificate in the server side certificate (concatenated with the server certificate).
- Import the G2-to-G1 cross certificate into the SYSTEM (Local Machine) Root CA certificate store.
- Verify that the client machine meets the following minimum specifications:
- Pentium Dual Core CPU
- 2 GB RAM (800 MB available for the SR Service)
- A minimum of 5 GB of available space (in total) for the SR Service installation and working space.
- When the Interaction Recording Web Services server (or Web Services if you are using version 8.5.210.02 or earlier) is deployed with a self-signed certificate, you must import the certificate to Trusted Root Certification Authorities for the current user (for example, My User account) and local agent's workstation (for example, Compute Account), from the Certificates Microsoft Management Console (MMC) snap-in .
- If you are running Bria 4 on Windows 7, you must enable Windows Aero. If you do not enable Windows Aero, the Screen Recording Service may fail to capture the Bria 4 application.
- Verify the client machine is synchronized to the same time as the machine on which Media Control Platform (MCP) is installed.
- Starting from version 8.5.500.19, the Microsoft Visual C++ 2015-2022 Redistributable (x64) must be installed on the machine.
Installation considerations
After verifying that your system meets the basic prerequisites, you should consider the following:
- The recommended installation procedure will install the Screen Recording Service's self-signed PFX certificates to the root certificates store. For more information, see Creating Self-Signed Certificates.
- When required use one of the following options to query the Screen Recording Service (SR Service) version:
- Run the following command line wmic datafile where name='C:\\<Installation Directory>\\GenesysServiceHandler.exe.
- Open the web browser and navigate to https://127.0.0.1/version if the SR Service is deployed with HTTPS enabled or http://127.0.0.1:8080/version if the SR Service is running as HTTP.
- Proxy support for outbound connections from SRS can be enabled either with or without authentication support.
- The parameters used to configure the SRS Proxy are available in Advanced configuration for the Screen Recording Service.
- When a proxy is used it may interfere with the SR Service operation. The SR Service runs as an HTTP server and relies on an incoming socket connection to correctly identify the agent's windows session. If the HTTP requests are forwarded by a proxy, the SR Service may not be able to correctly identify the user session in a multi-user environment. With a single user, the SR Service will rollback to the currently active windows session.
When a proxy is used it is recommended that localhost (127.0.0.1) connections be excluded from the proxy settings.
When the proxy is an internal system service (like an Antivirus\Firewall), it is recommended that the SRS related processes (SrsProcess.exe and GenesysServiceHandler.exe) be added to the security software exception\white list. - The Screen Recording Service can be used by a Citrix client. The following Citrix configurations are supported:
- Citrix XenApp 7.x or Citrix XenDesktop 7.x running under Windows Server 2019
- In a Citrix environment (for Genesys SR Service 8.5.230.23 and later), SRS only supports a single session per remote PC (Session Sharing is not supported).
- In a Citrix environment, Genesys recommends to configure the screen-recording.client.max-attempts parameter to 15 to avoid ping timeout from Workspace Web Edition (WWE) during upgrade, as upgrade usually takes longer duration in Citrix environment. For more information on the screen-recording.client.max-attempts parameter, see Integrating with Workspace Web Edition.
- In a Citrix environment (for Genesys SR Service 8.5.370.85 and later), the SR Service can be configured to work with Citrix's Virtual Loopback feature.
- Configure the authenticationHost parameter so that the SR Service uses a loopback IP address that is outside of the range being used by the Citrix Virtual Loopback Feature. See Advanced Configuration for the Screen Recording Service for more details on how to configure the authenticationHost parameter.
- If SRS is deployed on a Citrix VDA, you need to disable Citrix API hooks for vlc.exe by creating the following registry values. For more information, see
How to Disable Citrix API Hooks on a Per-application Basis.
- Keys:
- Value Name: ExcludedImageNames
- Type: REG_SZ
- Value: vlc.exe
HKEY_LOCAL_MACHINE\SOFTWARE\Citrix\CtxHook
HKEY_LOCAL_MACHINE\SOFTWARE\Wow6432Node\Citrix\CtxHook
HKEY_LOCAL_MACHINE\SOFTWARE\Wow6432Node\Citrix\CtxHook64 - If the IPv4 SRS authenticationHost parameter is configured to something other than 127.0.0.1, then use that IP address instead of 127.0.0.1 in the above URLs. See Advanced Configuration for the Screen Recording Service for more details.
- If the IPv4 SRS authenticationHost parameter is configured to something other than 127.0.0.1, and SRS is configured to use HTTPS, then use that IP address when creating self-signed certificates. See Creating Self-Signed Certificates to support IP Loopback Addresses other than 127.0.0.1 for more details.
- The SR Service can be used in a VMware Horizon environment. The following VMware Horizon configuration is supported:
- VMware Horizon 7 running under Windows Server 2019
- If you are using Workspace Web Edition or Workspace Desktop Edition and the SR Service with Genesys Softphone in a VDI environment (such as Citrix Xenapp), you must configure the screen-recording.client.address option to point to the SRS Loopback address.
Screen Recording Service - operating systems
The Screen Recording Service is supported on the following operating systems in a non-Citrix mode:
- Windows 10 (64-bit)
- Windows 11
The Screen Recording Service is supported on the following operating systems for Citrix support:
- Windows Server 2022
- Windows Server 2019
The Screen Recording Service is supported on the following operating system for VMware Horizon support:
- Windows Server 2022
- Windows Server 2019
Recommended screen resolutions
Genesys has tested the Screen Recording Service under the following recommended screen resolutions. If you use the Screen Recording Service on a computer with a different screen resolution than listed above, you should do a field validation of the Screen Recording Service in your setup to ensure that it is working properly. If you encounter unexpected results, Genesys recommends that you set your screen resolution to one of the recommended and tested resolutions listed below.
Single Monitor:
- 1024 x 768
- 1280 x 720
- 1600 x 1200
- 1920 x 1080
Dual Monitor:
- Side-by-side 1024 x 768 + 1024 x 768
- Side-by-side 1280 x 720 + 1280 x 720
- Side-by-side 1600 x 1200 + 1600 x 1200
- Side-by-side 1920 x 1080 + 1920 x 1080
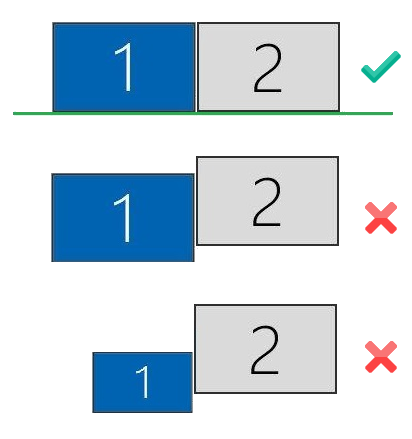
When using dual monitors, set both displays to the same resolution and arrange them side-by-side (not offset) in your display settings, as shown here:
Using dual monitors in a non-recommended configuration can result in errors.
Get your software
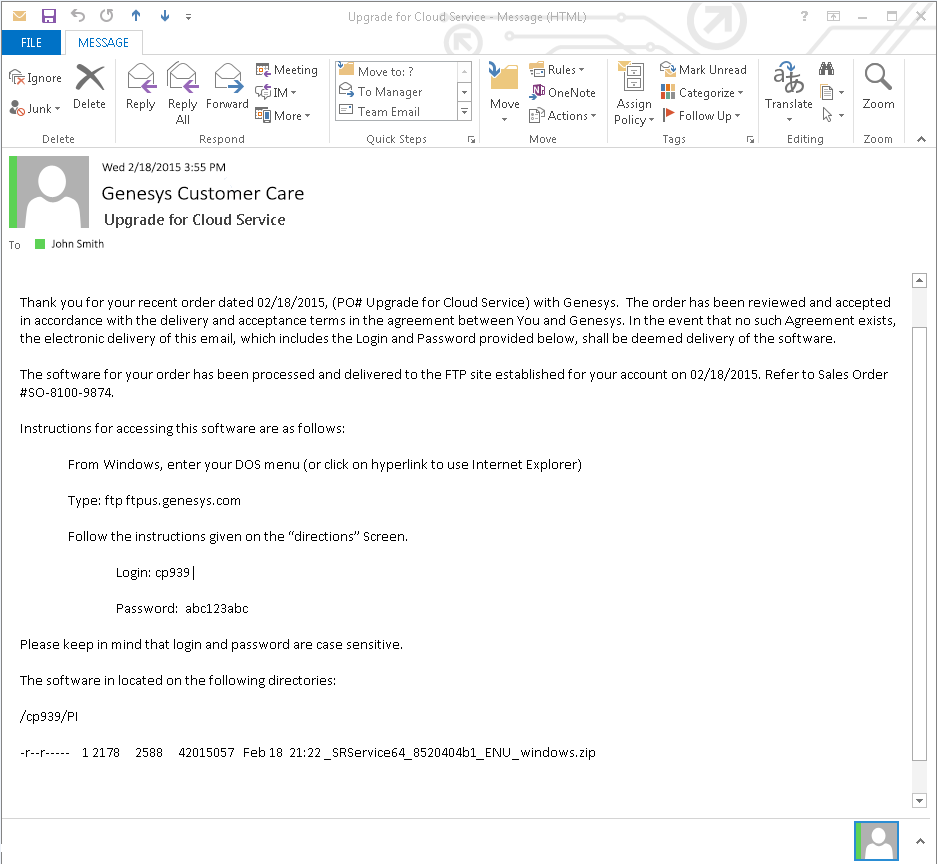
Find the email you received from Genesys with the details about your software (it will look similar to the example), and using your favorite FTP client—for example, Filezilla, connect with the credentials listed in the email.
Download the zipped file to a temporary folder on your computer.
Installing your software for the first time
There are two ways to install the SR Service by using:
- To install the Screen Recording Service you must have Administrator privileges.
- Firefox users must close the browser before installing the Screen Recording Service. If Firefox is open while Screen Recording Service is being installed, restart the browser after the installation is completed.
Installing the SR Service for the first time with the installation wizard
This installation procedure is for version 8.5.3 and later.
- Locate the setup.exe and double-click its icon. The installation wizard is activated.
- Select one of the following options and click Next:
- Standard: Installation will not collect the user’s input and proceeds with the default values.
- Advanced: Installation will collect the user’s input only for specific configuration parameters.
- Customized: Installation will collect the user’s input for all the required parameters.
Important- For SRS versions 8.5.345.24 and later, selecting the Standard mode of installation installs SRS in the HTTPS mode. For SRS versions below 8.5.345.24, this option installs SRS in the HTTP mode.
- The Use HTTPS self-signed certificates option is configurable only when the Advanced or Customized mode of installation is selected. When the Use HTTPS self-signed certificates option is selected, SRS uses the HTTPS mode. When this option is not selected, SRS uses the HTTP mode.
- If you select Use HTTPS self-signed certificates, you must also specify the following:
- Base URL for allowed Server Host Names: https://*.genesyscloud.com
- GWS Server URL: https://<server_name>:443
- Select Use an existing configuration file (optional) to copy the configuration of one machine, to all other installations of the SR Service on different machines in the same deployment. In the Location field, enter the location of the existing configuration file and click Next.
- Select Use HTTPS self-signed certificates (SRS uses HTTPS mode). Enter the Base URL for allowed Server Host Names and the GWS Server URL (see the note, above).
- For the Select Certificate Validation option, select one of the following options: Do Not Validate the certificate option, Validate the certificate using Windows certificate store, or Validate the certificate using self-signed certificate.
- Verify that the location in the Destination Folder, is the correct location (that is, the location where the SR Service will be installed) for the SR Service. If it is not the correct location, enter the correct location and click Next.
- Click Install, to complete the first time installation.
Installing the SR Service for the first time with the command prompt
- Open a command prompt, and type cd to change directories to the installation folder.
- At the prompt, enter the following command and press Enter:
setup.exe /s /z"-s '<C:\genesys_silent.ini>' -sl '<setup log file name>' -t '<setup wizard log file name>'"
For more information, refer to the Advanced Configuration for the Screen Recording Service section.
- Set the configured genesys_silent.ini file path in the command line. Use the absolute path for the input file parameters.
For example, run setup.exe /s /z"-s'c:\genesys_silent.ini' -sl 'c:\setup.log' -t'c:\setup_wizard.log'" - The genesys_silent.ini file must be configured when using command line silent installation and an unused parameter must be commented out in the genesys_silent.ini file. The standard genesys_silent.ini file is included with the installation package.
- The genesys_silent.ini file provides all possible configuration parameters along with a description of each.
- The file lists all the parameters with placeholders.
- Verify that the unused configuration parameters are either deleted or commented.
- Verify that the configuration file contains at least the following parameters:
[SRServer]
InstallationType=Standard
[IPCommon]
InstallPath=<Absolute path where the SRS needs to be installed>
[MaintMode]
Mode=FirstInstall
- For SRS versions 8.5.345.24 and later, HTTPS is used by default for the HTTP server within SRS. For the earlier versions of SRS, HTTP is used by default. To change this mode, you must use InstallationType=Advanced, CertificateValidation=UseWinCertStore and then set HTTPS=true or HTTPS=false.
- For additional security options, consult a Genesys Professional.
- During the installation process, the antivirus program may block the installation when the installation process detects that the antivirus program is attempting to make system changes. In this scenario, the user will have to unblock the installation program to continue the installation.
Verify the installation
Use Windows Explorer to locate the directory where you installed the software. For example, C:\Program Files (x86)\GCTI\Genesys SR Service \Logs\GSR. Once you see the folder is there, restart your computer to confirm that the service starts automatically.
To verify the version installed, browse to https://127.0.0.1/version or http://127.0.0.1:8080/version.
Enable Screen Recording
In addition to installing and configuring the Screen Recording Service, the agent desktop application must be configured appropriately to support screen recording, and screen recording must be enabled within Interaction Recording Web Services (or Web Services if you're using version 8.5.210.02 or earlier). For further details, refer to the Enable Screen Recording section.
Test the service and validate the installation
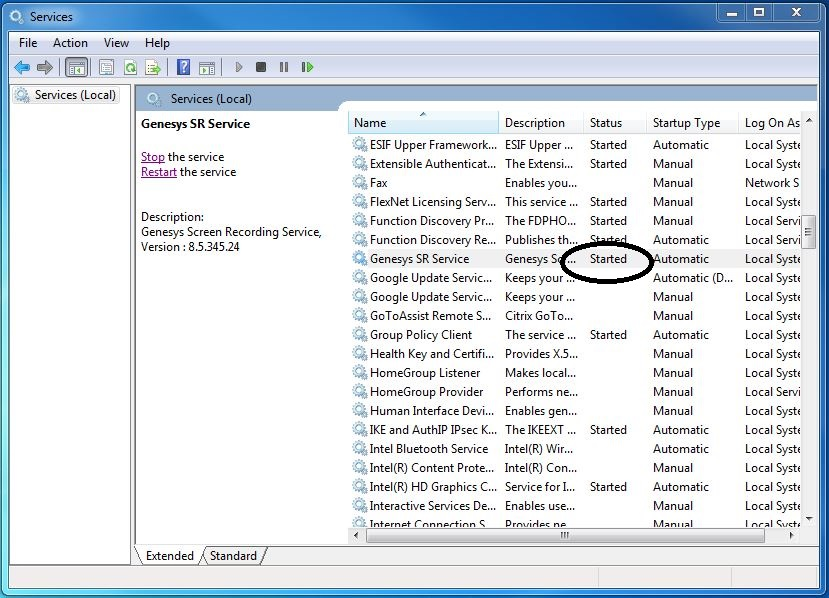
After installation, use Windows Services to confirm that the Genesys SR Service is ‘Started’. Check the startup log file as follows:
- Open the C:\Program Files (x86)\GCTI\Genesys SR Service
\Logs\GSR.log file, and make sure that something similar to the following lines are included (with the version reflecting the version you have just installed):
ServiceHandler: Running Version:8.5.230.23, IP:135.39.66.17, OS:win32 - Make sure that the C:\Program Files (x86)\GCTI\Genesys SR Service \Logs\GSR.log file contains no errors or exceptions.
- Use the agent desktop to login as an agent that has been configured to have their voice interactions recorded. When the recordingWhen parameter is not set to off, the screens will also be recorded when the Screen Recording Service is running. Once logged-in as an agent, request an inbound call to that agent, or use the agent desktop to initiate an outbound call (For example, to a cell phone). Keep the interaction active for 10-20 seconds, and then disconnect the call. Proceed with step 4 to review the log file.
- After the test, review the C:\Program Files (x86)\GCTI\Genesys SR Service \Logs\GSR.log for the following line: Uploader: Upload of file <file-name-of-media> was successful.
Upgrading the Screen Recording Service
Screen Recording Service can be upgraded manually or automatically. Both types of upgrades assume a functional existing deployment of Screen Recording Service. If the functionality of the existing deployment is in question, it is recommended to look for and stop the service, delete the previous installation folder and proceed as though this is the first time deploying the software. Contact your Genesys Professional if you are not sure if the software is working.
Manual upgrade from any version to 8.5.302.10
- Create a backup copy of the C:\Genesys\SRC directory and name the backup directory C:\Genesys\SRC.backup.
- Unzip your new software in a temporary directory (for example, C:\temp).
- Update the .ini file. Access the temporary directory and type the following command in a command prompt window:
setup.exe /s /z"-s '<genesys_silent.ini>' -sl '<setup log file name>' -t '<setup wizard log file name>'"
- Validate the upgrade using the steps in the Test the Service and Validate the Installation section above.
Manual Upgrade
- The following steps must be performed by a System Administrator.
- Before you upgrade to a newer Screen Recording Service version, check with your Genesys Professional about compatibility with your system.
- Copy the new SR Service software to a temporary directory.
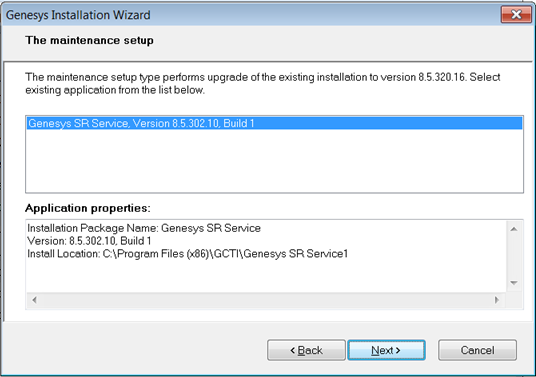
- Run the setup.exe. As shown in the following image, the setup process automatically detects the existing SR Service installation and selects it for upgradation.
- Click Next and follow the instructions provided in the Installing the SR Service for the first time with the installation wizard section above.
- Validate the upgrade using the steps in the Test the Service and Validate the Installation section.
Automatic Upgrade
- Upload the new SR Service software to the Web Server by copying the content in the IP folder to a location on your Web Server that does not require HTTP authorization. For example, https://<IP Address>/src/ip/setup.exe .
- Configure Genesys Framework to push a new SR Service version to the Agent's Desktop.
- Update the Interaction Recording Web Services (or Web Services if you're using version 8.5.210.02 or earlier) Cluster application object in the configuration database. On the Annex tab, edit the [screen-recording-client] section and add the parameters.[+] Show the table that describes the parameters.
Upgrading while using HTTPS with an IP address other than 127.0.0.1
When SR Service is upgraded, the self-signed HTTPS certificates are removed and new ones are generated and installed. The newly generated HTTPS certificates will be for the IP address 127.0.0.1. If the IPv4 SRS authenticationHost parameter (see Advanced Configuration for the Screen Recording Service for more details about the authenticationHost parameter) is configured to something other than 127.0.0.1, then the HTTPS certificates will not work.
To continue using HTTPS with an IP address other than 127.0.0.1, new HTTPS certificates must be generated. Follow the instructions in Creating Self-Signed Certificates to support Virtual Loopback Addresses to create and install new HTTPS certificates.
Rollback to a previous version
To rollback to a previous version of the Screen Recording Service:
- The SR Service only supports a manual rollback.
- Recordings captured but not uploaded will need to be manually moved to the upload folder of the active SRS directory after the rollback is complete.
- In the Task Manager, verify that Genesys SR Service is stopped. If it has not been stopped, stop it now.
- Copy the current C:\Program Files (x86)\GCTI\Genesys SR Service directory to a different folder. (For example: C:\Program Files (x86)\GCTI\Genesys SR Service.<date>). This directory contains recordings that have not yet been uploaded; it may be needed for subsequent troubleshooting purposes.
- Uninstall the existing SR Service installation.
- Install the previous SR Service version.
- Restart your computer or start the Genesys SR Service Windows service.
- Validate the rollback using the steps in the Verify the Installation section above.
Uninstalling the Screen Recording Service
- Open the Start menu and select Control Panel.
- Click Programs and Features.
- In the Name column, select the Screen Recording Service entry (for example, Genesys SR Service 8.5.xxx.yy), right click and select Uninstall.
The Screen Recording Service is uninstalled.


