Using Single Sign On (SSO)
Important
- This feature might not be available to all customers.
- The activity-based SLO feature is not supported. Therefore, use the saml_landingpage property in the gax.properties file to configure the logout URL.
- Once SSO is enabled and after logging into GAX, the Change Password link may not work. You can manage the user passwords in the IdP-based user account directory.
- For releases prior to 9.0.100.56, when configuring SSO for GAX where token-based authentication is used, if the name of the Configuration Server application object is different than confserv, add a new section with the name confserv under Application Options of the Configuration Server object and then copy the database-guid option with its value and paste it under the newly created confserv section. After this change, restart GAX.
- Token-based authentication must be enabled as described in Secure Communication with Configuration Server.
- If you are using GAX version 9.0.100.72 or above for SSO and prefer to use the below JKS parameters additionally, follow the procedure provided in Including Additional JKS Parameters for SSO to add them using root login and continue with the Enabling SSO procedure.
- saml_jkspassword
- saml_signingkeyname
- saml_signingkeypassword
You can set up Genesys Administrator Extension to use Single Sign On (SSO), so that users can use existing credentials (for example, a corporate login and password) to access GAX. When these users log out of GAX, they are simultaneously logged out of other SSO-supported applications.
GAX uses SAML2 to enable SSO.
By default, SSO is not enabled in GAX. To enable this feature, refer to the following procedure.
Enabling SSO
Procedure:
Steps
- On the host machine, open the GAX_HOME folder (the folder in which you installed GAX) and create a sub-folder called saml.
- Open the saml folder and create a sub-folder called sp.
- Access the metadata file from the IdP (identity provider).
Open the gax.properties in the GAX_HOME/conf folder and set the following values:- saml = true
- session_securecookies = true
- cookie_samesite = None
- Set the saml_idp_metadata option to one of the following:
- http://location—The web location of the IdP metadata file.
- filename—The path and file name of the IdP metadata file of the local machine.
- Perform one of the following to download the Service Provider metadata file from GAX:
- For GAX version 9.0.107.04 (or lower), use the following URL to download the metadata:
http://host:port/gax/saml/metadata, where host:port is the IP name and port number for the GAX installation. - For GAX version 9.0.108.03 (or higher), use the following URL to download the metadata:
http://host:port/gax/saml2/service-provider-metadata/default, where host:port is the IP name and port number for the GAX installation.
- For GAX version 9.0.107.04 (or lower), use the following URL to download the metadata:
- You must use the host name or IP address to access the metadata file. You cannot specify localhost.
- If you have already configured SSO and you are upgrading to GAX version 9.0.108.03 (or higher), do the SSO setup completely once again after the upgrade.
- Copy the downloaded metadata file, sp.xml, to the following folder on the host machine: GAX_HOME\saml\sp.
- Upload the sp.xml metadata file to the IdP server. The following is an example of a typical location on the IdP server: /home/ubuntu/idp/metadata/my_sp.xml.
- Log in to the IdP server and edit the conf/relying-party.xml file by adding the following metadata provider:
<metadata:MetadataProvider id="uniqueID" xsi:type="metadata:FilesystemMetadataProvider" metadataFile="/home/ubuntu/idp/metadata/my_sp.xml" maxRefreshDelay="P1D" />ImportantYou must use a unique ID for metadata:MetadataProvider id. - Restart the IdP server.
- On the host machine, edit the gax.properties file in the GAX_HOME folder and specify options for the following properties:
- saml=true
- saml_entityid—Your unique ID for IdP. This is the same ID specified in relying-party.xml.
- saml_idp_metadata=saml/idp-metadata.xml
- saml_landingpage—The SSO landing page.
- ImportantThe following options are not mandatory to enable SSO in GAX. However, if you prefer to use customized Java Keystore file instead of the default JKS, these options can be added to the gax.properties file.
- saml_jksfilelocation—The location/path of the custom Java KeyStore (.jks) file. If this is not configured, the JKS file in the classpath is used.
- saml_jkspassword—The custom KeyStore password. It is required when the saml_jksfilelocation option is set for a custom JKS file.
- saml_signingkeyname—The custom key file name. It is required when the saml_jksfilelocation option is set for a custom JKS file.
- saml_signingkeypassword—The custom key file password. It is recommended to set the same password as saml_jkspassword and it is an optional parameter.
- Restart GAX.
Important
Important
If SSO is enabled, but the metadata of the Service Provider (GAX) or IdP is incorrect, GAX logs the error and directs the user to the non-SAML login page.
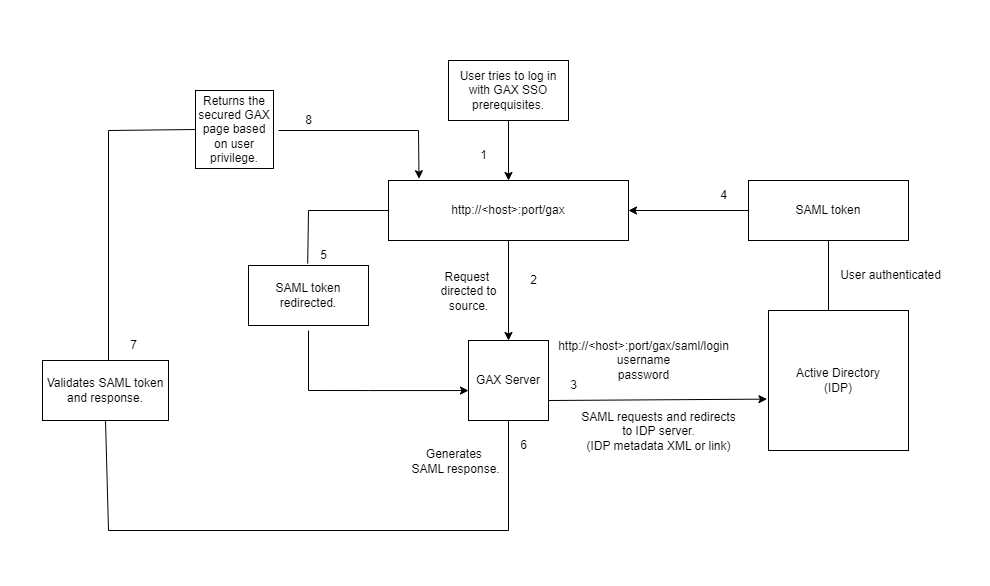
The following diagram shows how a user is authenticated with SSO in GAX.
This page was last edited on December 20, 2024, at 12:27.
Comments or questions about this documentation? Contact us for support!

