Contents
Create and Update Predictors
Predictors enable you to analyze various factors that might affect a specific metric. For example, you might check how the matching between customer and agent languages, ages, locations, customer's reason for making contact, and agent skills affect the NPS score. In addition to simple Predictors, you can also combine them to create composite Predictors that analyze multiple metrics.
Viewing Data on This Window
- To open the configuration menu, click the Settings gear icon, located on the right side of the top menu bar:
 .
. - A right-hand toggle navigation menu opens a tree view of all Datasets associated with your Account, with the Predictors and Models configured for each. To open or close this navigation menu, click the
 icon. Note that composite predictors do not appear in this tree view.
 - You must reload the page to view updates made using the Predictive Routing API, such as appending data to a Dataset, creating, updating, or deleting a Predictor, or creating, updating, or deleting a Model.
- The Tooltips, which appear when you hover over any ? icon, contain helpful explanatory information about the associated fields.
Creating a Predictor
The following series of procedures takes you through the steps required to create and configure a new Predictor.
Procedure: Begin to create a new Predictor
Purpose: To create a Predictor, which specifies a metric you plan to optimize and the agent and customer features you have found to have the strongest effect on that metric.Prerequisites
- You might want to run a Feature Analysis report before creating a Predictor. The Feature Analysis report can analyze which features in your dataset have the strongest impact on the value of a specific metric.
Steps
To start creating a Predictor:
- Select Predictor from the left-hand navigation bar and then click Add Predictor.
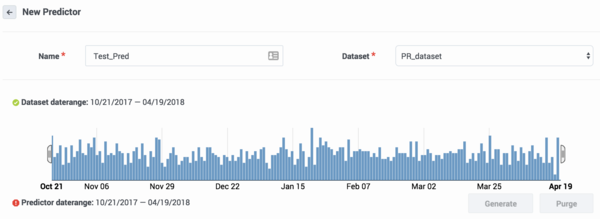
- Name your Predictor and select a Dataset from the drop-down menu. When you select a Dataset, the Dataset date range appears.
- Note: Predictor names can consist only of alphanumeric characters, and must start with a letter or underscore.
- Move the slider bars at either end of the date range to select the part of the Dataset you want the Predictor to evaluate.
Procedure: Select a metric and the Agent and Customer Identifiers
Steps
To continue Predictor configuration, perform the following steps:
- Select the metric for this Predictor. A Predictor can be associated with only one metric.
- Select the Agent identifier, which can be either Dataset generated or Agents.
- Dataset generated: Agent profile data is derived from the most up-to-date data captured in the Dataset used to create the current Predictor. Note that this Dataset must be synchronized for the latest data to be available for the Predictor.
- Agents: Agent profile data is taken from the Agent Profile schema. This is the typical production configuration.
- Select the Customer identifier, which can be either Customers or None.
- None: Customer and interaction data is gathered from attached data.
- Customers: Customer data is taken from both the Customer Profile schema and attached data. If both sources include data for a specific field, the value in the attached data is used. This is the typical production configuration.
- KPI Type: This field is reserved for future use. All users should accept the default type, which is Service.
- Optional. Enter an expression to be used for computing the final score returned by the scoring engine. You can construct the expression using arithmetic operations, Python 3 built-in functions, and discovered fields. To access the built-in functions, press the SHIFT+@ shortcut.
- Examples of ways to use this field:
- If URS has different scales for scoring, you can use this field to scale the returned score appropriately.
- You might need to translate the result returned from URS to correct the sort order. For instance, if customer_talk_duration is a target metric, agents with lower scores are actually better. So you might enter the score expression 1 / p_score, which produces an outcome such that higher predicted values are lower actual scores.
- For an in-depth discussion of how GPR handles metrics, see Understanding Score Expressions.
Procedure: Select the Agent ID and Actions Cutoff
Steps
To continue Predictor configuration, perform the following steps:
- Select the Agent ID from the drop-down menu. This is a unique employee identifier that is relevant for the type of metric you are evaluating.
- If Agents (the Agent Profile schema) has been selected as Agent Identifier, the Agent ID you select must be the same field as the ID_FIELD in the Agent Profile.
- Select the maximum number of best scores that will be returned when you make a scoring request to the API.
- ImportantThe maximum number of best scores is only relevant to the API, not to scoring requests sent using the Predictive Routing application.
Procedure: Choose Agent Features
Steps
Agent Features are items in the Dataset that refer to the agent. All agent-related fields in your selected Dataset appear in the drop-down list under Agent Features.
- Select an Agent Feature from the drop-down list. The type associated with it in the Dataset appears.
- Continue until you have selected the Agent Features you want to include in your Predictor.
- Optionally, you can create a new feature. A new feature must be based on existing features. When you create a new feature, you can add an expression, which enables you to perform some action on existing features and then use the result in your Predictor.
- Click Add New Feature.
- Type a name for your new feature and then select the type of value this feature returns: Boolean (the returned value is an either/or value, such as true/false), list (a list of the possible returned values), string, and so on.
- If you need to use a value from a different source than that initially added to the schema, toggle the Override control to on (toggle turns from gray to blue) for those features that should be updated at the time of scoring and then add an expression that tells GPR what value to use. For example, if you configured your Agent Profile schema with the CSAT captured in the AVG_CSAT column, but at runtime you want the value to be computed from other columns in the schema, turn on the Override control and enter the desired expression in the Expression field.
- To construct your expression, you can use arithmetical operators, Python 3 built-in functions, and fields accessed by the following shortcuts:
- SHIFT+@ - for Dataset fields
- SHIFT+# - for Profile fields
Procedure: Choose Customer Features
Steps
Customer Features are items that refer to the customer or that are available in interaction user data. They refer to aspects of the environment, broadly speaking, in which the interaction occurs. All customer- and userdata-related fields in your selected Dataset appear in the drop-down list under Customer Features.
- Select a Customer Feature from the drop-down list. The type associated with it in the Dataset appears.
- Continue until you have selected the customer features you want to include in your Predictor.
- Optionally, you can create a new feature. A new feature must be based on existing features. When you create a new feature, you can add an expression, which enables you to perform some action on existing features and then use the result in your Predictor.
- Click Add New Feature.
- Type a name for your new feature and then select the type of value this feature returns: Boolean (the returned value is an either/or value, such as true/false), list (a list of the possible returned values), string, and so on.
- If you need to use a value from a different source than that initially added to the schema, toggle the Override control to on (toggle turns from gray to blue) for those features that should be updated at the time of scoring and then add an expression that tells GPR what value to use. For example, if you configured your Customer Profile schema with the customer value status captured in the CUST_VALUE column, but at runtime you want the value to be computed from other columns in the schema, turn on the Override control and enter the desired expression in the Expression field.
- To construct your expression, you can use arithmetical operators, Python 3 built-in functions, and fields accessed by the following shortcuts:
- SHIFT+@ - for Dataset fields
- SHIFT+# - for Profile fields
Procedure: Create and generate your new Predictor
Steps
To finalize your Predictor configuration, save and generate it:
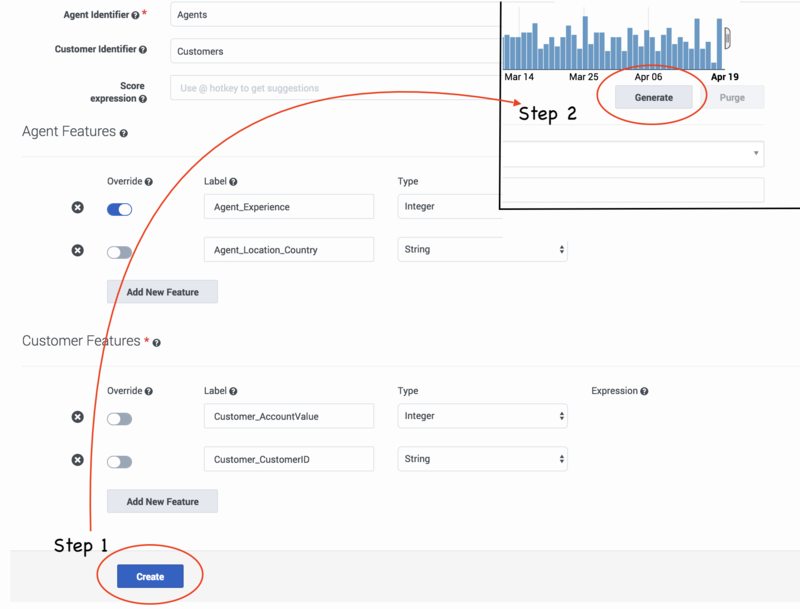
- Click Create to save your Predictor settings. You should receive a success pop-up window indicating that the Predictor has been created.
- Before you can train and activate Models, you must generate your Predictor. Scroll up to the daterange display on your Predictor configuration window, and then click Generate.
- Pop-up windows indicate the progress of the generate job.
Your new Predictor now appears in the list of Predictors, along with information about its status, such as the number of associated Models, when it was last run, and its quality.
Viewing and Updating Predictors
After you have created Predictors, use the following procedures to view and maintain them. It is important to ensure that your Predictors and Models stay up-to-date, so that they continue to address your most compelling business needs.
Procedure: View your Predictors
Steps
When you navigate to Settings > Predictors, the window shows a table listing all your existing Predictors. For each, the table shows what the following information:
- Name - The name given to the Predictor when it was created.
- Type - Whether the metric requires classification (binary) or regression analysis.
- Models - The number of Models created for the Predictor.
- Rows - The number of rows in the Dataset used to create the Predictor.
- Quality - The quality value displayed for the Predictor (AUC for classification metrics and RMSE for regression metrics) is the average of the results for each trained Model associated with that Predictor. Both active and inactive Models are included in the average, as long as they are trained.
- Metric - The metric that the Predictor is built to optimize.
- Last Run - The last time the Predictor was trained.
From this list you can do the following:
- Edit your Predictor, if you have not yet created and activated any Models created for it. See Update a Predictor (below) for details.
- Create or edit Models for the predictor. Click the name of a Predictor to open it, and then click Models to access the Model functionality.
- Delete a Predictor. Select the check box next to a Predictor name, and then click the trash can icon.
Procedure: View the Predictor Information Pane
Steps
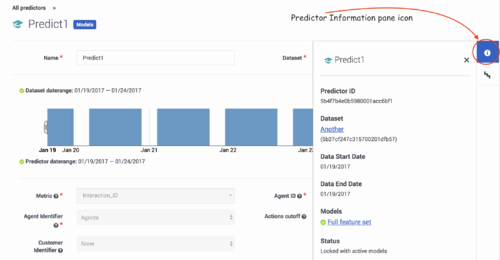
When you view the configuration data for a Predictor, the right-hand toggle Information pane icon becomes active. Click this button to view the following information:
- The Predictor ID, which you can use to make API requests affecting the Predictor.
- The Dataset upon which the Predictor is based.
- The start and end dates for the data on which the Predictor is based.
- The Model or Models created for this Predictor.
- The Predictor status.
Procedure: Update a Predictor
Steps
You can edit your Predictor unless you have created and activated one or more Models based on it. In that case, Genesys recommends that you create a new Predictor with the desired parameters.
You can change the Predictor date range, purge generated data, and re-generate your Predictor with a different date range at any time. However, already trained and activated Models continue to use data from the old daterange.
- Click Purge to change the date range in your Dataset used to generate new Models.
- Activated existing Models continue to use the same date range.
- Select the new date range, and then click Generate.
Pop-up windows indicate the progress of the purge and generate jobs.
Gather Updated Scoring Data Using Profile Look Ups
When you are using a Model to score agents, you can configure Predictive Routing to incorporate up-to-date data from the Agent Profile schema and/or the Customer Profile schema rather than the corresponding data from your Dataset.
For example, your Dataset might be three months old. As a result, various metrics might no longer reflect the actual conditions in your environment. For example, a metric such as agent tenure is now three months out of date. Agent performance scores for each virtual queue might have changed, because of factors such as changes in virtual queue assignments or training that might have improved an agent's performance.
To make use of the most recent available data, you override the use of the older data and enable Predictive Routing to look up the new values for key features.
Settings Required to Use Profile Lookups
To have Predictive Routing look up fresh values for specified fields, you must have the following:
- Agent Profile and Customer Profile schemas loaded and accepted.
- The Agent Identifier and Customer Identifier fields set to Agents and Customers, respectively.
How Profile Lookups Work
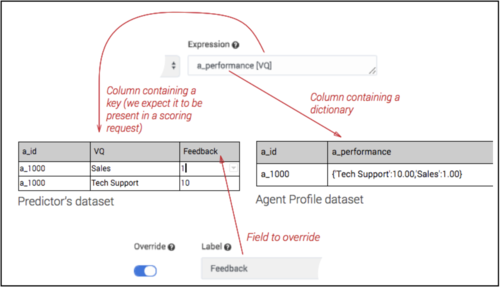
The image below shows a record in the Agent Profile schema that shows how to encode agent performance across different queues. The a_performance column contains a dictionary, consisting of two entries with the values Tech Support:10.00 and Sales:1.00, respectively.
- In the Predictor schema, the action feature—in this case, a_performance—must be defined in such a way as to allow it to be an expression, since its actual value is based on an Agent Profile lookup.
- Currently only one-dimensional dictionaries are supported, with up to 200 key-value pairs where the key is a string and the value is int, float, or Boolean.
Note that information from the Agent Profile schema is used only for scoring, not for Model training. When you are training a Model based on your Predictor Dataset, it uses the original profile data, but stores it in a flat (non-dictionary) format. This works well for training a Model, where what is needed is a complete and consistent set of data, which permits meaningful learning from these attributes while training a Global Model.
The following image shows a Dataset record encoding the same information as shown above, only in a flattened format:
Here the VQ columns contain the names of the virtual queues and the Feedback column contains the agent performance value for the associated virtual queue.
In the example we have been using, the Feedback column (feature) holds the historical data on the agent’s performance. To get the most recent value at run time, override this field so that it gets its value from the Agent Profile dataset rather than from the Predictor (training) Dataset. To do so, enable the Override toggle control next to the corresponding field and provide a lookup expression:
The Override toggle appears only beside fields that have a direct corresponding field in the Dataset. Once Override is toggled on, the expression field appears and you can enter an expression for looking up the associated value from the profile Dataset. Use the following shortcuts to open a suggestion list in the expression field:
- SHIFT+@ - for dataset fields
- SHIFT+# - for profile fields
The following graphic illustrates how the lookup expression maps to the different Datasets:
Now you can issue a scoring request and it looks up the associated value in the Profile Dataset. In this example, Predictive Routing looks up the value in the Agent Profile a_performance column using the VQ Key: Sales.
Composite Predictors
You can create composite Predictors by combining two or more simple Predictors—that is, standard Predictors such as those described in this topic so far. The composite is defined using an arithmetical function that works on the set of target metrics used in the selected simple Predictors. This enables you to score agents based on multiple metrics rather than just one.
The composite Predictor takes the scoring outcomes for each of the included Predictors and then applies the arithmetical expression you specify to those results. This composite result is then sent back to the routing strategy to be used when determining the best match between waiting interactions and available agents.
Example
Assume you have three agents with the following individual scores:
| Agent | Predicted NPS Score | Predicted CSAT Score |
|---|---|---|
| Agent 1 | 8 | 7 |
| Agent 2 | 8 | 8 |
| Agent 3 | 6 | 5 |
If you just use NPS to select the best agent, Agent 1 and Agent 2 appear equally likely to handle the interaction well. But if you want to maximize your CSAT as well, the additional parameter acts as a differentiator. The aggregated score for Agent 2 (16) is higher than that for Agent 1 (15).
- If a Predictor you include has multiple active Models associated with it, the Model used is determined in the same way as it normally is when you have multiple Models.
- The Lift Estimation report, which evaluates potential lift based on a specific Model, does not support composite Predictors. If you need to create a complex metric for use in the Lift Estimation report, see Creating Complex Metrics in Genesys Predictive Routing for guidance.
The advantage of starting with separate Predictors over pre-computing the final metric in a common Dataset is to maximize data usage. For example, you probably have much more data for talk duration than for NPS, which requires customers to take a survey. It is also easier to create the desired calculation when you combine individual, already-created metrics.
- Example 1:
- You might create a composite Predictor out of three simple ones by combining them. Target metrics contain only numeric or Boolean values, so that you can combine the outcome using basic arithmetic operations. Assuming that the target metrics for the respective Predictors are the following:
- Predictor1 - NPS
- Predictor2 - CSAT
- Predictor3 - TALK_DURATION
- You can write an expression such as the following:
- (Predictor1 + Predictor2) / Predictor3
- In this example, the agent score is (predicted NPS + predicted CSAT) / predicted talk duration. That means agents with higher NPS and CSAT get higher scores if call duration is lower. Agents with high NPS and CSAT scores that also have high talk durations are scored lower. As a result, you can take into account several aspects of agent performance when scoring.
- Example 2:
- You might use different simple Predictors depending on a context variable passed in a scoring request. You can create a composite Predictor that would use one simple Predictor for customers in a high-value category (value >= 50) and a different simple Predictor for lower-value customers (value <= 50). The idea is to offload this logic from the strategy into a Predictor to reduce the need to modify your strategy. To create such a Predictor, define the following expression for your composite Predictor:
- int(value > 50) * Predictor1 + int(value <= 50) * Predictor2
- The logic here is the following: the int(value > 50) function converts the Boolean value from true/false to 1/0. Whichever Predictor is multiplied by 0 is ignored and the remaining Predictor is used for routing.
Procedure: Create a composite Predictor
Steps
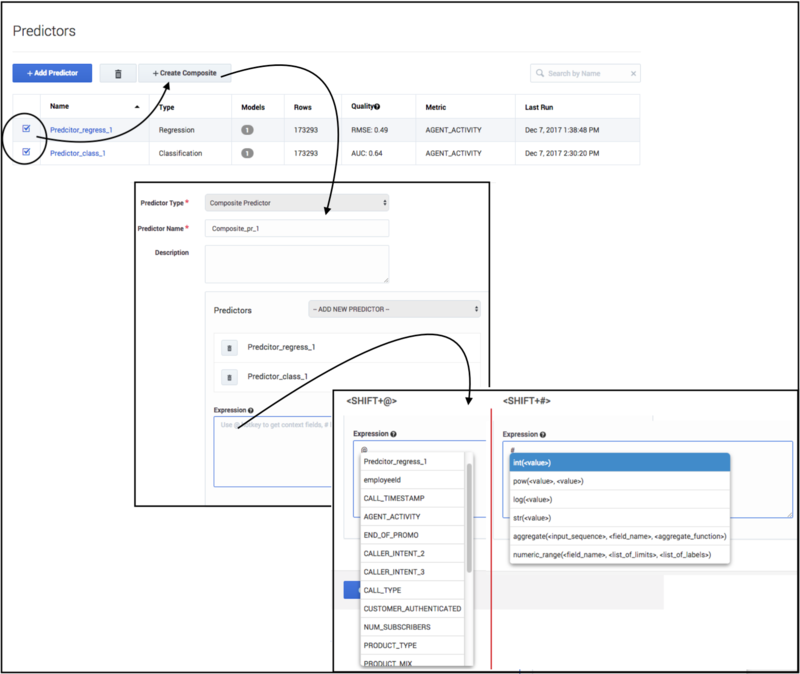
- Navigate to the Predictors list page in Settings.
- Select the check boxes next to at least two simple predictors. The Create Composite button appears. You must keep in mind the following constraints when selecting simple Predictors:
- All of the simple Predictors that are going to be used in a composite Predictor should have the Agent Identifier field set to Agents.
- The Agent ID field should be identical in all of the simple Predictors, and should be the same as that in the Agent Profile schema. For example, if in the Agent Profile schema the Agent ID is the Agent_Id field, the Agent ID in each Predictor must also be set to the Agent_Id field.
- Click Create Composite, which opens the Composite Predictor page, pre-populated with the Predictors you selected.
- Fill out the Expression field. This field is mandatory for composite Predictors.
- You can use a Suggestion menu triggered by the following keyboard shortcuts to configure your expression: [Shift + @] (to open context fields) or [Shift + #] (to open a list of functions). The menu lists only the applicable fields for a given composite Predictor, thus reducing the chance of error when composing an expression.
Your new composite Predictor now appears in the list of predictors. Note that information about Predictor status, such as the number of associated Models, when it was last run, and its quality, are available only for simple Predictors.

