Migrating Gplus Adapter for Salesforce
The Gplus Adapter for Salesforce is an integrated solution that enables Salesforce users to handle contact center interactions seamlessly within Salesforce. The adapter is part of the Genesys Gplus Adapters, which provide out-of-the-box, pre-packaged, and vendor-validated solutions that integrate Genesys’ Customer Experience Platform to the leading CRM solutions. The adapter is included in the Web Services and Applications installation package.
There are two deployment options available for the adapter:
- Gplus Adapter for Salesforce provides a smaller interface designed for Salesforce Classic, although it also works in Salesforce Console.
- Gplus Adapter for Salesforce - Workspace Web Edition provides the full Workspace Web Edition interface and is only available in the Salesforce Console.
If you would like to migrate to Gplus Adapter for Salesforce - Workspace Web Edition, follow this procedure:
- Log into Salesforce.com with your administrator credentials to open the Home page.
- Go to Setup.
- In the Quick Find field, type Call Center.
- Click Call Centers.
- Click Genesys Gplus for Salesforce.
- Click Clone.
- Enter the following values:
Parameter Value Internal Name Limited to 40 chars and the first character must be a letter Display Name Limited to 40 chars and the first character must be a letter CTI Adapter URL https://host:port/ui/crm-workspace/index.html Softphone Height Recommended: 325 Minimum: 300
Softphone Width Recommended: 850 Minimum: 500
- Click Save.
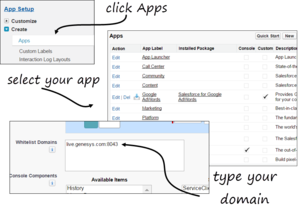
- Add your company domain where Web Services and Applications is installed to the whitelist.
- Click App Setup > Create > Apps.
- From the Apps list, click the application specific to your Salesforce deployment.
- Click Edit.
- Scroll down to the Whitelist Domains section, and then type your company domain. For example: live.genesys.com:8043
If you use the default port (443), you do not need to specify the port.
- Click Save.
Next steps
After you migrate your Gplus adapter, you must provision the call center with users. If you have a previous Salesforce Call Center, remove users from that Call Center and add the users to the new call center you just added.
Removing Multiple Users
To remove multiple users from a call center:
- Log into Salesforce with your administrator credentials to open the Home page.
- Click Setup, found under the User menu drop-down list, under your user name in the top right corner, to open the Force.com page.
- From the App Setup section on the left side of the screen, click Customize to open the customization options.
- Click Call Center to open the Call Center page.
- Click Manage Call Centers under the Call Center section.
- Click the name of the call center from which you want to remove the Salesforce user.
- In the Call Center Users section, click Manage Call Center Users.
- Select the Action check box next to each user you want to remove.
- Click Remove Users.
Adding Users
You can add new users to your Salesforce call center using the following steps:
- Log into Salesforce with your administrator credentials to open the Home page.
- Click Setup, found under the User menu drop-down list, under your user name in the top right corner to open the Force.com page.
- From the App Setup section on the left-hand side of the screen, click Customize to open the customization options.
- Click Call Center > Call Centers.
- Click the name of your contact center.
- In the Call Center Users section, click Manage Call Center Users. You can also access this button from the Call Center Edit screen, if you are editing your callcenter.xml file.
- Click Add More Users.
- Specify the search criteria to find the users who you want to assign to your call center. For example, you can search by the Last name field.
- Click Find to display the refined list of your search criteria.
- Select the check boxes for the users that you want to add.
- Click Add to Call Center.

