
Using the CMS to Work with Knowledge Bases
Overview
After logging in, you can use the Genesys Knowledge CMS to:
- Work with Knowledge Base (create, update, and delete knowledge bases)
- Work with Categories (assign categories to the documents in knowledge base)
- Work with Documents (create, update, and delete the contents of your knowledge bases by authoring questions and answers)
- Working with Multilingual Content
- Export Knowledge base to Knowledge Center Server
- Work with Customer Feedback
Relations between Knowledge Center Cluster and Knowledge Center CMS:
- Knowledge Base definitions can be created in CMS and exported in Knowledge Center Cluster
- A new Knowledge Base can be activated only using GAX plugin
- Configurable options (Name, Description, Custom fields, Languages, Channels, Skills) can be exported from CMS to Knowledge Center Server
- Deleting the Knowledge Base in Knowledge Center Server does not affect the CMS
- Data can be Exported or Synchronized from CMS to Knowledge Center Server
- Deleting an article from the CMS also deletes it from Knowledge Center Server (after Synchronization)
- Making changes in Knowledge Center Server does not affect CMS
- Deleting the Knowledge Base in the CMS does not affect Knowledge Center Server (documents or KB will be not deleted)
Logging Into the CMS
Prerequisites
- A user with CMS privileges has been created in Config Server.
Start
Enter your user name and password and press the Log In button.

End
Working with Knowledge Bases
Creating a New Knowledge Base
Prerequisites
- Knowledge.CMS.Administrator privileges have been assigned to the user.
Start
- Click the + sign on the main page.

The Create Knowledge Base window appears.
On the General tab:
- Enter the unique knowledge base ID (the ID should consist only of numbers, Latin letters and underscores, with a maximum length of 50 characters).
- Enter knowledge base name (maximum length of 50 characters).
- Enter the Document Type (FAQ or Article).
- (Optional) You can change the default icon assigned to the knowledge base.

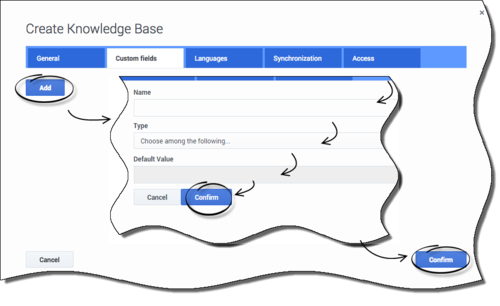
- To add custom fields, navigate to the Custom Fields tab and perform the following actions for each custom field:
- Press the Add button.
- Enter the unique name of the field (the name should consist only of numbers, Latin letters and underscores, with a maximum length of 50 characters).
- Choose the field type.
- Enter a default value, if you would like the field to have one.
- Press the Confirm button.
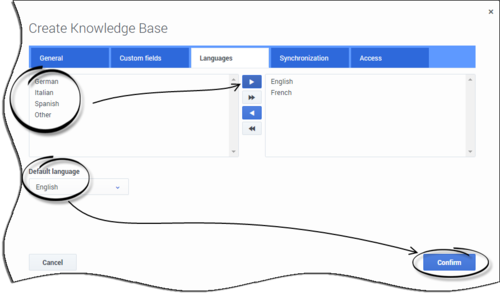
- To add supported languages to Knowledge Base:
- Click the Languages tab.
- Move appropriate languages to the Selected languages list.
- Select Default language from the list.
- Click the Confirm button.
 ImportantFor information about automatic synchronization, please see Setting up automatic synchronization
- Your knowledge base has been created.


End
Deleting a Knowledge Base
Prerequisites
- The knowledge base has been defined in the CMS.
- Knowledge.CMS.Administrator privileges have been assigned to the user.
Start
- Move your mouse over the appropriate knowledge base icon on the main page.
- Click Delete and confirm the action in the dialog box.

End
Editing a Knowledge Base Definition
Prerequisites
- The knowledge base has been defined in the CMS.
- Knowledge.CMS.Administrator privileges have been assigned to the user.
Start
- Move your mouse over the appropriate knowledge base icon on the main page.
- Click Edit.
- The Edit Knowledge Base window appears.

- Press Confirm to save your changes.

End
Defining Knowledge Base Availability
Use of skills provides the option of refining the the data that agents see when they interact with Knowledge Center. Agents will only have access to Knowledge Bases that best match their skills when availability is assigned.
Start
- Move your mouse over the appropriate knowledge base icon on the main page.
- Click Edit.
- The Edit Knowledge Base window appears.
- Click the Access tab.
- Select whether you would like knowledge base to be available for all of your agents or for only the agents that have one of the specified skills.
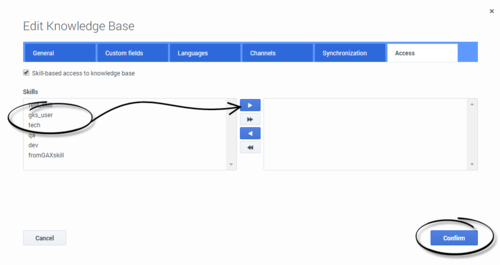
- Press Confirm to save your changes.

End
Importing Initial Documents
Prerequisites
- The knowledge base has been defined in the CMS.
- Knowledge.CMS.Document.Author or Knowledge.CMS.Category.Author privileges have been assigned to the user.
- Files being targeted for import are available in the appropriate format. For more information, please see Importing Data into the Knowledge Center Server
Start
- Move your mouse over the appropriate knowledge base icon on the main page.
- Click Import data.
- Choose Language of content
- Browse to the appropriate XML file.
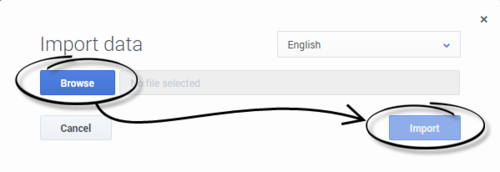
- Click Import; your data be will imported into the CMS.

End
Notify Knowledge Center Server about new Knowledge Base
Start
- Move your mouse over the appropriate knowledge base icon on the main page.
- Click Export config.
- The confirmation window appears asking you to confirm that you would like send the information about knowledge base to the Knowledge Center server.

- Click the Publish button.
ImportantContent of the knowledge base will not be sent to the knowledge center server at this step. The CMS will only notify Knowledge Center Server about the existence of the knowledge, its name, id, supported languages, custom fields and access policy. You can view and edit sent information in the Administrator Plugin.

End
Working with Categories
Creating a New Category
Prerequisites
- The knowledge base has been defined in the CMS.
- Knowledge.CMS.Category.Author privileges have been assigned to the user.
- No category has been selected.
Start
- Move your mouse over the appropriate knowledge base icon on the main page.
- Click Categories.
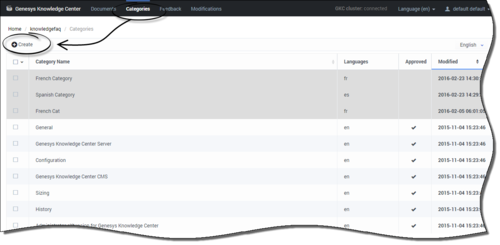
- Press the Create button.
- The Create Category window appears.
- Enter your category name.
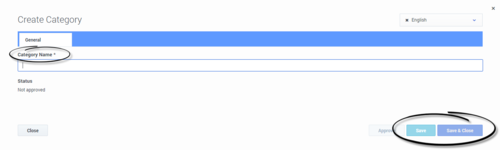
- Save your changes or cancel them, using the appropriate buttons.


End
Viewing or Modifying a Category
Prerequisites
- The knowledge base has been defined in the CMS.
- The category has already been created.
- Knowledge.CMS.Category.Author privileges have been assigned to the user.
Start
- Move your mouse over the appropriate knowledge base icon on the main page.
- Click Categories.
- Choose your category from the list and click the Edit button or double-click on the appropriate row.
- The Edit Category window appears.
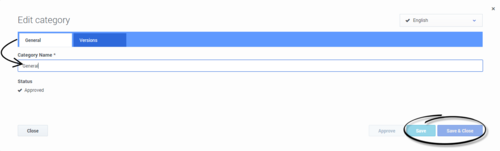
- View or browse through the category changes history (using the drop-down with versions) or make changes in the category name.
- Save your changes or cancel them, using the appropriate buttons.
- Every time you make a change, a new version of the category will be created and the new version of the formerly approved category will be given a state of not approved.

End
Deleting Categories
Prerequisites
- The knowledge base has been defined in the CMS.
- The category has already been created.
- Knowledge.CMS.Category.Author privileges have been assigned to the user.
- A connection to Genesys Knowledge Center is available.
Start
- Move your mouse over the appropriate knowledge base icon on the main page.
- Click Categories.
- Select one or more categories from the list.

- Click the Delete button.
- Confirm your action in the pop-up.

End
Approving Categories
Prerequisites
- The knowledge base has been defined in the CMS.
- The categories have already been created.
- Knowledge.CMS.Approver privileges have been assigned to the user.
Start
- Move your mouse over the appropriate knowledge base icon on the main page.
- Click Categories.
- Choose one or more categories from the list.
- Click the Approve button.
- Confirm your action in the pop-up.
End
Working with Documents
Creating a Document
Prerequisites
- The knowledge base has been defined in the CMS.
- The appropriate categories have been created.
- Knowledge.CMS.Document.Author privileges have been assigned to the user.
Start
- Move your mouse over the appropriate knowledge base icon on the main page.
- Click Documents; a list of documents appears.
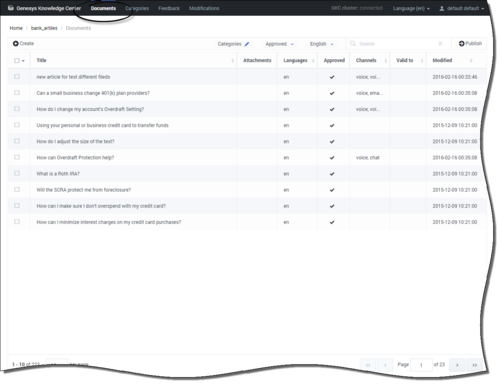
- Click the Create button; the Create Document window appears.
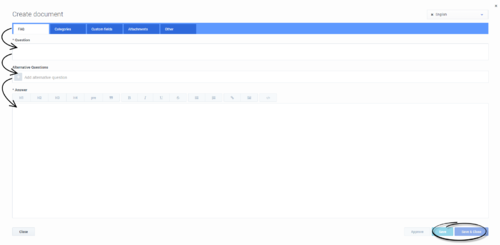
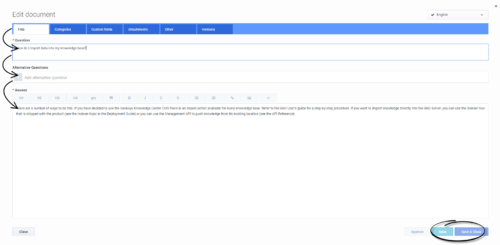
- Fill in the FAQ tab by adding Question and Answer (required) or Article tab by adding Title, Summary and Description (required). Add alternative wordings of the question or title (by pressing the + sign in the Alternative questions field). Links and images are permitted in the Answer and Description fields to aid in answer clarity.
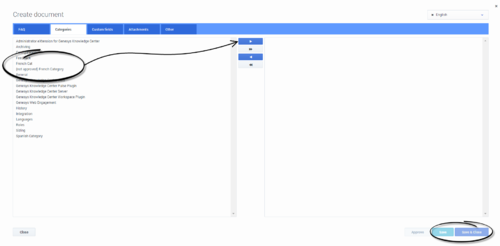
- Fill in the Categories tab by selecting the appropriate categories from the list on the left and moving them to the right.
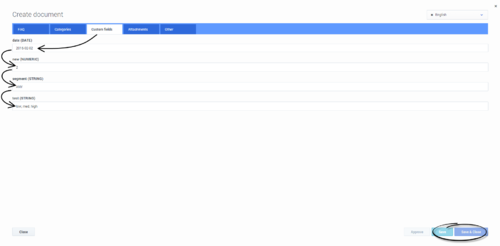
- Fill in the desired Custom fields values.
- Add Attachments by pressing the Add button and then the Upload button. To remove attachments, press the Remove button.
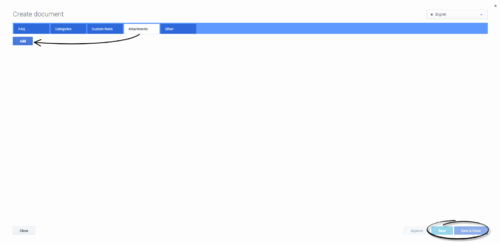 ImportantMaximum file size: 20 MB.
 - Fill in the Other tab as needed, including channel options which allows you to specify if a document is only for a specific channel type (for example, email only or chat only, or a combination of channels).
The channel option is important for the agent experience. If the email attribute is added to content, then only agents that are engaging over email conversations will see that content. The experience would be similar for Chat. By default content is accessible for all agents using any channel. If content is public, it will be viewable to the public, regardless of the channel.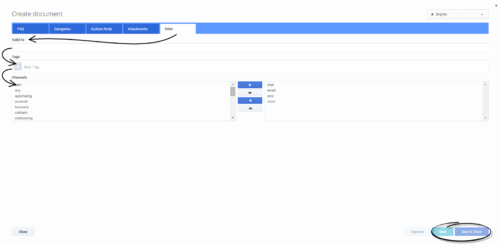 ImportantIf the content is publicly facing, it will always be visible to customers regardless of the channel attribute.
 - (Optional) Click on the Languages menu in the top right to create this document in multiple languages. For more information on Creating and editing documents in other languages, see Working with Multilingual Content.
- Save your changes or cancel them, using the appropriate buttons.


End
Viewing or Modifying a Document
Prerequisites
- The knowledge base has been defined in the CMS.
- The appropriate categories have been created.
- The Document has already been created.
- Knowledge.CMS.Document.Author privileges have been assigned to the user.
Start
- Move your mouse over the appropriate knowledge base icon on the main page.
- Click Documents; a list of documents appears.
- Choose a Document from the list and double-click the appropriate row.
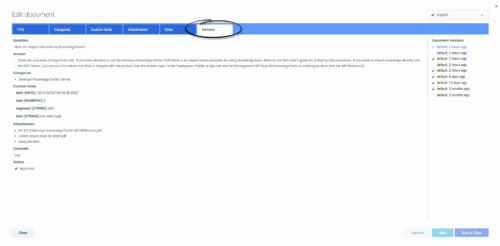
- View or browse through the category changes history (using the drop-down with versions), or make changes in the editor.
- Save your changes or cancel them, using the appropriate buttons.
- Every time you make a change, a new version of the document will be created and the new version of the formerly approved document will be given a state of not approved.


End
Deleting a Document
Prerequisites
- The knowledge base has been defined in the CMS.
- The Document has already been created.
- A connection to Genesys Knowledge Center is available.
- Knowledge.CMS.Document.Author privileges have been assigned to the user.
Start
- Move your mouse over the appropriate knowledge base icon on the main page.
- Click Documents.
- Select one or more Documents from the list.
- Click the Delete button.
- Confirm your action in the pop-up.


End
Approving Documents
Prerequisites
- The knowledge base has been defined in the CMS.
- The Document has already been created.
- Knowledge.CMS.Approver privileges have been assigned to the user.
Start
- Move your mouse over the appropriate knowledge base icon on the main page.
- Click Documents.
- Select one or more Documents from the list.
- Click the Approve button.
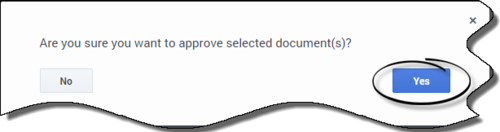
- Confirm your action in the pop-up.

End
Working with Multilingual Content
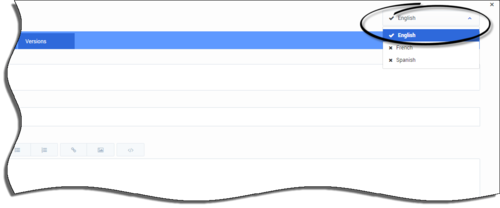
To review Knowledge Base content in different languages, simply select the appropriate language from the list located in the toolbar and the language selection displays a list of documents or categories in the selected language. If a document was not defined in the selected language, but was defined in another language, it is then grayed out.
Creating a new language version of a document
Prerequisites:
- If you are not currently in the document where you wish to add a new language, select the document from the list of documents and click Edit.
Start
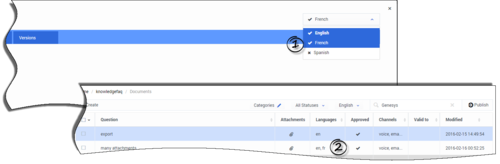
- From the Language list on the right, you can view a list of available languages. Languages with a check mark denote documents which are currently available. Languages with an X denote documents which are not yet created.
- Click on the specific language with an X to create the new document in that language.
- Update appropriate fields.
- Save changes.
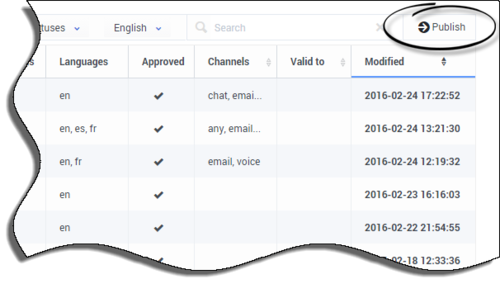
- Once approved, the language displays a check mark and its abbreviated form is now visible under the Languages column.


End
Publishing Knowledge base to Knowledge Center Server
Publishing selected documents
Prerequisites
- The knowledge base has been defined in the CMS.
- The categories have already been created and approved.
- Your Documents have been created and approved.
- A connection to Genesys Knowledge Center is available.
- Knowledge.CMS.Approver privileges have been assigned to the user.
- Knowledge.Author privileges have been assigned to the user.
Start
- Move your mouse over the appropriate knowledge base icon on the main page.
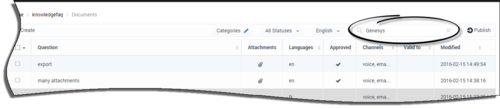
- Click Documents.
- Using the check boxes, select the document(s) you wish to publish or leave all documents unchecked to publish them all.
- Click the Publish button.
- All approved documents from the CMS are exported into Genesys Knowledge Center Server.

End
Setting up automatic synchronization
Start
- Move your mouse over the appropriate knowledge base icon on the main page.
- Click Edit.
- The Edit Knowledge Base window appears.
- Click the Synchronization tab.
- Click the Automatic synchronization box to turn it On.
- Choose the following options:
- attachment synchronization type
- list of languages to be synchronized
- set scheduling:
- One time - to synchronize once
- Daily - to synchronize every N hours
- Weekly - to synchronize on the defined days of weeek
- Monthly - to synchronize on defined days of month
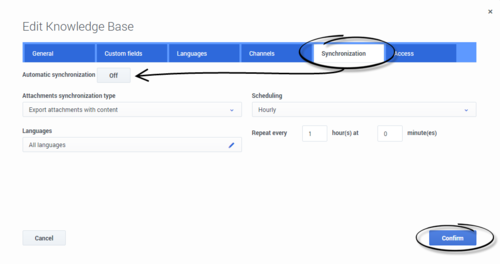
- Press Confirm to save your changes.

End
Synchronizing recent changes
Prerequisites
- A connection to the Knowledge Base must be available
- Knowledge.CMS.Approver privileges have been assigned to the user.
Start
- Move your mouse over the appropriate knowledge base icon on the main page.
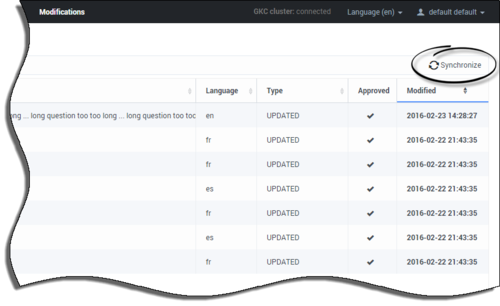
- Click Modifications from the side menu to see a list of documents that have been modified since the last synchronization.
- Click the Synchronize button.
- From the confirmation dialogue box, select the languages you wish to synchronize and click Synchronize.
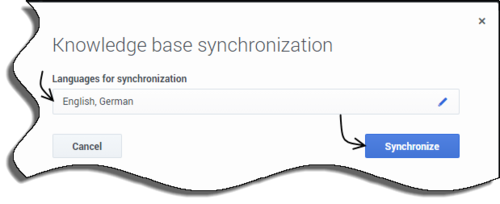
When the synchronization process completes, the list of modifications is then updated.


End
Working with Customer Feedback
Processing a "No answer" Item
Prerequisites
- The knowledge base has been defined in the CMS.
- A connection to Genesys Knowledge Center is available.
- Knowledge.CMS.Document.Author privileges have been assigned to the user.
- Knowledge.Author privileges have been assigned to the user.
Start
- Move your mouse over the appropriate knowledge base icon on the main page.
- Click Feedback.
- Choose the No answer tab.
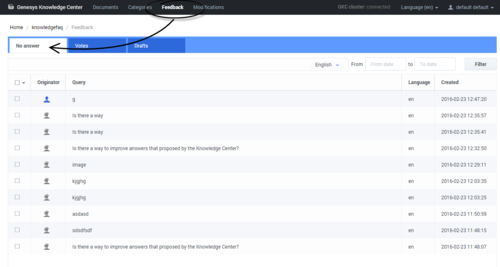
- Choose one or more items from the list.
- Process each item:
- Search for similar existing questions using the Search button.
- Click the Create document button and create a new document based on the No answer item.
- Delete unnecessary items using the Delete button.
- Search for similar existing questions using the Search button.


End
Processing Votes
Prerequisites
- The knowledge base has been defined in the CMS.
- A connection to Genesys Knowledge Center is available.
- Knowledge.CMS.Document.Author privileges have been assigned to the user.
Start
- Move your mouse over the appropriate knowledge base icon on the main page.
- Click Feedback.
- Choose the Votes tab.
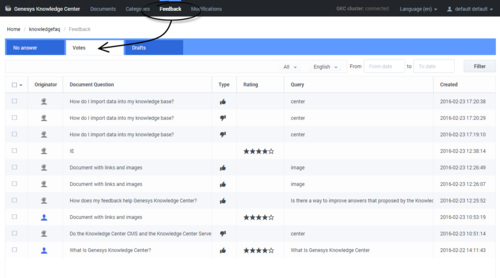
- Choose one or more items from the list.
- Process each item:
- Add a search query as an alternative question for the upvoted document using the Add as alternative button. Or Edit existing document. Or Create new document basing on search query.
- Delete appropriate items using the Delete button.
- Add a search query as an alternative question for the upvoted document using the Add as alternative button. Or Edit existing document. Or Create new document basing on search query.

End
Processing Drafts
Prerequisites
- The knowledge base has been defined in the CMS.
- A connection to Genesys Knowledge Center is available.
- Knowledge.CMS.Document.Author privileges have been assigned to the user.
Start
- Move your mouse over the appropriate knowledge base icon on the main page.
- Click Feedback.
- Choose the Drafts tab.
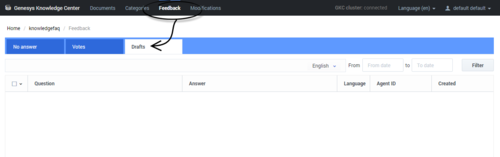
- If any drafts are awaiting review, they are present under this tab.
- Process each item: Create new document or Reject draft

End