
Genesys CX Insights
Genesys Customer Experience Insights (Genesys CX Insights or sometimes GCXI) provides a presentation layer that extracts data from the Genesys Info Mart database, and presents it in readable historical reports to enable business and contact center managers to make better business decisions for streamlining operations, reducing costs, and providing better services.
Genesys CX Insights has replaced Genesys Interactive Insights (GI2) as the historical reporting presentation layer. See also Genesys Info Mart and Reporting and Analytics Aggregates (RAA).
Glossary


Completing Database Preparation
This page describes steps you must take to complete deployment of the Info Mart database after it has been initialized.
Contents
Preparing the Info Mart Database for 3rd Party Media
The Genesys Info Mart transformation job processes online and offline interactions differently. (For definitions of online and offline as used in Genesys Info Mart, see Online and Offline Interactions.) The IS_ONLINE field in the MEDIA_TYPE dimension table identifies whether a particular media type will be associated with online interactions or with offline interactions.
Genesys Info Mart will dynamically add to the MEDIA_TYPE table any unknown media types that it encounters during transformation, but it identifies them as media types for offline interactions (IS_ONLINE=0, by default). Genesys recommends specifying new online media types in advance, to ensure that they are represented correctly in interaction data from the start.
The following procedure describes how to set up the Info Mart database to handle online 3rd Party Media interactions. You can perform this procedure at any time after the Info Mart database schema has been initialized.
Procedure: Setting up media types for online interactions
Purpose: To prepopulate the MEDIA_TYPE dimension table with media types that Genesys Info Mart might encounter in 3rd Party Media interactions, so that they will be processed as online interactions.Prerequisites
- The Info Mart database has been initialized (see step 1 in Overview: Completing the Deployment).
- You have the required permissions to alter the Info Mart database.
Steps
- Log in to the Info Mart database as any user with INSERT and ALTER permissions.
- Check the current contents of the MEDIA_TYPE table to identify the last MEDIA_TYPE_KEY value. Media types for 3rd Party Media interactions have values of 1001 or higher.
- Execute an SQL INSERT command to add the desired media types to the MEDIA_TYPE table. For each new media type, specify values for the required fields.
- MEDIA_TYPE_KEY — The unique primary key. Using the information from step 2, specify the next available value greater than 1000 (in other words, 1001 or higher).
- MEDIA_NAME — Any name, up to 64 characters, that you want to use to identify the media type.
- MEDIA_NAME_CODE — The name of the media type that Genesys Info Mart uses internally. The code name can be up to 32 characters, must be unique, and must exactly match the name of the corresponding Media Type Business Attribute, including case.
- IS_ONLINE — The online/offline flag. For online media types, specify a value of 1.
- CREATE_AUDIT_KEY — The lineage for data creation. Specify a value of -1, which indicates that the row was not inserted by Genesys Info Mart.
- UPDATE_AUDIT_KEY — The lineage for data update. Specify a value of -1, which indicates that the row was not updated by Genesys Info Mart.
- The following Figure shows the contents of a sample MEDIA_TYPE table in which:
 Sample MEDIA_TYPE Table View Large
- None, Voice, Email, and Chat are the default media type dimensions.
- SampleOnlineMedia1 is an online 3rd Party Media media type that was added manually in advance.
- SampleOfflineMedia is an offline 3rd Party Media media type that was added dynamically by Genesys Info Mart during runtime.
- SampleOnlineMedia2 is an online 3rd Party Media media type that was not added in advance (for example, because the user forgot or because it is new to the deployment). The media type was added dynamically by Genesys Info Mart (as an offline media type) during runtime, and then the IS_ONLINE field in the record was manually altered to indicate that it is an online media type.
- For more information about the required data types and the meaning of the fields, see the Genesys Info Mart Physical Data Model (formerly called Reference Manual) for your RDBMS.
- If you are executing this procedure during runtime and you encounter a constraint violation, go to step 4. Otherwise, go to step 5.
- Constraint violations, if they occur, are most likely to occur if you are manually adding media types while the transformation job is running.
- You might encounter a constraint violation when you execute the INSERT command if:
- The media type has already been added. Check the contents of the MEDIA_TYPE table to identify if a record with that MEDIA_NAME_CODE already exists, and verify the value of the IS_ONLINE flag. If the record exists because Genesys Info Mart added it dynamically during transformation, execute an ALTER TABLE command to change the value of the IS_ONLINE flag to 1.
- Genesys Info Mart dynamically added a media type to the MEDIA_TYPE table and used a MEDIA_TYPE_KEY value that you were planning to use. Repeat step 2 and step 3 to add the desired media type with a different MEDIA_TYPE_KEY value.
- Genesys Info Mart might encounter a constraint violation if the transformation job was coincidentally trying to add an unknown media type at the exact time that you were manually adding it or using the same MEDIA_NAME_KEY to add another media type, and your insert took effect first. In this case, no action is required.
- The transformation job will complete unsuccessfully.
- In the next ETL cycle, the transformation job will take the appropriate action — either recognizing the media type that you inserted, or else using a different MEDIA_TYPE_KEY to insert the new media type.
- Commit the change to the database.
Creating Custom Calendars
To enable you to customize the calendars that you use in your reporting, Genesys Info Mart supports multiple custom calendar dimensions. The following procedure describes the steps to create a custom calendar.
Procedure: Configuring custom calendars
Purpose: To modify the Genesys Info Mart Application object and Info Mart database schema to provide additional calendar dimensions for use in reports.Prerequisites
- You have the required permissions to access and modify the Genesys Info Mart Application object, if required (see step 1).
- The database access account that you use to create the Info Mart database schema is available and has the required privileges (see Database Privileges). If you prepared a database worksheet, refer to it to determine the ID to use.
- If your deployment does not always use the latest Oracle Java SE platform JDK or JRE update release (which is Oracle’s preferred means of delivering timezone data updates), you have run the Java Timezone Updater Tool to update your JRE time zone data.
Steps
- Configure the Genesys Info Mart application to support the required custom calendars, if you did not configure the required options before installing the application.
- On the Options tab of the Genesys Info Mart Application object, create a new section that has a section name that starts with the prefix date-time- (for example, [date-time-emea]).
- Create new options that have the same names as the options in the default [date-time] section, and configure the options as required for your reporting purposes.
- For more information about the [date-time] options, see date-time Section in the Genesys Info Mart Configuration Options Reference.
- Prepare the script to create the custom dimension tables in the Info Mart database schema.
- Locate the script that you ran to create the Info Mart database schema, as described in Preparing the Info Mart Database. (The script is make_gim.sql, make_gim_partitioned.sql, make_gim_multilang.sql, or make_gim_multilang_partitioned.sql in the sql_scripts folder in your Genesys Info Mart installation package.)
- Copy the SQL statements that create the default DATE_TIME table, and use them as the basis for a custom script to create additional calendar table(s), with the same structure and column names as the default DATE_TIME table.
- The table name must match the value of the date-time-table-name option that you specified in the custom [date-time-*] configuration section (see step 1).
- Log in to the Info Mart database by using the Info Mart owner ID.
- Execute the script that you created in step 2.
Next Steps
- Verify that the custom dimension tables have been populated.
- If you configure the custom calendars before you start Genesys Info Mart for the first time, Job_InitializeGIM will populate the custom calendar dimension tables. If you configure the custom calendars after Job_InitializeGIM has run, the custom calendar dimension tables will be populated at the next run of Job_MaintainGIM.
- If you have not already done so, create read-only views for your reporting application to query. See Creating Read-Only Tenant Views.
Creating Read-Only Tenant Views
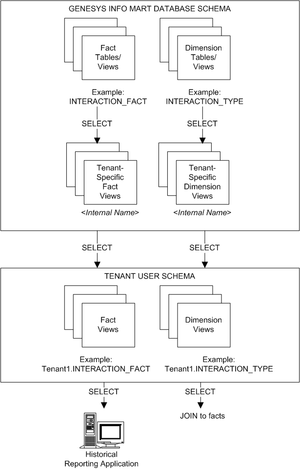
Read-only views allow you to control end-user access to Info Mart data.
About Read-Only Views
Each Tenant User schema has a view on a single DATE_TIME table, so each schema supports a single time zone. Genesys Info Mart supports creating table views for more than one tenant in the same Tenant User schema. This functionality simplifies deployment of the reporting solution.
The following Figure illustrates how the tenant-specific, read-only Genesys Info Mart Views function in a Genesys Info Mart deployment. The diagram shows a Tenant User schema that contains table views for only one tenant.
Reports in multiple time zones
To provide reports in multiple time zones, the downstream report developer must use a separate Tenant User schema for each time zone. However, the Tenant Admin does not need to create a separate Tenant User schema for each combination of time zone and tenant. Instead, the Tenant Admin can include all tenants, or a group of tenants, in a single schema per time zone.
In addition to creating a separate Tenant User schema for each time zone, you must configure your aggregation software to identify the different time-zone calendars and enable tenant-specific access to the applicable Tenant User schema for a particular time zone. For deployments that use GCXI, see Configuring aggregation across more than one time zone in the Reporting and Analytics Aggregates User’s Guide for more information.
Creating the Views
The Genesys Info Mart installation package includes a script, make_gim_view_for_tenant.sql, that you run in order to create tenant-specific, read-only views on the Genesys Info Mart tables. The following procedures describe the modifications you must make to the make_gim_view_for_tenant.sql script for your RDBMS, in order to create the tenant views in your deployment.
Creating Read-Only Views — Microsoft SQL Server
Repeat the following procedure for each tenant in your Genesys Info Mart configuration.
The script that creates each tenant view first drops the view, so the script can be rerun if necessary (for example, if you add new custom user-data tables to the Info Mart database schema).
Procedure: Creating Genesys Info Mart tenant views for Microsoft SQL Server
Purpose: In a tenant user schema, to create tenant-specific, read-only views on database objects (database tables and views) that are in the Info Mart schema in Microsoft SQL Server.Prerequisites
- You have identified database connection parameters for each database. Refer to the database worksheet you prepared for Microsoft SQL Server.
- You have obtained the TENANT_KEY, which Genesys Info Mart uses to identify the tenant, in one of the following ways:
- You have obtained the database identifier that Configuration Server assigned to the tenant (Tenant DBID). The TENANT_KEY matches the Tenant DBID.
- You have successfully run the first ETL cycle, so that the TENANT dimension has been populated, and then you queried the TENANT dimension table in the Info Mart view that is named TENANT, to obtain the TENANT_KEY. The TENANT view was created by the script you ran to create the Info Mart database schema (make_gim.sql, make_gim_partitioned.sql, make_gim_multilang.sql, or make_gim_multilang_partitioned.sql).
- The Tenant User user accounts are available. Refer to the database worksheet you prepared for Microsoft SQL Server to determine the IDs to use.
- You have located a copy of the make_gim_view_for_tenant.sql script, which is available in the sql_scripts folder in the installation directory or in the sql_scripts folder on the Genesys Info Mart CD.
Steps
- Log in to the Info Mart database as the Tenant Admin database user.
- In a text editor, modify the make_gim_view_for_tenant.sql script to provide the required parameters:
- &&1 — Replace all instances of &&1 with the name of the Tenant User schema.
- &&2 — Replace all instances of &&2 with the name of the Info Mart schema.
- &&3 — Replace all instances of &&3 with one of the following:
- all_tenants — To create views for all the tenants that have been configured for the deployment
- A list of Tenant keys (for example: 101,102,103) — To create views for a group of tenants
- The Tenant key — To create views for a single tenant
- &&4 — Replace all instances of &&4 with the name of the tenant user who will access the view.
- Run the modified make_gim_view_for_tenant.sql script.
Next Steps
- If you are enabling optional functionality, see the task summaries that are provided under Enabling Specific Functionality.
- If you want to use the Data Export feature to export your Info Mart data to a data warehouse for the purpose of archiving or custom reporting, see the "About Data Export" page in the Genesys Info Mart Physical Data Model for your RDBMS. There you will find information about configuring and scheduling the export job, optionally creating and using export views for the export, and creating a target database consistent with the Info Mart schema. (The Data Export feature is supported for premise customers starting with release 8.5.011.22.)
- Otherwise, your Genesys Info Mart deployment process is complete.
Creating Read-Only Views — Oracle
Repeat the following procedure for each tenant in your Genesys Info Mart configuration.
The script that creates each tenant view first drops the view, so the script can be rerun if necessary (for example, if you add new custom user-data tables to the Info Mart database schema).
Procedure: Creating Genesys Info Mart tenant views for Oracle
Purpose: In a tenant user schema, to create tenant-specific, read-only views on database objects (database tables and views) that are in the Info Mart schema in Oracle.Prerequisites
- You have identified database connection parameters for each database. Refer to the database worksheet you prepared for Oracle.
- You have obtained the TENANT_KEY, which Genesys Info Mart uses to identify the tenant, in one of the following ways:
- You have obtained the database identifier that Configuration Server assigned to the tenant (Tenant DBID). The TENANT_KEY matches the Tenant DBID.
- You have successfully run the first ETL cycle, so that the TENANT dimension has been populated, and then you queried the TENANT dimension table in the Info Mart view that is named TENANT, to obtain the TENANT_KEY. The TENANT view was created by the script you ran to create the Info Mart database schema (make_gim.sql, make_gim_partitioned.sql, make_gim_multilang.sql, or make_gim_multilang_partitioned.sql).
- The Tenant User user accounts are available. Refer to the database worksheet you prepared for Oracle to determine the IDs to use.
- You have located a copy of the make_gim_view_for_tenant.sql script, which is available in the sql_scripts folder in the installation directory or in the sql_scripts folder on the Genesys Info Mart CD.
Steps
- Log in to the Info Mart database as the Tenant Admin database user.
- In a text editor, modify the make_gim_view_for_tenant.sql script to provide the required parameters:
- &&1 — Replace all instances of &&1 with the name of the Tenant User schema.
- &&2 — Replace all instances of &&2 with the name of the Info Mart schema.
- &&3 — Replace all instances of &&3 with one of the following:
- all_tenants — To create views for all the tenants that have been configured for the deployment
- A list of Tenant keys (for example: 101,102,103) — To create views for a group of tenants
- The Tenant key — To create views for a single tenant
- TipEnsure that you use upper case for the user names. For example, if the name of the Tenant User is Tenant1, replace all instances of &&1 with TENANT1.
- Run the modified make_gim_view_for_tenant.sql script.
Next Steps
- If you are enabling optional functionality, see the task summaries that are provided under Enabling Specific Functionality.
- If you want to use the Data Export feature to export your Info Mart data to a data warehouse for the purpose of archiving or custom reporting, see the "About Data Export" page in the Genesys Info Mart Physical Data Model for your RDBMS. There you will find information about configuring and scheduling the export job, optionally creating and using export views for the export, and creating a target database consistent with the Info Mart schema. (The Data Export feature is supported for premise customers starting with release 8.5.011.22.)
- Otherwise, your Genesys Info Mart deployment process is complete.
Creating Read-Only Views — PostgreSQL
Repeat the following procedure for each tenant in your Genesys Info Mart configuration.
The script that creates each tenant view first drops the view, so the script can be rerun if necessary (for example, if you add new custom user-data tables to the Info Mart database schema).
Procedure: Creating Genesys Info Mart tenant views for PostgreSQL
Purpose: In a tenant user schema, to create tenant-specific, read-only views on database objects (database tables and views) that are in the Info Mart schema in PostgreSQL.Prerequisites
- You have identified database connection parameters for each database. Refer to the database worksheet you prepared for PostgreSQL.
- You have obtained the TENANT_KEY, which Genesys Info Mart uses to identify the tenant, in one of the following ways:
- You have obtained the database identifier that Configuration Server assigned to the tenant (Tenant DBID). The TENANT_KEY matches the Tenant DBID.
- You have successfully run the first ETL cycle, so that the TENANT dimension has been populated, and then you queried the TENANT dimension table in the Info Mart view that is named TENANT, to obtain the TENANT_KEY. The TENANT view was created by the script you ran to create the Info Mart database schema (make_gim.sql, make_gim_partitioned.sql, make_gim_multilang.sql, or make_gim_multilang_partitioned.sql).
- The Tenant User user accounts are available. Refer to the database worksheet you prepared for PostgreSQL to determine the IDs to use. In releases earlier than 8.5.009, the name of the Tenant User schema must be the same as the name of the corresponding tenant user.
- You have located a copy of the make_gim_view_for_tenant.sql script, which is available in the sql_scripts folder in the installation directory or in the sql_scripts folder on the Genesys Info Mart CD.
Steps
- Log in to the Info Mart database as the Tenant Admin database user.
- In a text editor, modify the make_gim_view_for_tenant.sql script to provide the required parameters:
- &&1 — Replace all instances of &&1 with the name of the Tenant User schema.
- &&2 — Replace all instances of &&2 with the name of the Info Mart schema.
- &&3 — Replace all instances of &&3 with one of the following:
- all_tenants — To create views for all the tenants that have been configured for the deployment
- A list of Tenant keys (for example: 101,102,103) — To create views for a group of tenants
- The Tenant key — To create views for a single tenant
- Starting with release 8.5.009, you must also provide the following parameters:
- &&4 — Replace all instances of &&4 with the name of the Tenant user.
- &&5 — Replace all instances of &&5 with the name of the Info Mart database user.
- Run the modified make_gim_view_for_tenant.sql script.
Next Steps
- If you are enabling optional functionality, see the task summaries that are provided under Enabling Specific Functionality.
- If you want to use the Data Export feature to export your Info Mart data to a data warehouse for the purpose of archiving or custom reporting, see the "About Data Export" page in the Genesys Info Mart Physical Data Model for your RDBMS. There you will find information about configuring and scheduling the export job, optionally creating and using export views for the export, and creating a target database consistent with the Info Mart schema. (The Data Export feature is supported for premise customers starting with release 8.5.011.22.)
- Otherwise, your Genesys Info Mart deployment process is complete.