Business Rules Configuration
Contents
Use Custom Rule Templates
It is tempting to simply augment the iWD Standard Rules Template to meet your specific business requirements. However, it is a best practice to create one or more custom rule templates to add new rule conditions and actions that you require to meet your business requirements. There are several a few advantages to this approach, such as:
- Genesys might release new versions of the iWD Standard Rules Template from time to time. Importing a new version of the Standard Rules Template into the Genesys Rules Development Tool requires that you delete (or rename) the existing version. Therefore, any custom rule conditions or actions that you added to the Standard Rules Template would be lost.
- By keeping the iWD Standard Rules Template intact, it allows you to associate it with the Environment tenant in Configuration Server. In a multi-tenant environment, this enables a common, standard set of rule conditions and actions that can be accessed by all tenants.
- Access control can be applied to rule templates, because each template is represented by a separate Script object in Configuration Server. Therefore, multiple rule templates can be created, segregating different types of rule conditions and actions that will be accessed by different types of users or by different functional areas of the business. Normally, you will want the Standard Rules Template to be accessible by all users whereas, you might have other templates where basic rule conditions and actions are in one template and more advanced conditions and actions in a separate template. You can then use access control on the associated Script objects to determine which users will be able to access specific templates through the Genesys Rules Authoring Tool.
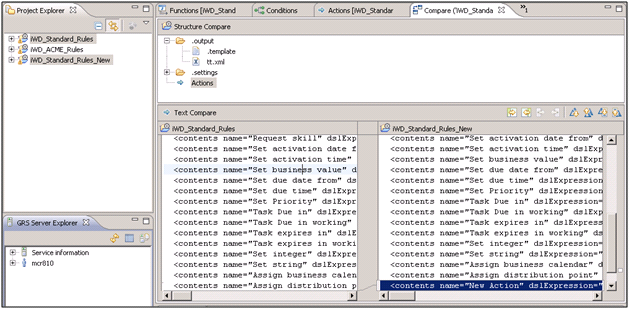
- If you do modify the iWD Standard Rules Template, Eclipse provides a way to compare your modified template project with the original version that is included in the Genesys iWD Manager Installation Package. Just rename your modified version of the template project, and then import the original Genesys version. Select both projects in the Project Explorer, right-click, and choose Compare With Each Other. A Compare view will display the differences in the Actions, Conditions, Functions, and Parameters. In the example below, one new Action has been added to the iWD_Standard_Rules_New project.
Compare Modified Template with Original (Genesys) Version
Design of Rules Hierarchy
It is useful to create business rules at different levels of the business structure (for example, Global Rules, Department-level, Process-level), rather than putting all rules at the Global level. Not only does this configuration make troubleshooting simpler, it also enables you to provide access control to specific sets of rules. Moreover, it enables you to set default rules. For example, at the Global Rules level you might set a default priority or a default due date for all tasks that meet specific criteria. You can then override those defaults at a lower level of the business hierarchy, based on various conditions.
Use Prioritization Ranges
It can be very useful to define priority ranges for different types of tasks. Priority ranges define the minimum and maximum priorities that can be assigned to any type of tasks.These tasks are enforced when the tasks are assigned their initial priorities and when they are reprioritized over time. For example, in a blended environment you might reserve priorities 501+ for voice calls, whereas 401-500 are for the highest-value off-phone tasks, 301-400 are for the next highest-value, and so on. Through business rules, you can ensure that a particular type of task’s priority never exceeds an upper ceiling. You can do this in your prioritization or reprioritization rule by adding a rule condition, such as Priority is {operator} {priority}, where {operator} = less than.
By maintaining tasks within predefined priority ranges, it is easier to troubleshoot anything that might happen with these tasks, and easier to predict what will actually be routed to an employee when they become available for work.
Do Not Reprioritize Interactions Frequently
It is important to reprioritize tasks at reasonable time intervals. That is, if a task is not due for 3 days, and your business normally operates with a significant task backlog, it does not make sense to reprioritize that task every 15 minutes. That will just consume unnecessary resources that can put a stress on the system, when there are tens of thousands, or hundreds of thousands of tasks in queue. Therefore, plan your reprioritization intervals so that tasks that are not due for several days are only reprioritized once, or a few times per day, versus tasks that are due within the current working day (or a shorter time frame). Those tasks could be reprioritized once per hour.
The appropriate reprioritization intervals should be based on an analysis of your backlog and how soon you expect to work through it. Remember that you can set up different reprioritization intervals, based not only on when a task is due, but on any other criteria as well. The criteria might include department, process, business value, current priority, any custom attribute, or combination of custom attributes. It can be an extremely helpful exercise to graph out the different types of tasks and the way in which you expect the reprioritization of the tasks to occur over time. You can start by putting this data into an Excel spreadsheet, and then, within Excel, automatically generate a line chart. Put each task in a different color. The more intersecting lines you have on your graph, the more confusion you can expect to have when you put the system into operation.


