Corinneh/Callback
Contents
Callback
Businesses sometimes can't offer on-demand, low-wait agent help due to resource limitations or increased service usage. In these situations, the best option is to give some form of deferred option to connect consumers and agents at a mutually beneficial later time.
Genesys Callback, taking its name from the most typical form of deferred agent voice connection, also provides support for Call-In behavior, in addition to a range of scenario variation and sourcing options. Genesys Callback, then, is a name that belies the full feature functionality of the product. Consider its name as a shorthand for the set of scenarios described in this documentation.
In this page:
- Learn what you need to create your first Callback application in Designer.
- Test your first Callback scenario.
- Learn about the scenarios, UIs, APIs related to Genesys Engage Callback.
What is a Callback?
A Callback is a data record which contains data for calling a customer at some time in the future. Callbacks generally consist of attached data and configuration data. Attached data is specific to the end customer and may be used in screen pops, routing, reporting, and further applications. Configuration data describes how a Callback is fulfilled; this includes target expressions, timeout values, and virtual queue names.
Using Callback, you can associate a Callback service with a phone number, that enables a caller to request a Callback. Depending on which scenario you choose to implement, the Callback is then routed to an agent who processes the call.
Get Started with Configuration Prerequisites
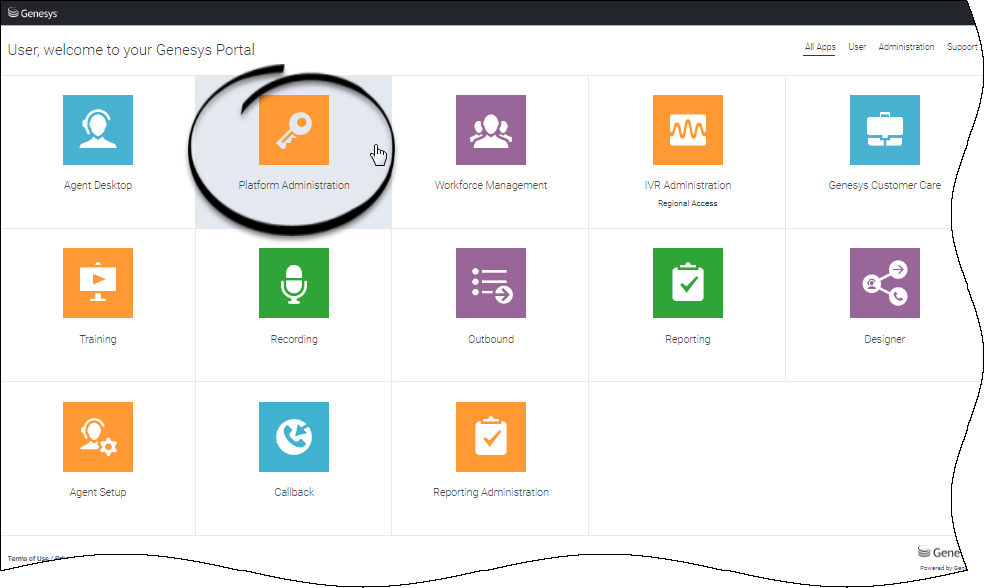
Open the Genesys Portal and select the Platform Administration section. You are redirected to the Configuration Manager. Make sure that you have configured:
- A Callback Administrator
- A routing strategy for inbound calls
- A phone number
- Virtual Queues (VQs) to store Callbacks; these queues will be used later in Designer in your Callback blocks.
- At least one agent who will process Callbacks.
See Getting Started for Administrators and Platform Administration instructions for further details.
Provisioning your First Callback Scenario in Designer
Corinne's Note: I think I would move this to the Provision Callback In Designer page.
Callback is provisioned through Designer. To create and configure Callback services, Designer includes a set of blocks dedicated to Callback.
Open the Genesys Portal and select the Designer section. You are redirected to the Designer UI.
Create your Designer Applications
Two Designer apps are required to support "In-Queue Callback".
- The In Designer app providing the Callback offer to a customer waiting in a queue; for example, in a scenario where the customer is connected to an IVR already.
- The Out Designer app providing the Callback attempt.
In Designer, click + Add Application. The Creating New Application dialog opens. Enter a name for your scenario. For your In Designer app, select Default for the type.
Click Create and Open to configure your scenario.
The next dialog defines the settings of your new Designer application. You can edit these settings at any time by clicking the Settings icon in the top-right corner. Review each tab. Note that in the Misc tab, you can enable tracing to facilitate debugging.
Configure the Designer inbound application
The In Designer app provides the Callback offer to a customer waiting in a queue; for example, in a scenario where the customer is connected to an IVR already.
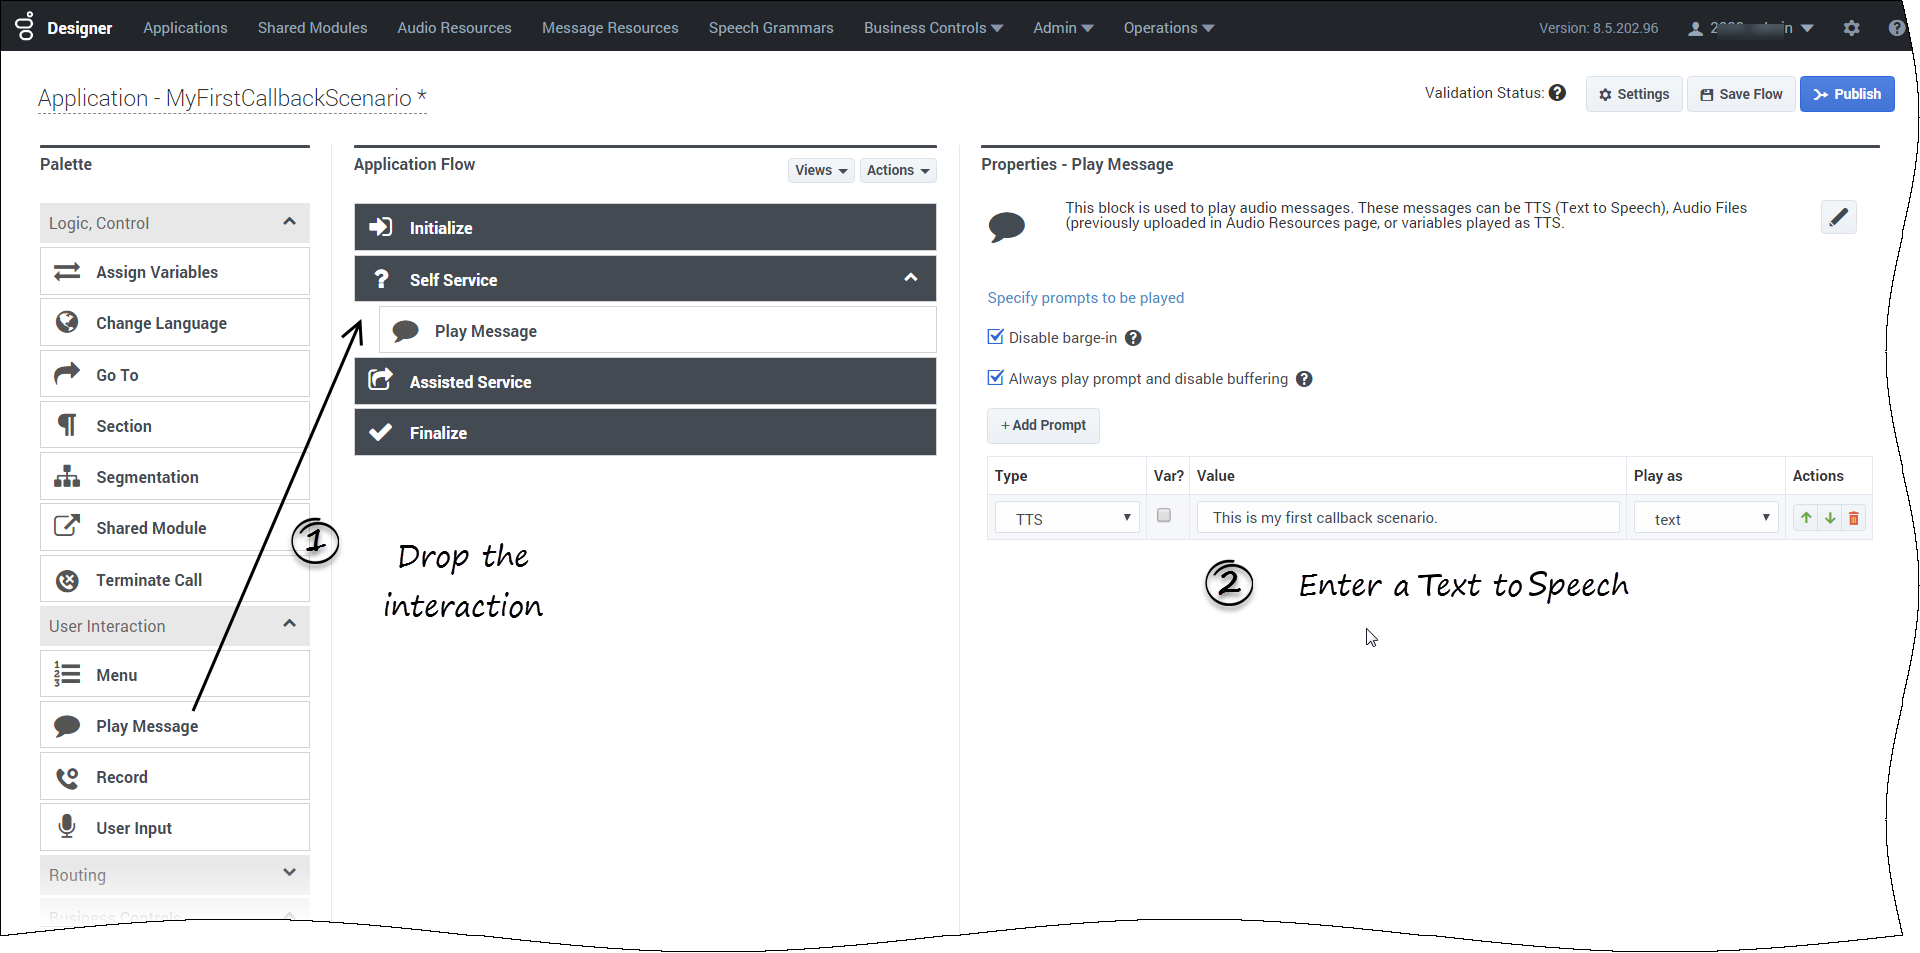
Now, you can start to customize your app. First, drag and drop a User Interaction > Play Message item from the Palette list to the Self Service section of your app. Edit the TTS field value to add your Welcome prompt. This is what the caller will hear when calling the Application's call number.
- Scroll the Palette list to reach the Callback items. Then, drag and drop a Callback > Callback V2 item into the Assisted Service section of your app.
- In the Call Routing properties panel, select the virtual queue that you configured for Callback.
- Click Publish to make your app available! And a green checkmark appears for your Validation Status.
Configure the Designer Out application
The Out Designer app provides the Callback attempt.
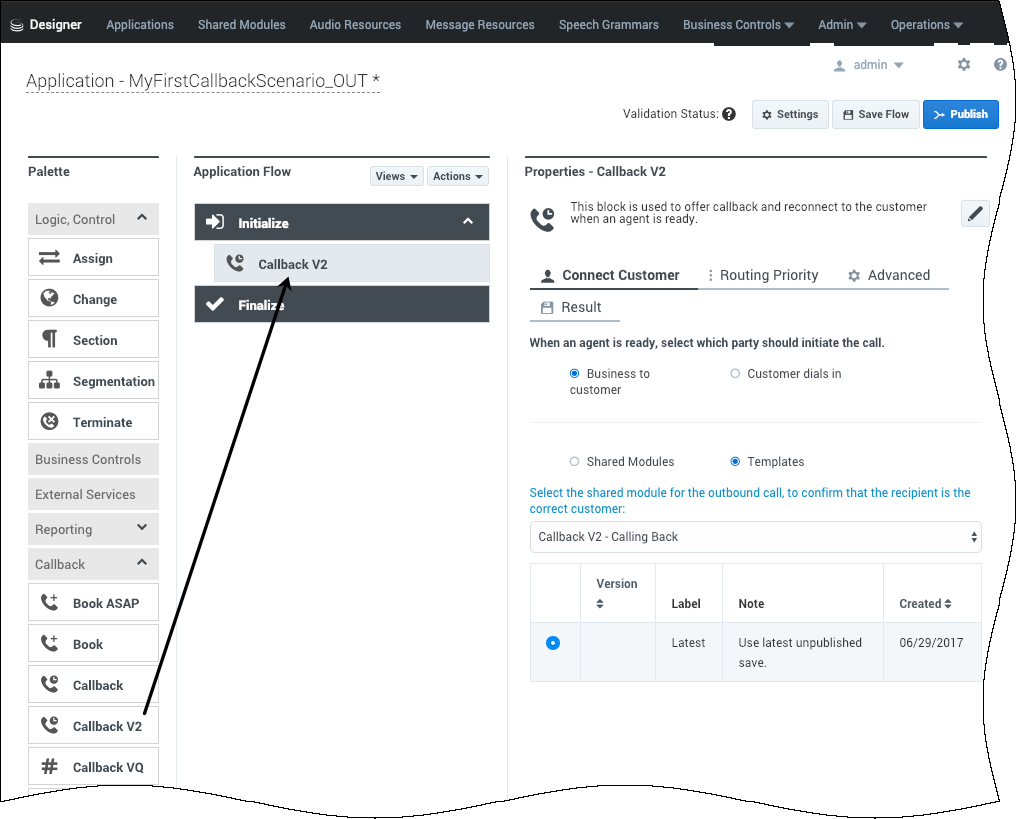
- Scroll the Palette list to reach the Callback items. Then, drag and drop a Callback > Callback V2 item into the Initialize section of your app.
- Click Publish to make your app available! And a green checkmark appears for your Validation Status.
Add your queue to the CALLBACK_SETTINGS table
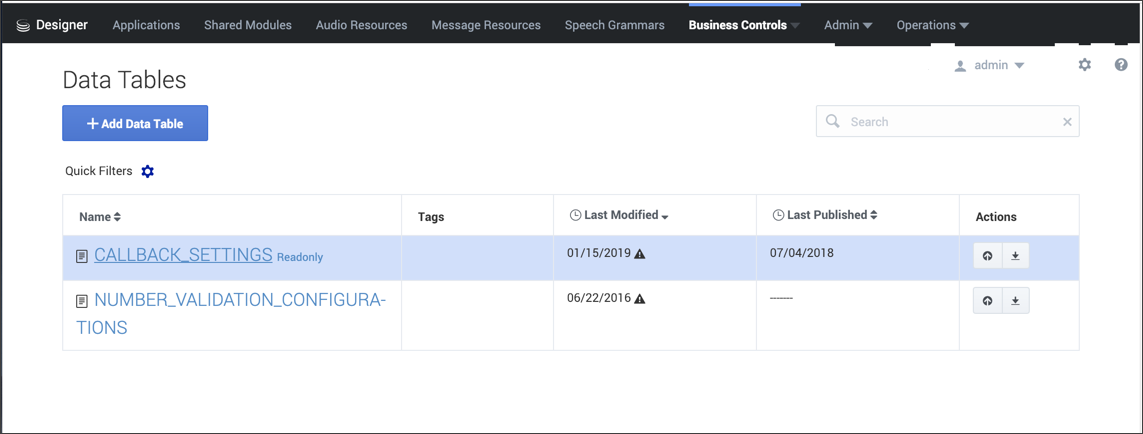
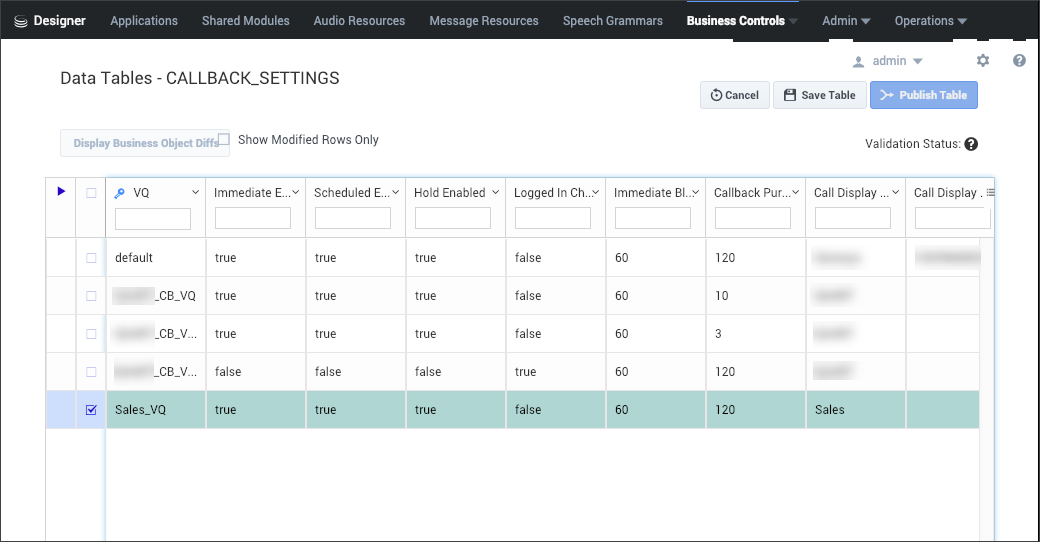
In Designer, navigate to Business Controls > Data Tables. Click CALLBACK_SETTINGS and add an entry for your queue as described here.
- Enter your Designer Out application in the Callback Application setting of the table.
- If you defined Callback Skills for Callback agents, you can use this as a condition for this queue.
Enable Phone Calls
If you have never set up any Designer apps before, the following steps about selecting a phone number and activating the app are additional steps you must take for any app that will be answering calls.
A final step is required to enable you to test your first service. Your Callback service needs a phone number, that you (and later, your customers) will be able to call.
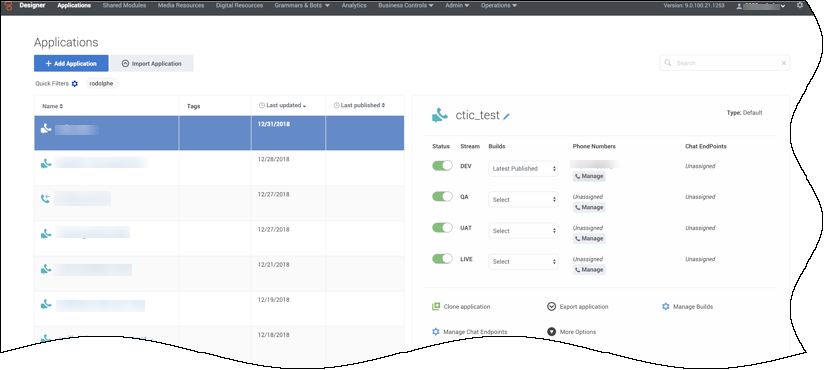
- Click the Applications tab in the top-level menu bar to go back to Designer's start panel.
- Click Manage in the Phone Numbers column of your app, then assign a Phone number.
- Then, enable your app to make its status green. For further details, see Application Workflow.
Now, you can test your scenario by calling this phone number or by creating a Callback using the Callback UI. Your logged-in agent will receive the call in the Agent Desktop UI.
Supported scenarios
Corinne's Note: Move this content to a standalone "Supported Scenarios" section?
The following scenarios describe sample call flows for immediate and scheduled callbacks:
- Immediate callbacks
- A customer's call arrives and the caller is offered immediate (or in-queue) Callback. If the caller accepts, he or she confirms the phone number of the Callback. The voice interaction is converted to a virtual call and added to the queue where it will be monitored to provide statistics, such as the Estimated Wait Time (EWT).
- When an agent that satisfies the required skill expression is ready, the customer is called and the call is routed to the agent.
- Scheduled callbacks
- A customer's call arrives and the caller is offered a scheduled Callback. If the caller accepts, he or she confirms the phone number of the Callback, along with the date and time of the Callback.
- At the scheduled date, the customer is called and the call is routed to an agent.
- Click-to-Call-In
- A customer initiates a Click-To-Call-In request using an app or a website to retrieve the inbound call instructions such as the number to dial and an optional pin.
- The system responds with a phone number and an optional verification code.
- The customer calls in and optionally enters the verification code on the call.
- After the customer is matched to the previously initiated session, the call is routed to an agent.
- ImportantTo implement this scenario, you need to use the corresponding API to initiate the Click-To-Call-In request.
Callback UIs
Corinne's Note: This is an overview of the interfaces, so it makes sense to have it on this page.
Open the Genesys Portal and click the Callback icon. You are redirected to the Callback UI.
Managing Callbacks
In some scenarios, you may need to create or monitor a Callback request, or even cancel a set of Callback records. You can do this on the Callback tab.
- If you create a Callback for your scenario, select the Callback queue that is associated with your scenario in Designer.
- If you do not see your Callback after a successful creation, make sure that your time filters are correct. For example, if you scheduled a Callback in two days, it does not show up if the Last 30 Days label is selected; switch to Next 7 Days for example.
Callback Developer Console
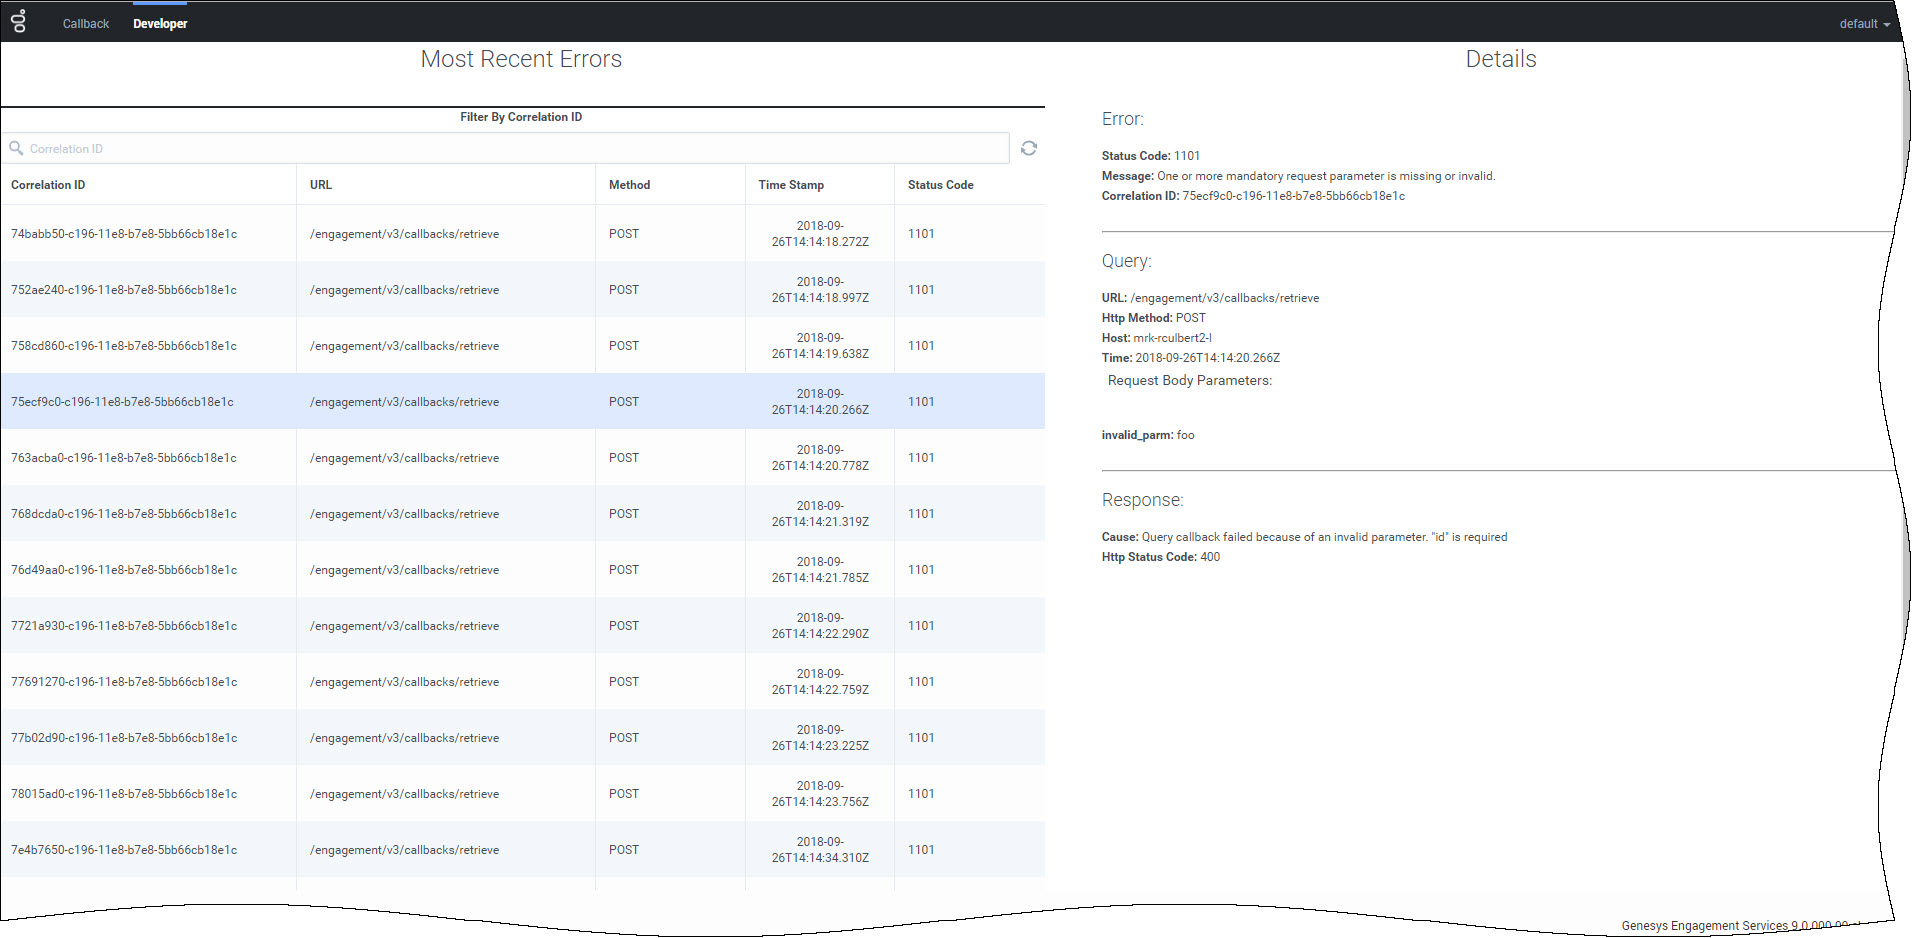
Depending on your Role, next to the Callback tab, the Developer menu and tab provides access to Developer tools such as the list of errors related to your Callback API queries, information about a specific API Key, validation for your API keys, and more. For additional information, refer to the Developer console section of this guide.
Genesys Engage REST APIs and Tutorials for Callback
Corinne's Note: I think this could be on this page, or it might be better on a page about using the Developer interface, and it should be a Related Resources or Additional Resources section.
The documentation for REST APIs are available through the Genesys Engage cloud Developer Center.
- Callback— Create, retrieve, cancel a Callback.
- Estimated Wait Time—Retrieve Estimated Wait Time.
- Availability— Retrieve time slots for a Callback, matching Office Hours.
- Click To Call In— Request the phone number to call in.
You can test queries in the Developer Center. However, if you receive error messages while testing your application, use the Developer Console to get more information.
This portal also includes Callback Tutorials: select Engagement in the tutorial list.
Accessing Callback APIs
To access Callback APIs from the Web or Mobile applications, the following items are mandatory:
- Request an API key from your Genesys Customer Care Representative.
- Add this x-api-key header to your HTTPS requests.
The entry point for your APIs are the following:
- https://gapi-<region>.genesyscloud.com/engagement/v3/callbacks
- https://gapi-<region>.genesyscloud.com/engagement/v3/estimated-wait-time
- https://gapi-<region>.genesyscloud.com/engagement/v3/availability
- https://gapi-<region>.genesyscloud.com/engagement/v3/call-in

