
Deploying eServices in Windows Environments
This section describes how to install the eServices components in your Windows environment.
For your own deployment, be sure to use the Configuration Worksheet to help you plan the specifics of your solution.
Deploying eServices on Windows
The following table describes the prerequisite components required before you install your eServices solution.
| Type of Component | Component Used |
|---|---|
| Operating System | A supported Windows environment. |
| Web Server | Apache Web Server |
| Web Application Container | Tomcat |
| E-mail (POP3) Server | Third-party e-mail server |
| Java Environment | Java Runtime Environment (JRE). For supported versions, see the Genesys Supported Operating Environment Reference Guide. |
| Database Server | For supported databases, see the Genesys Supported Operating Environment Reference Guide. |
| Licence Server | License Server 9.5; License File: 7260@ESHost.eServices 8.1 also supports FLEXNet Publisher v11.9 License Manager. |
| Management Framework Components | See the Management Framework documentation for information about installing and configuring the components. |
| Stat Server | See the Stat Server documentation for installation and configuration instructions. |
| Universal Routing Server | See the Universal Routing documentation for installation and configuration instructions. |
If you plan on installing eServices on the same computer as Genesys Framework, you should already have a Host object created and available for your eServices deployment. However, if you have not already done so, or if you want to install eServices on a different computer than Framework, create the Host object in the Configuration Layer for the machine that will host your model environment.
If you plan to install eServices components across multiple hosts, create a shared directory on your local drive or network to receive the installation packages. Genesys recommends that you do this before starting the configuration and installation process. (This is unnecessary if you plan to install eServices on a single host.)
Create three databases in your SQL Server RDBMS. Two of these will accommodate Universal Contact Server contact information, and the other will handle Interaction Server's one table for tracking transient data. You will use the names of these databases during your creation of eServices Database Access Points (DAPs). After configuration and installation, you will run scripts against these databases to make them available to Genesys servers.
This procedure describes the steps required to install the eServices components that were configured with the eServices Configuration Wizards.
- Starting the Integrated Installation:
- Go to your shared directory, on which you had the Genesys Wizard
Manager place the eServices components (for example,\\ESHost\GenesysSetup). Find and run windows\IPStarter.exe.
- At the Welcome window, click Next to proceed.
- If any components were not assigned to a specific computer while running the Configuration Wizards, the Host independent components dialog page lists those components. Select the check box of any of these components that you want to install on the current machine (the host computer of the installation package). Click Next.
- At the Ready to start dialog page, click Next to proceed.
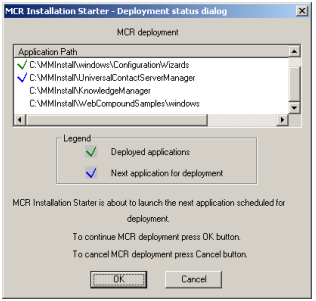
- The Integrated Installation takes you through each component's
necessary installation steps. Prior to each subsequent component's
installation, the installer displays a list of component directories containing:
- Components that have been installed, each with a green check mark next to it.
- Components not yet installed, with no markings next to them.
- The component to be installed next, with a blue check mark next to it.
- Installing Configuration Wizards:
If you do not already have the Genesys eServices Configuration Wizards installed on this host, the Installation Starter will install them for you in the existing Wizards directory. You may need to restart your host after eServices Configuration Wizard installation.
If you already have the Genesys eServices Configuration Wizards installed on this host, click Cancel on the first page of the eServices Configuration Wizard setup. - Installing Universal Contact Server:
- Click Next, and then click Install.
- Click Finish.
ImportantOnce you install any given eServices component on your computer, the wizard uses that directory for all other eServices components. You are not allowed to install these components across different directories. - Installing Interaction Server:
- Click Next, then Install, if ready for installation.
- Click Finish.
- The next component, Web API Server, is not included in the 8.5 release of eServices. Information on deploying it is available in the eServices 8.1 Deployment Guide.
- Installing E-Mail Server:
- Click Next, then Install if ready for installation.
- Click Finish.
- Installing Classification Server:
- Click Next, then Install if ready for installation.
- Click Finish.
- Installing Training Server:
- Click Next, then Install if ready for installation.
- Click Finish.
- Installing Chat Server:
- Click Next, then Install if ready for installation.
- Click Finish.
- Installing Universal Contact Server Manager:
- Click Next, and then Install.
- Click Finish.
- Installing Knowledge Manager:
- Click Next, then Install.
- Click Finish.
- Installing Co-Browsing Server:
- Enter the fully qualified domain name of the web server and the unique server identifier. Click Next.
- Browse to the destination folder where the application will be installed, and click Next.
- Click Install, then Finish.

The integrated installation is now complete.
- In Configuration Manager or Genesys Administrator, on the Server Info tab of the Chat Server Application object, click Add Port.
- In the resulting Port ID dialog, enter the following:
- Port ID = webapi
- Communication Port = 6181
- Click OK, then OK again.
Your change takes effect immediately.
The Web Callback Application use a number of preconfigured Script objects of various subtypes, including Simple Routing, Interaction Queue, Interaction View, Subroutine.
Prerequisites
- Interaction Management CD.
- Install the Web Callback Application.
- On your Interaction Management CD, find and double-click Setup.exe in the solution_specific\ Web Callback Application \Windows directory.
- At the welcome page for the installation wizard, click Next.
- Specify the destination for the Web Callback Application, and click Next.
- Click Install.
- Click Finish.
- Start the Web Callback Application.
- From the Windows taskbar, select Start > Programs > Genesys Solutions > eServices 8.1.0 > eServices Web Callback Application >Start Web Callback Application. This launches the Web Callback Application Wizard.
- Login to the wizard using your user name and password.
- At the Welcome to the Web Callback Application Wizard window, click Next.
- If using a multi-tenant environment, select the Tenant and click Next.
TipDuring the installation, the setup procedure does not look for possible name conflicts between existing objects and new components from the Web Callback Application. It overwrites any existing objects. In order to prevent the loss of existing objects, Genesys recommends you install the new samples into a separate tenant. Alternatively, you should use IRD's Business processes export capability to create backups of workflows and strategies related to an existing configuration.
- Specify a destination directory for the strategy files, and click Next.
You may want to select the directory used for your Interaction Routing
Designer strategies, unless it already contains strategies with same file
names, which would then be overwritten. If you do decide to use that
particular directory, make a backup of its content before proceeding.
TipDo not select the StrategyFiles directory created during installation of your Web Callback Application as the target here. This causes file "collision", since the source and target files are identical.
- At the Import Completed window, click Next.
- Optionally, select a resource capacity rule which takes into account webcallback media type. Click Next.
- Click Finish.
- Once you exit the wizard, you can view the following:
- New objects installed with these Samples, by opening the <tenant>\Scripts folder in Configuration Manager or Genesys Administrator.
- Database scripts in the <Web Callback Application installation>\Scripts folder for updating the Interaction Server database.
- UCS_impex.kme file in the <Web Callback Application installation> folder for importing Web Callback standard responses via Knowledge Manager.
- WebCallback distribution for processing Agent Group in the <tenant>\Agent Groups folder in Configuration Manager or Genesys Administrator.
- WCB_CUSTOMER_NUMBER Attribute Value in the <tenant>\Business Attributes\Interaction Custom Properties\Attribute Values folder in Configuration Manager.
- webcallback Media Type in the <tenant>\ Business Attributes\ Media Type\ Attribute Values folder in Configuration Manager.
- WebCallback Transaction in the <tenant>\Transactions folder in Configuration Manager or Genesys Administrator.
Finishing the eServices Deployment on Windows
Creating Databases and Running Scripts
If you have not already done so, create the databases for Interaction Server and Universal Contact Server. For UCS, you may also want to create an Archive database to store older UCS data and ease storage in the Main UCS database.
Running the Database Scripts
- At the starting directory for each component, locate the SQL script folder:
- Interaction Server—Script
- Universal Contact Server—sql-scripts
- Run the database scripts for each component.
- UCS has two scripts. First run ucs_drop_<dbname>.sql; this deletes any existing tables and indexes in the UCS database. Then run ucs_<dbname>.sql.
- Interaction Server has a single script file.
Verifying Connections
At this point in the eServices installation process, you must update the configuration settings for some components before continuing. See the Connections Table for a list of connections that must be set in the Configuration Layer. Refer to the Reference Manual for information on option settings.
- In Configuration Manager or Genesys Administrator, verify that the required connections have been made in the eServices Application objects.
- Add a connection from Stat Server to Interaction Server, or to Interaction Server Proxy (see "Interaction Server Proxy as Reporting Bus").
- Add a connection from Universal Routing Server to Interaction Server.
Interaction Server Proxy as Reporting Bus
You can connect Stat Server to Interaction Server Proxy rather than directly to Interaction Server. This can be advantageous if you are running multiple Stat Servers. To do this,
- Deploy Interaction Server Proxy.
- Wherever this Guide speaks of connecting Stat Server to Interaction Server, instead make the connection to Interaction Server Proxy