General Options
If this is the first pass, the following options are available:
Pass Name - The pass name.
If you selected Call Pass Based as the Escalation Type, the Device Selection and Call Priority options also appear. Specify the device and priority for the pass. To move the priority of a device, use the up or down arrows in the corresponding row.
If this is a subsequent pass, the following options are also available:
Accept Contacts From - Select one of the following options
- All Passes - The contact is attempted if one of the selected results was obtained for the contact on any of the previous passes.
- The Previous Pass - The contact is attempted only if one of the selected results was obtained for the contact on the previous pass.
Select one or more of the following options to determine which contacts will be attempted on the current pass, based on the results of the previous pass:
Last Voice Messaging result was:
- Not Attempted
- Busy
- No Answer
- Not Attempted Skip
- Undelivered Machine
- Delivered Machine
- Hang Up on Machine
- Bad Device
- Delivered Person
- Not Connected
- Delivered without success
Last Text Messaging result was:
- Not Attempted
- Failed
- Success
Last Email Messaging result was:
- Not Attempted
- Failed
- Success
Last Script result was:
- Not Attempted
- Failed
- Success
Timeframe Options
Days to wait - The number of days, on which contact attempts are allowed, to wait between the last pass and this one. Select 0 to schedule this pass to run on the same day as the previous pass. Select 1 to schedule this pass to run on the next allowed day after the previous pass, and so on.
For example, if the previous pass ran on Monday, 'M W F' are selected as the allowed days, and the Days to wait is set to '2', this pass will run on Friday. If 'M W Th F' were selected as the allowed days, the pass would run on Thursday.
Allow Attempts On These Days - Select one or more days of the week on which contact attempts are allowed for this pass. You can select different days for each pass.
Start Time - Select the time of day at which this pass will start. Select Local if the start time is local to the contact, or select an alternate time zone if it is not. For example, if you are messaging in the U.S, and you specify 9AM-9PM Local, the pass will start at 9AM EST in the America/New York time zone and complete at 12AM EST (9PM PST) in the America/Los Angeles time zone. If, however, you were to specify 9AM-9PM America/New York, messaging in the America/Los Angeles time zone would occur only from 12PM-9PM EST (9AM-6PM PST).
End Time - Select the time of day at which the pass will end.
On subsequent passes (i.e. Pass 2, 3, 4, etc.), the following option is also available if you've selected a Fixed pacing model:
Delay to Next Attempt (mins) - Specify a time delay to ensure there’s a gap between message attempts. Otherwise, a delivery delay of the first message could result in the first and second message arriving at the same time.
Delivery Options
Add goal options - Use this option to configure a goal for this pass.
- Stop pass after - Enter the value, based on the type of goal you want to achieve:
- Messages attempted - Select this option to stop the pass after the specified number of contact attempts.
- Achieving script goal - Select this option to stop the pass after achieving the specified value identified in the script being used for the sub-campaign.
For example, to stop the pass after 30,000 message attempts, enter 30000. To stop a pass after collecting $25,000, enter 25000.
Pacing Options
Pacing Model - Fixed - Enable if you want to attempt a specific number of records per minute. Auto - Enable if you want to evenly distribute contact attempts over the sub-campaign period.
If you enable the Auto pacing model, the following option is available:
Priority - Select from the available options to assign delivery priority, such as High, Medium, Low, or Background to a sub-campaign. If one sub-campaign has a higher priority than another sub-campaign, the high priority sub-campaign is given precedence to available phone lines. We recommend you avoid Background, as this doesn't qualify for priority pacing. For instance, if you're running two campaigns, one with High priority and one with Background priority, the High priority campaign would run at 100% and the Background priority campaign would run at 0%. Medium is a standard default setting and ensures there is an even balance between campaigns.
General Options
If this is the first pass, the following options are available:
Pass Name - The pass name.
Accept Phone Numbers: - Select Landline and Wireless, Landline Only, or Wireless Only.
If you selected Call Pass Based as the Escalation Type, the Device Selection and Call Priority options also appear. Specify the device and priority for the pass. To move the priority of a device, use the up or down arrows in the corresponding row.
If this is a subsequent pass, the following options are also available:
Accept Contacts From - Select one of the following options
- All Passes - The contact is attempted if one of the selected results was obtained for the contact on any of the previous passes.
- The Previous Pass - The contact is attempted only if one of the selected results was obtained for the contact on the previous pass.
Select one or more of the following options to determine which contacts will be attempted on the current pass, based on the results of the previous pass:
Last Voice Messaging result was:
- Not Attempted
- Busy
- No Answer
- Not Attempted Skip
- Undelivered Machine
- Delivered Machine
- Hang Up on Machine
- Bad Device
- Delivered Person
- Not Connected
- Delivered without success
Last Text Messaging result was:
- Not Attempted
- Failed
- Success
Last Email Messaging result was:
- Not Attempted
- Failed
- Success
Last Script result was:
- Not Attempted
- Failed
- Success
Timeframe Options
Days to wait - The number of days, on which contact attempts are allowed, to wait between the last pass and this one. Select 0 to schedule this pass to run on the same day as the previous pass. Select 1 to schedule this pass to run on the next allowed day after the previous pass, and so on.
For example, if the previous pass ran on Monday, 'M W F' are selected as the allowed days, and the Days to wait is set to '2', this pass will run on Friday. If 'M W Th F' were selected as the allowed days, the pass would run on Thursday.
Allow Attempts On These Days - Select one or more days of the week on which contact attempts are allowed for this pass. You can select different days for each pass.
Start Time - Select the time of day at which this pass will start. Select Local if the start time is local to the contact, or select an alternate time zone if it is not. For example, if you are messaging in the U.S, and you specify 9AM-9PM Local, the pass will start at 9AM EST in the America/New York time zone and complete at 12AM EST (9PM PST) in the America/Los Angeles time zone. If, however, you were to specify 9AM-9PM America/New York, messaging in the America/Los Angeles time zone would occur only from 12PM-9PM EST (9AM-6PM PST).
End Time - Select the time of day at which the pass will end.
Delivery Options
Bridge Calls to Agent when - Bridge All Calls to Agents is the only available option.
Caller ID Number - This is the number that will appear on customer’s Caller ID display. It should be a valid number that belongs to you or your contact center (in many locations, this is a legal requirement). Select one of the numbers on the list, or select <Account Default> to use the caller ID number that is defined as the default for the account. If you select <Account Default>, and you later change the default caller ID number to another number, the sub-campaign will automatically present the new default number.
If necessary, you can add additional Caller ID numbers to this list, or change the default caller ID number to another number.
Add goal options - Use this option to configure a goal for this pass.
- Stop pass after - Enter the value, based on the type of goal you want to achieve:
- Messages attempted - Select this option to stop the pass after the specified number of contact attempts.
- Achieving script goal - Select this option to stop the pass after achieving the specified value identified in the script being used for the sub-campaign.
For example, to stop the pass after 30,000 message attempts, enter 30000. To stop a pass after collecting $25,000, enter 25000.
Retry Options
Retry Busy Calls - Select the number of retry attempts to be made for numbers that are busy, along with the number of minutes between attempts. The defaults are set to retry a busy number three times, waiting five minutes before each retry.
Retry Attempts - Select the number of retry attempts to be made for the selected option(s) along with the number of minutes between attempts. The defaults are set to retry twice, waiting thirty minutes before the retry.
When Call Result is:
- No Answer - Select this option to retry the call when there is no answer.
- Hang Up on Machine - Select this option to retry if the system reached an answering machine and hung up. (Applies only if you did not select Deliver to answering machines under Delivery Options.)
- Undelivered Machine - Select this option to retry if the system reached an answering machine, voice mail, or automated attendant that did not allow us to deliver at least 10 seconds of the message, or the entire message if less than 10 seconds.
- Bad Device - Select this option to retry for bad device issues such as a broken answering machine, broken phone, bad phone line, connection to a fax machine, etc. In general, bad device indicates that tones were detected instead of voices when the connection was made.
- Delivered without success - The message was delivered, but as part of a script path that resulted in an 'unsuccessful' status. For example, the message may have been delivered to the device, but not to the right person, or the person you were trying to reach. If the script you are using for a sub-campaign does not include a path that results in an 'unsuccessful' status, this option is not available when editing the passes for the sub-campaign.
Pacing Options
Enable Push Preview - Enable to push customer records through to agent portals.
Pacing Model -
- Predictive - Uses an algorithm to predict agent availability. In Preview passes, putting a campaign in Predictive mode doesn't invoke the automatic dialer; it simply predicts when to send the next record to an agent.
- Fixed - Paces the campaign based on a defined number of record attempts per minute.
When you enable Predictive pacing, the following option is available:
Priority - Select from the available options to assign delivery priority, such as High, Medium, Low, or Background to a sub-campaign. If one sub-campaign has a higher priority than another sub-campaign, the high priority sub-campaign is given precedence to available phone lines. We recommend you avoid Background, as this doesn't qualify for priority pacing. For instance, if you're running two campaigns, one with High priority and one with Background priority, the High priority campaign would run at 100% and the Background priority campaign would run at 0%. Medium is a standard default setting and ensures there is an even balance between campaigns.
When you enable Fixed pacing, the following option is available:
Requested Attempts per Min. - The Requested Attempts per Min. option is not applicable.
General Options
If this is the first pass, the following options are available:
Pass Name - The pass name.
Accept Phone Numbers: - Select Landline and Wireless, Landline Only, or Wireless Only.
If you selected Call Pass Based as the Escalation Type, the Device Selection and Call Priority options also appear. Specify the device and priority for the pass. To move the priority of a device, use the up or down arrows in the corresponding row.
If this is a subsequent pass, the following options are also available:
Accept Contacts From - Select one of the following options
- All Passes - The contact is attempted if one of the selected results was obtained for the contact on any of the previous passes.
- The Previous Pass - The contact is attempted only if one of the selected results was obtained for the contact on the previous pass.
Select one or more of the following options to determine which contacts will be attempted on the current pass, based on the results of the previous pass:
Last Voice Messaging result was:
- Not Attempted
- Busy
- No Answer
- Not Attempted Skip
- Undelivered Machine
- Delivered Machine
- Hang Up on Machine
- Bad Device
- Delivered Person
- Not Connected
- Delivered without success
Last Text Messaging result was:
- Not Attempted
- Failed
- Success
Last Email Messaging result was:
- Not Attempted
- Failed
- Success
Last Script result was:
- Not Attempted
- Failed
- Success
Timeframe Options
Days to wait - The number of days, on which contact attempts are allowed, to wait between the last pass and this one. Select 0 to schedule this pass to run on the same day as the previous pass. Select 1 to schedule this pass to run on the next allowed day after the previous pass, and so on.
For example, if the previous pass ran on Monday, 'M W F' are selected as the allowed days, and the Days to wait is set to '2', this pass will run on Friday. If 'M W Th F' were selected as the allowed days, the pass would run on Thursday.
Allow Attempts On These Days - Select one or more days of the week on which contact attempts are allowed for this pass. You can select different days for each pass.
Start Time - Select the time of day at which this pass will start. Select Local if the start time is local to the contact, or select an alternate time zone if it is not. For example, if you are messaging in the U.S, and you specify 9AM-9PM Local, the pass will start at 9AM EST in the America/New York time zone and complete at 12AM EST (9PM PST) in the America/Los Angeles time zone. If, however, you were to specify 9AM-9PM America/New York, messaging in the America/Los Angeles time zone would occur only from 12PM-9PM EST (9AM-6PM PST).
End Time - Select the time of day at which the pass will end.
Delivery Options
Bridge Calls to Agent when - Select from the following options to define when the call should bridge to an agent:
- Live Party Detected - The call is bridged to the agent only when the system determines that a live party, and not an answering machine, has been reached.
- Live Party or Answering Machine Detected - The call is bridged to the agent when the system determines that either a live party or an answering machine has been reached.
Caller ID Number - This is the number that will appear on customer’s Caller ID display. It should be a valid number that belongs to you or your contact center (in many locations, this is a legal requirement). Select one of the numbers on the list, or select <Account Default> to use the caller ID number that is defined as the default for the account. If you select <Account Default>, and you later change the default caller ID number to another number, the sub-campaign will automatically present the new default number.
If necessary, you can add additional Caller ID numbers to this list, or change the default caller ID number to another number. See Add a Caller ID number, Change a Caller ID number.
Deliver to answering machines - Most scripts are written such that a message can be delivered to a live person or an answering machine. Often it is a variant of the same message. Select this option to leave the answering machine version of the message when it reaches an answering machine or voice mail. Clear this option to hang up on an answering machine without leaving a message.
Add goal options - Use this option to configure a goal for this pass.
- Stop pass after - Enter the value, based on the type of goal you want to achieve:
- Messages attempted - Select this option to stop the pass after the specified number of contact attempts.
- Achieving script goal - Select this option to stop the pass after achieving the specified value identified in the script being used for the sub-campaign.
For example, to stop the pass after 30,000 message attempts, enter 30000. To stop a pass after collecting $25,000, enter 25000.
Retry Options
Retry Busy Calls - Select the number of retry attempts to be made for numbers that are busy, along with the number of minutes between attempts. The defaults are set to retry a busy number three times, waiting five minutes before each retry.
Retry Attempts - Select the number of retry attempts to be made for the selected option(s) along with the number of minutes between attempts. The defaults are set to retry twice, waiting thirty minutes before the retry.
When Call Result is:
- No Answer - Select this option to retry the call when there is no answer.
- Hang Up on Machine - Select this option to retry if the system reached an answering machine and hung up. (Applies only if you did not select Deliver to answering machines under Delivery Options.)
- Undelivered Machine - Select this option to retry if the system reached an answering machine, voice mail, or automated attendant that did not allow us to deliver at least 10 seconds of the message, or the entire message if less than 10 seconds.
- Bad Device - Select this option to retry for bad device issues such as a broken answering machine, broken phone, bad phone line, connection to a fax machine, etc. In general, bad device indicates that tones were detected instead of voices when the connection was made.
- Delivered without success - The message was delivered, but as part of a script path that resulted in an 'unsuccessful' status. For example, the message may have been delivered to the device, but not to the right person, or the person you were trying to reach. If the script you are using for a sub-campaign does not include a path that results in an 'unsuccessful' status, this option is not available when editing the passes for the sub-campaign.
While there is no harm in retrying busy numbers numerous times during a voice pass, we advise you not to be too aggressive in retrying numbers that are not answered or numbers that are answered by a machine. Because some Caller ID devices keep a record of attempted calls from the originating Caller ID number, your contacts may complain that you are calling too often.
Pacing Options
Enable Predictive Pacing - In this mode, the automatic dialer paces calls to match anticipated agent availability. If you do not select this, the campaign will run in Progressive mode, where a phone number is dialed only when an agent is available to handle the call.
Target Abandon Rate - Select the desired percent Target Abandon Rate (The percentage of calls abandoned by the customer before being connected to an agent).
Enable Fast Bridging - Select if you want to run the campaign in ASM Mode. See DialingModes for more information.
Requested Attempts per Min. - The Requested Attempts per Min. option is not applicable.
Priority - Select from the available options to assign delivery priority, such as High, Medium, Low, or Background to a sub-campaign. If one sub-campaign has a higher priority than another sub-campaign, the high priority sub-campaign is given precedence to available phone lines. We recommend you avoid Background, as this doesn't qualify for priority pacing. For instance, if you're running two campaigns, one with High priority and one with Background priority, the High priority campaign would run at 100% and the Background priority campaign would run at 0%. Medium is a standard default setting and ensures there is an even balance between campaigns.
General Options
If this is the first pass, the following options are available:
Pass Name - The pass name.
Accept Phone Numbers: - Select Landline and Wireless, Landline Only, or Wireless Only.
If you selected Call Pass Based as the Escalation Type, the Device Selection and Call Priority options also appear. Specify the device and priority for the pass. To move the priority of a device, use the up or down arrows in the corresponding row.
If this is a subsequent pass (Pass 2, 3, 4, etc.), the following options are also available:
Accept Contacts From - Select one of the following options:
- All Passes - The contact is attempted if one of the selected results was obtained for the contact on any of the previous passes.
- The Previous Pass - The contact is attempted only if one of the selected results was obtained for the contact on the previous pass.
Select one or more of the following options to determine which contacts will be attempted on the current pass, based on the results of the previous pass:
Last Voice Messaging result was:
- Not Attempted
- Busy
- No Answer
- Not Attempted Skip
- Undelivered Machine
- Delivered Machine
- Hang Up on Machine
- Bad Device
- Delivered Person
- Not Connected
- Delivered without success
Last Text Messaging result was:
- Not Attempted
- Failed
- Success
Last Email Messaging result was:
- Not Attempted
- Failed
- Success
Last Script result was:
- Not Attempted
- Failed
- Success
Timeframe Options
Days to wait - The number of days, on which contact attempts are allowed, to wait between the last pass and this one. Select 0 to schedule this pass to run on the same day as the previous pass. Select 1 to schedule this pass to run on the next allowed day after the previous pass, and so on.
For example, if the previous pass ran on Monday, 'M W F' are selected as the allowed days, and the Days to wait is set to '2', this pass will run on Friday. If 'M W Th F' were selected as the allowed days, the pass would run on Thursday.
Allow Attempts On These Days - Select one or more days of the week on which contact attempts are allowed for this pass. You can select different days for each pass.
Start Time - Select the time of day at which this pass will start. Select Local if the start time is local to the contact, or select an alternate time zone if it is not. For example, if you are messaging in the U.S, and you specify 9AM-9PM Local, the pass will start at 9AM EST in the America/New York time zone and complete at 12AM EST (9PM PST) in the America/Los Angeles time zone. If, however, you were to specify 9AM-9PM America/New York, messaging in the America/Los Angeles time zone would occur only from 12PM-9PM EST (9AM-6PM PST).
End Time - Select the time of day at which the pass will end.
On subsequent passes (Pass 2, 3, 4, etc.), the following option is also available if you've selected a Fixed pacing model:
Delay to Next Attempt (mins) - Specify a time delay to ensure there’s a gap between message attempts. Otherwise, a delivery delay of the first message could result in the first and second message arriving at the same time.
Delivery Options
Caller ID Number - This is the number that will appear on customer’s Caller ID display. It should be a valid number that belongs to you or your contact center (in many locations, this is a legal requirement). Select one of the numbers on the list, or select <Account Default> to use the caller ID number that is defined as the default for the account. If you select <Account Default>, and you later change the default caller ID number to another number, the sub-campaign will automatically present the new default number.
If necessary, you can add additional Caller ID numbers to this list, or change the default caller ID number to another number. See Add a Caller ID number, Change a Caller ID number.
Deliver to answering machines - Most scripts are written such that a message can be delivered to a live person or an answering machine. Often it is a variant of the same message. Select this option to leave the answering machine version of the message when it reaches an answering machine or voice mail. Clear this option to hang up on an answering machine without leaving a message.
Add goal options - Use this option to configure a goal for this pass.
- Stop pass after - Enter the value, based on the type of goal you want to achieve:
- Messages attempted - Select this option to stop the pass after the specified number of contact attempts.
- Achieving script goal - Select this option to stop the pass after achieving the specified value identified in the script being used for the sub-campaign.
For example, to stop the pass after 30,000 message attempts, enter 30000. To stop a pass after collecting $25,000, enter 25000.
Retry Options
Retry Busy Calls - Select the number of retry attempts to be made for numbers that are busy, along with the number of minutes between attempts. The defaults are set to retry a busy number three times, waiting five minutes before each retry.
Retry Attempts - Select the number of retry attempts to be made for the selected option(s) along with the number of minutes between attempts. The defaults are set to retry twice, waiting thirty minutes before the retry.
When Call Result is:
- No Answer - Select this option to retry the call when there is no answer.
- Hang Up on Machine - Select this option to retry if the system reached an answering machine and hung up. (Applies only if you did not select Deliver to answering machines under Delivery Options.)
- Undelivered Machine - Select this option to retry if the system reached an answering machine, voice mail, or automated attendant that did not allow us to deliver at least 10 seconds of the message, or the entire message if less than 10 seconds.
- Bad Device - Select this option to retry for bad device issues such as a broken answering machine, broken phone, bad phone line, connection to a fax machine, etc. In general, bad device indicates that tones were detected instead of voices when the connection was made.
- Delivered without success - The message was delivered, but as part of a script path that resulted in an 'unsuccessful' status. For example, the message may have been delivered to the device, but not to the right person, or the person you were trying to reach. If the script you are using for a sub-campaign does not include a path that results in an 'unsuccessful' status, this option is not available when editing the passes for the sub-campaign.
While there is no harm in retrying busy numbers numerous times during a voice pass, we advise you not to be too aggressive in retrying numbers that are not answered or numbers that are answered by a machine. Because some Caller ID devices keep a record of attempted calls from the originating Caller ID number, your contacts may complain that you are calling too often.
Pacing Options
Pacing Model -
- Predictive - Click to enable if you are assigning agents to the campaign. In this mode, a customer is given the option to speak to an agent after hearing the automated message or alert.
- Fixed - click to enable if you are not assigning agents to the campaign. In this mode, a customer hears the message or alert and then the call ends.
If you enable Predictive, you have the following options:
Option 1:
- Enable Abandon Rate Pacing - paces calls based on target abandon rate (the percentage of calls abandoned by the customer before being connected to an agent).
- Target Abandon Rate - Select the desired percent Target Abandon Rate.
Option 2:
- Enable Average Distribution Duration - distributes the calls over a specified period of time.
- Average Distribution Duration (secs) Specify the time in seconds
Priority - Select from the available options to assign delivery priority, such as High, Medium, Low, or Background to a sub-campaign. If one sub-campaign has a higher priority than another sub-campaign, the high priority sub-campaign is given precedence to available phone lines. We recommend you avoid Background, as this doesn't qualify for priority pacing. For instance, if you're running two campaigns, one with High priority and one with Background priority, the High priority campaign would run at 100% and the Background priority campaign would run at 0%. Medium is a standard default setting and ensures there is an even balance between campaigns.
If you enable Fixed, you have the following option:
Requested Attempts per Minute - Define the number of attempts to be made per minute.
In addition, if you select Fixed pacing model, you can go to Timeframe Options and specify a delay between message attempts to ensure there's a gap between each message attempt.
Contents
[hide]Multi-channel Campaigns
Leverage both automated and agent-assisted outbound channels to proactively reach customers. With Genesys Engage cloud, your agents can make calls – manually or via an automatic dialer – or you can send automated messages via text, email, or outbound IVR.
You can initiate outreach in one channel and then expand to another channel if no response is received, and you can blend Interactions by leveraging more than one channel as part of a single customer dialog, including strategies such as scheduling a service call by phone, then sending a text-based reminder one day before the scheduled appointment.
Here's how you can set up a multi-channel campaign using Outbound for Genesys Engage cloud.
Channels
First, let's take a look at the available channels.
Channel | Description | Example |
---|---|---|
Voice | Outbound IVR and automated alert messaging (Power GVP and Predictive GVP). |
|
Dialer | Automatic dialer places calls (Progressive and Predictive). |
|
Preview | Agents review customer records and then manually launch the call. |
|
Text | One-way and interactive SMS text messaging. |
|
Personalized and dynamic email messaging. |
|
Voice
Use the Voice channel to run an Outbound IVR campaign that sends automated messages and alerts to your contacts. You can run an Outbound IVR campaign in Power GVP mode, with no agents assigned to the campaign, or in Predictive GVP mode, where contacts are given the option to speak to an agent.
Dialer
Use the Dialer channel to run a campaign using a dialer that automatically dials and bridges calls to agents.
This channel enables you to run a campaign using Predictive dialing, which paces calls based on anticipated agent availability, or Progressive dialing, which places a call only when an agent is available. In addition, you can run a campaign in ASM mode, also called fast bridging, to optimize bridging time.
Learn more about the dialing modes here
Preview
Use the Preview channel if you don’t want to use an automatic dialer. Instead, agents preview each record and then manually launch the call.
Text
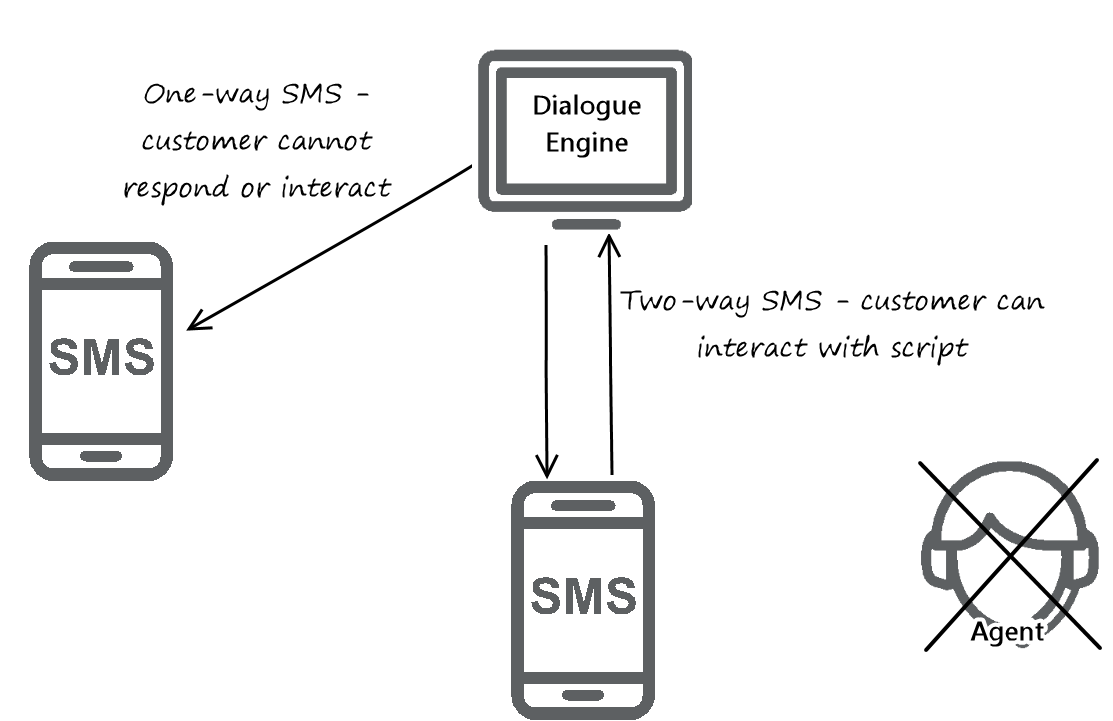
Use the Text channel to send one-way or two-way text messages to your contacts. With one-way messaging, you simply broadcast a message to every person on your contact list. In this scenario, contacts don’t respond to the scripted message. For example, a wireless provider could send payment reminders to customers who are more than 30 days behind on their bill. Customers are not asked to respond to the text.
If you’re running a campaign that requires a customer's response – for example a questionnaire or appointment confirmation – use two-way SMS. For example, a clothing retailer could invite customers to an exclusive in-store sales event and ask them to respond to the text with Y or N.
With this option, the script engages a dialog engine that looks for predefined keywords or short codes in the customer’s response. Interactions continue to take place between the script and the customer only; an agent is never involved.
Use the Email channel to send personalized and customized messages, including embedded links. With email, one-way broadcast is the only option. While custom REPLY TO addresses for direct responses are supported, auto-response (dialog engine) functionality is not supported.
For example, a hotel chain can email customers to announce an upcoming sale on its website. A customer can reply to the email but a dialog engine will not be engaged, and therefore interactions will not take place. The reply email will instead go to a specified mailbox.
Scripts for Text and Email
Unlike the Voice channel, which uses Designer for script and outbound IVR functionality, the Text and Email channels use Engage scripts.
A script is a file that combines the text, images and business rules, or set of instructions, sent out to a customer via a text message or Email.
Scripts can be very simple - involving only one-way communication with no interactive capabilities - or in the case of SMS, they can involve a dialog engine that enables interaction between the script and the customer.
Your account representative creates the script for you and can also edit the script and basic script attributes, such as response groups, message variables, and Email image resources.
Configure multi-channel campaigns
You can run a multi-channel, or multi-pass, campaign if you want to reach out to your customer using more than one channel or device. For example, in the first pass, you could use the Voice channel to send an automated payment reminder to your customers, via an outbound IVR. In the second pass, you could use the Text channel to send a personalized reminder message to the customers you didn’t reach in the first pass. In the third pass, you could use the Preview channel to have agents manually call the customers you didn’t reach in the first two passes.
To configure a multi-channel pass:
Specify a script
If you plan to send a text or email, you need to first specify the script that contains the message content. This script was created or uploaded on the Scripts tab.
To specify a script:
- On the Edit Campaign page, click the Outbound tab.
- In Outbound Options,select the script from the Script menu.
If your campaign won't include an Text or Email channel, you do not need to specify a valid script. Voice scripts are created in Designer.
Select the Pattern options
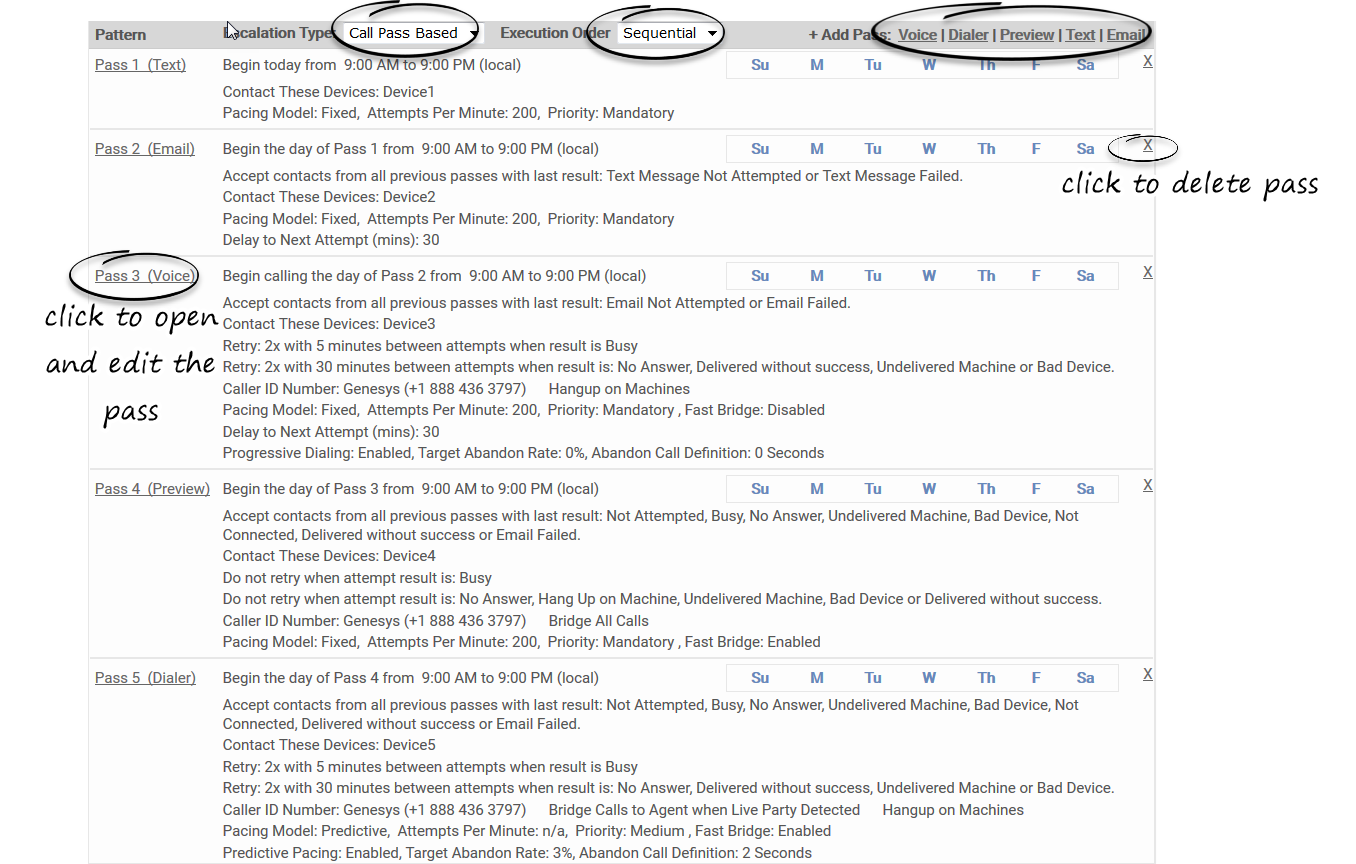
Define the call pattern by selecting the escalation type and execution order In the Pattern section of the Outbound tab.
Escalation Types are as follows:
- None - Select this option when escalation is not required.
- Contact Based - This option enables you to attempt multiple contact methods on each pass. Contact based escalation requires an input specification file that lists the order of escalation (from the Order field) and the conditions defining the escalation (from the Conditions field), and then a strategy is set to use those conditions. Whatever is listed in the input specification file as a condition must also be selected in the Retry Options for the pass.
Execution Order options are as follows:
- Sequential - Only one pass runs at a time. The pass with the earlier start time will run first. If passes have the same start time, the pass listed first in the Pattern section of the Outbound tab will run first.
- Parallel - Multiple passes are executed at the same time. For example, assume Pass1 is scheduled to dial from 9:00 AM to 11:00 AM (local time zone) and Pass2 is scheduled to dial from 10:30 AM to 12:00 PM (also local time zone). Any contact attempts made during Pass1 can be moved immediately to Pass2 and a second contact attempt made when Pass2 begins at 10:30 AM.
Define the passes
Now you can set up a multi-channel campaign by adding one pass at a time. A pass is basically a contact attempt that applies pre-defined treatments.
To add a pass, go to the Outbound tab of your campaign, and in the Pattern section, select the following:
Now apply the rules and conditions for each pass.
Configure the standard campaign filters, business rules, contact rules, and suppression rules as you normally would for a single-channel campaign.
Edit or delete a pass
Once you've defined a pass, a summary of the pass will appear in the Pattern section of the Outbound tab. To edit the pass, click the pass name to open the list of pass options. When you've finished editing, click Save Pass. The changes take effect immediately.
To delete a pass, click the corresponding X that appears next to the pass name and summary.