Legal Terms for Social Engagement 8.5.2
Overview
IMPORTANT - THIS DOCUMENT MUST BE READ IN FULL AND TERMS ACCEPTED PRIOR TO THE DEPLOYMENT OR UPGRADE OF GENESYS SOCIAL ENGAGEMENT
The release of Genesys Social Engagement version 8.5.2 (“Product”) introduces some significant changes over earlier versions of the product. For details regarding these changes, please see this link.
Prior to deploying (or upgrading) and using the Product (and subsequent versions) you agree to review the remainder of this document, after which you will select the click-to-accept option to be bound by these Terms. If you do not agree to these Terms, in whole or in part, you will reject the Terms and refrain from deploying or otherwise using such version of the product. If you are deploying (or upgrading) the product on behalf of an organization or entity (“Customer”), then you are agreeing to these Terms on behalf of that Customer and you represent and warrant that you have the authority to bind the Customer to these Terms. In that case, “you” and “your” refers to you and that Customer
Social Engagement Channels
Channels in the Product are used to source and dispatch data to and from Twitter and Facebook and potentially other Social Networks (“Social Media Providers”). You, or authorized persons working with the Customer may setup channels for the purposes of enabling engagement around Customer’s business on Social Media. Customers will not setup channels for the purpose of monitoring competitors branded social networking pages or for uses outside of the need to engage and manage conversations regarding their business on Social Media.
The Customer’s usage of Social Media will be bound by the Social Media Providers: Rules, and Terms of Service, that may be found on Social Media Providers branded web pages. Notwithstanding any term in the Agreement to the contrary, Genesys reserves the right to suspend the Product, or portion thereof, or reject or cancel the transmission of any information through the Product based upon (i) reasonable belief that the use of the Product is in violation of applicable laws or Social Media Providers Terms of Service (ii) Customer’s use unreasonably burdening the platform running the Product (e.g., use of broad search criteria) or (iii) an imminent compromise to the security or integrity of the platform running the Product. As practicable depending on the circumstances, Genesys will provide written notice of the suspension and keep Customer reasonably informed of Genesys’ efforts to restore the Customer’s use of the Product.
Customer Interactions Stored in the Genesys Data Center
In order to facilitate the use of the analytics component of the Product, Genesys will store a copy of the customer’s inbound and outbound Twitter and Facebook posts, comments, and messages (“Customer Interactions”) in a Genesys-managed software-as-a-service environment/data center, for approximately 3 months, after which the data will be deleted from the Genesys-managed software-as-a-service environment/data center. Customer will not use the Product to receive or transmit sensitive data, including but not limited to personal health information, personally identifiable information, passwords and sensitive account access information, and credit card information. Provided that Customer is fully compliant with the limitations in this Agreement, Genesys shall maintain reasonable, appropriate administrative, physical, and technical safeguards for protection of the security, confidentiality and integrity of Customer Interactions while such interactions are stored with the Genesys-managed software-as-a-service environment/data center center
As between Genesys and Customer, the Customer Interactions are the proprietary material of Customer and shall be considered Customer’s Confidential Information. Customer grants Genesys a non-exclusive, non-sublicenseable (except to parties working on Genesys' behalf), non-transferable, royalty-free license to access, process, store, transmit, and otherwise make use of the Customer Interactions as directed by Customer or as necessary to provide the Product capabilities and to otherwise fulfill its obligations under and in accordance with the Agreement.
Data Limits
Genesys does not limit the number of outbound Customer Interactions that are issued in direct response to inbound Customer Interactions. Customers are permitted to source up to 200,000 inbound Customer Interactions per month. Inbound Customer Interactions may include tweets that mention the company’s handle or tweets that mention keywords, or Twitter Direct Messages, or any posts or comments from the customer’s Facebook page, or Facebook Private Messages, or other Social Media Providers. Volumes in excess of 200,000 inbound Customer Interactions per month will be subject to additional fees and terms.
Genesys does not limit the number of outbound Customer Interactions that are issued in direct response to inbound Customer Interactions.
Service Availability Support and Warranties
Service level targets as set out in the START_WIDGET7e51b16cf4bac2f8-0END_WIDGET shall come into effect following acknowledged receipt of All Relevant Information being supplied by Customer to Genesys for the Product.
Maintenance must be purchased with new and continued use of the Product. The analytics component of the Product is facilitated by the Genesys-managed software-as-a-service environment/data center. Use of analytics component of the Product is only available for those customers that purchase and continuously maintain Maintenance. Lapse in maintenance coverage terminates any usage right of the analytics component of the Product. Customers that discontinue Maintenance may build custom interfaces to Social Media Providers using sample code accessible to experienced developers via the Genesys documentation website (or upon request) to facilitate continued use of the engagement capability of the Product.
Customer acknowledges that the Product is dependent on access to various third party services (including, but not limited to, Twitter and Facebook) and you agree that Genesys is not responsible for the non-availability, delays, failures or interruption affecting the Service or the performance of the Service caused by any such third party services or errors or bugs in software, hardware or the Internet on which the Service relies. You acknowledge that we do not control such third party services and such errors or bugs are inherent in the use of such software, hardware and the Internet.
Disclaimer
THE AVAILABILITY OF THE PRODUCT IS PROVIDED ON AN "AS IS" ‘WHERE IS” BASIS WITHOUT WARRANTY OF ANY KIND EITHER EXPRESS OR IMPLIED, INCLUDING BUT NOT LIMITED TO THE IMPLIED WARRANTIES OF MERCHANTABILITY, FITNESS FOR A PARTICULAR PURPOSE, AND NON-INFRINGEMENT. GENESYS MAKES NO REPRESENTATIONS OR WARRANTIES THAT USE OF THE SOCIAL ENGAGEMENT SERVICES WILL BE UNINTERRUPTED, TIMELY, COMPLETE, OR ERROR-FREE.
Do you accept these terms?
Setting Up Social Engagement 8.5.2 or Later
Contents
Overview
Social Engagement 8.5.2 introduced new data architecture. From 8.5.2 onwards, the API connectors to Twitter and Facebook are stored in the Genesys cloud. This allows the Genesys Engineering team to quickly adapt to changes to the APIs made by Twitter and Facebook, and thus protect customers from the volatility inherent in connecting to Social Networks via APIs. Now, besides installing Twitter and Facebook drivers on-premise, you must also set up and configure the cloud component (known as Genesys Social Admin or GSA).
Legal Terms for Social Engagement 8.5.2
Installing On-premise Components
For New Social Engagement Customers:
For Existing Social Engagement Customers:
- Uninstall your existing drivers and remove their configuration options, as described here.
- Proceed to install Social Engagement 8.5.2, as decribed in the following section.
Installing Social Engagement 8.5.2
- Download the installation packages for Genesys Cloud API Driver for Twitter and Genesys Cloud API Driver for Facebook.
- Locate the installation script for each driver (install.exe for windows and install.sh for Linux platforms) and run it.
- While running the script you will be asked to enter/confirm:
- Host Name
- Configuration Server Host Name
- Network port
- Username
- Password
- Select a Social Messaging Server object.
- Answer any other questions and finish the installation.
- If you are an existing customer,
- In Genesys Administrator Extension, select the Social Messaging Server object, go to the Options tab, and select Import.
- Import the configuration files driver-for-facebook-options.cfg for Facebook and driver-for-twitter-options.cfg for Twitter (usually located in ...SMServer/media-channel-drivers/channel-facebook and .../SMServer/media-channel-drivers/channel-twitter). Select to NOT override the existing configuration options. At this point, you have two new configuration sections: [channel-facebook] and [channel-twitter]. For more information on importing .cfg files, see the Genesys Administrator Extension User Guide.
- Use Genesys Administrator Extension to configure your Social Messaging Server application for the Twitter and Facebook driver channels. For more information about the Social Messaging Server options, see Social Messaging Server Options.
Preparing for the Cloud Integration
After you have completed the above steps, you can gather the following information:
- Identify and note the name of the company/organization that will be using the product—for example, XYZ Corp. This is your Account name for Genesys Social Admin.
- For Twitter:
- Identify and note the handle, (and optionally, keyword strings) that you plan to use for your Twitter feed:
- In most instances, using just the Twitter handle used for responding will be a sufficient first step; for example, ‘@XYZCorp_Help’.
- It is CRITICAL that only the appropriate keywords are used. Twitter does not permit infinite access to the Twitter data feed. If very broad or popular keywords are used inappropriately, too much data will be consumed. If keywords such as: #JustinBieber, #iphone, #awesome were used the likely result would be a data failure.
- Testing for keywords may be necessary in order to check and see if they are inappropriate. To do this go to https://twitter.com/search-home and enter the keyword(s) you plan to use (one at a time). View the search results and if they are relevant. Only relevant keywords should be used.
- Note the login and password credentials for any twitter handles you intend to use with Social Engagement.
- Identify and note the handle, (and optionally, keyword strings) that you plan to use for your Twitter feed:
- For Facebook:
- Identify and note the names of the of the Facebook pages that you plan to use.
- Note the login and password credentials for the user that has administrator access to these Facebook pages.
Note also the following:
- Ports—Both Twitter and Facebook drivers (installed in Social Messaging Server) connect to the Social Admin platform (in the Genesys cloud) using HTTPS on standard port 443. All API calls must go over HTTPS.
- Copy, Paste, Save—In the first seven steps of the following setup you will have to copy and save various pieces of text in order to use them in later steps. Please have a plain-text editor ready on your desktop and be prepared to save text (along with descriptions regarding the text) from steps 1 through 7.
Cloud Integration
Contents of this section:
- Set up an account
- Create a Twitter account channel
- Create a Twitter service channel
- Create a Facebook account channel
- Create a Facebook service channel
- Define an Admin user
- Configure connections
- Using more than one Twitter handle
1. Set up your company/organization account
The first step of deploying Social Engagement requires you to create an Account within the Social Admin component of Social Engagement.
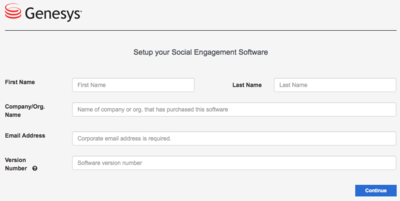
- Navigate to https://socialanalytics.genesyscloud.com/gse/signup. You should see a form titled "Setup your Social Engagement Software."
- Populate the fields. Note and copy the value of Company/Org. Name to your text file (for example, Company/Org. Name: ##> ACME XYZ123 Corp.) You'll use this text in a later step of this setup.
- Click Continue.
- Go to your email inbox and open the email titled "Confirmation required for Genesys Social Engagement deployment". If you don't see it, check your spam folder.
- Follow the steps described in the email and select the option to log in using the email and password you've just created.
- After successfully logging in, navigate to the top right hand corner of the screen and click on the small gear icon and then on the Settings option from the drop-down that appears.
- In the next view, click the Accounts options.
- Click the pencil icon to open the edit view for the account that you have just created
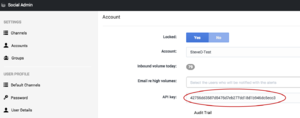
- In the edit view of your account, copy and paste the value of the API key field to your text file. You'll need it in a later stage of this setup.
- At this point it is not necessary to make any changes to the other fields and attributes on this form.
2. Create a Twitter channel with the type Twitter:Account
The Twitter Channel with channel type 'Twitter:Account' is the mechanism you will use to authenticate to Twitter. Please be ready with your organization's Twitter handle (login) and Twitter password before proceeding.
- Navigate to the top right hand corner of the screen and click the small gear icon, then click Settings on the drop-down that appears.
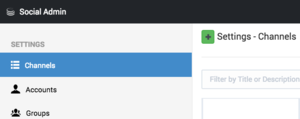
- In the following view, select Channels, then click the green + icon to create a new channel.
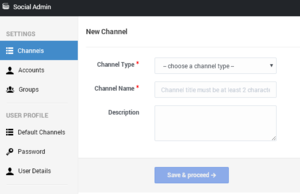
- From the Channel Type drop-down, select Twitter:Account.
- Add a Channel Name. Please use the form <your channel's Twitter handle> - Twitter Account. Example: @Genesys - Twitter Account.
- Optionally, add a description that indicates the planned usage of the channel.
- Click Save and Proceed.
- An extended form displays. On it is a Channel ID, as shown in the figure below. Make a note of this Channel ID—it will be needed for a later step
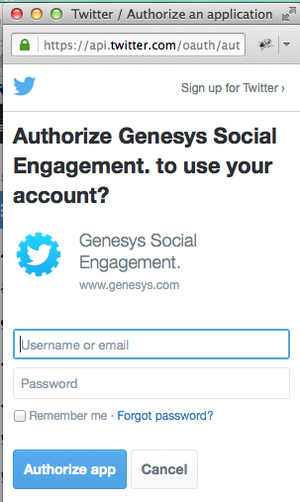
- Click Login to Twitter.
- Enter the Twitter credentials for your organization: username (handle) or email, and the password associated with your Twitter account. IMPORTANT: Also check Remember me.
- A window that displays Access_token successfully saved indicates that you have successfully authenticated to Twitter.
The New Channel window displays.
3. Create a Twitter channel with the type Twitter:Service
A Twitter channel of type Twitter:Service will listen for mentions of your keyword(s) on Twitter.
- Navigate to the top right hand corner of the screen, click the small gear icon, and select Settings.
- In the following view, select Channels, then click the green + icon to create a new channel
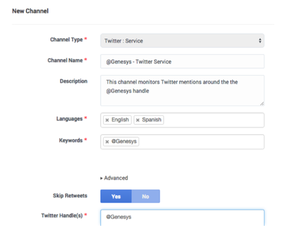
- In the New Channel window (see the figure New Channel above):
- From the Channel Type drop-down, select Twitter:Service.
- Add a Channel Name. Please use the convention '<your channel's Twitter handle> - Twitter Service'. Example: @Genesys - Twitter Service.
- Optionally, add a Description.
- Click Save & proceed.
- An extended form displays.
- Click in Languages to select one or more languages.
- In Keywords, type the handle you will be using to listen for mentions, for example @Genesys, then hit Return or Tab. This will have the effect of sourcing all tweets based on the handle that you use.
- If there is a need, you may source additional posts by populating other words and phrases in the keyword field; for example, #Genesys.
- It is not possible to exclude posts with certain mentions, while including others. The inclusion of words or phrases in the keyword field is the only mechanism for sourcing posts from Twitter. If you have a need to use a broader range of words and phrases, it is important to review Best Practices for Managing Keywords in Twitter Service Channels below.
4. Create a Facebook channel with the type Facebook:Account
A Facebook channel of this type is the mechanism you will use to authenticate to Facebook. Please be ready with your organization's Facebook administrator login credentials for the relevant page(s) before proceeding. For simplicity, please make sure that you are currently logged into Facebook (with this administrator's password) using the same browser that you are using for this setup.
- Navigate to the top right hand corner of the screen and click the small gear icon, then click Settings on the drop-down that appears.
- In the following view, select Channels, then click the green + icon to create a new channel.
- From the Channel Type drop-down, select Facebook:Account.
- Add a Channel Name. Please use the convention <company name> - Facebook Account. Example: Genesys - Facebook Account.
- Optionally, add a description that indicates the planned usage of the channel.
- Click Save and Proceed.
- An extended form displays.
- Make a note of the Channel ID—it will be needed for a later step
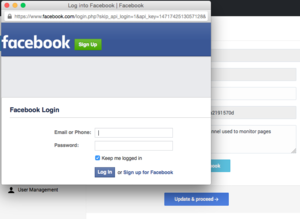
- Click Login to Facebook. A pop-up appears asking you to log in to Facebook
- Log in with the admin credentials for the Facebook pages that you want to use. It is important that these user credentials have Facebook admin access to all of the Facebook pages to be used.
- Once you have logged in and authenticated you should see a message access_token successfully saved, close window. You may close this window.
The New Channel window displays.
300px|thumb|none|Update Channel
5. Create a Facebook channel with the type Facebook:Service
A Facebook channel of this type is used to listen for posts, comments, and messages on Facebook.
- Navigate to the top right hand corner of the screen and click the small gear icon, then click Settings on the drop-down that appears.
- In the following view, select Channels, then click the green + icon to create a new channel.
- From the Channel Type drop-down, select Facebook:Service.
- Add a Channel Name. Please use the convention <company name> - Facebook Service. Example: Genesys - Facebook Service.
- Optionally, add a description that indicates the planned usage of the channel.
- Click Save and Proceed.
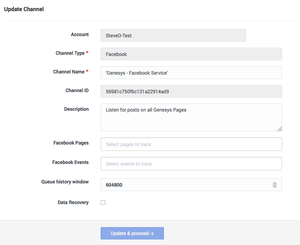
- Update Channel displays.
- Make a note of the Channel ID—it will be needed for a later step
- Click Facebook Pages to get a drop-down list of all of the Facebook pages that the Facebook user is an administrator of. Select each page that you want to monitor.
- Click Update & proceed.
The New Channel window displays.
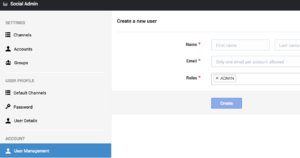
6. Define an Admin user for the account
You will also have to create a new admin user login and password in order to facilitate communication with Social Messaging Server.
- Navigate to the top right hand corner of the screen and click the small gear icon, then click Settings on the drop-down that appears.
- From the following view, select User Management.
- In the First Name field, type the company's name followed by a 1; for example, Genesys1.
- In the Last Name field, type admin.
- In the Email field, type an email address using a format like the following: Genesys1_Admin@GenSocialEngage.com. Copy and paste this email address to your notepad file as it will be used for a later step of the deployment.
ImportantThis email address will not be used for sending or receiving emails. It is only used to manage logging in, and communications between the cloud and on-premise components of Genesys Social Engagement.
- Make sure that Admin is selected in the Roles field.
- Click Create.
- Now return to User Management. You should see a list of the users associated with the account that you have set up.
- Click Reset Password for the admin user that you have just created.
- Enter a new password, and make a note of it (copy and paste to your text file); also make a note of associated email address. You will use them in a later step of the deployment.
7. Configure connections
To configure connections between the on-premise Social Messaging Server and the cloud-based Account and Channels that you set up in Steps 1 through 5 above, you must set values for certain configuration options.
- Import the configuration options files, being sure to select No in response to Do you want to overwrite the existing data?
- Set option values both the Twitter and Facebook Drivers. The values are based on the setup in Steps 1–6. Be sure that your text file has all of the text that you've copied and pasted clearly identified. Set the option values by copying and pasting the exact values from your text file (complete descriptions of these options are on this page).
Option Values Option Value gsa-account-name Company/Organization name from Step 1 gsa-api-key API key from Step 1 gsa-channel-id Facebook—Facebook:Service Channel ID from Step 5 Twitter—Twitter:Service Channel ID from Step 3 gsa-channel-name Facebook—Facebook:Service channel name in Step 5 Twitter—The exact text used in the Twitter:Service channel name from Step 3 gsa-url-base socialanalytics.genesyscloud.com/api/v2.0 gsa-user-name The admin email address from Step 6 gsa-user-password The admin password from Step 6 - Test both channels by submitting posts via Twitter and Facebook, and seeing if they appear in the customer’s Workspace.
Sample values are shown in the following figures (click to enlarge). Note that the values of gsa-api-key, gsa-channel-id, and gsa-user-password are masked in these figures for privacy.
thumb|none|Facebook Samplethumb|none|Twitter Sample
8. Using more than one Twitter handle to respond to customers
Use this step if a Genesys customer has two or more Twitter handles (for example, @ACMEXYXCorp1, @ACMEXYZCorp2) that they wish to use for conversing with customers on Twitter.
- Repeat Steps 2 and 3 above to configure another pair of Twitter:Account and Twitter:Service channels using another twitter handle.
- Repeat Step 6 to add another admin and set a password, taking care to note the new email that you use and password. These will be used in a later step.
- Log out of https://socialanalytics.genesyscloud.com
- Now use the admin credentials just created to log in again to https://socialanalytics.genesyscloud.com
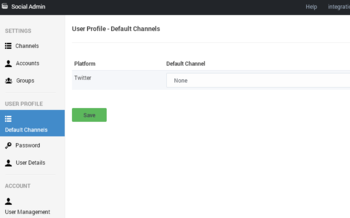
- Navigate to the top right hand corner of the screen and click the small gear icon, then click Settings on the drop-down that appears.
- Click Default Channels.
- From the pulldown, select the Twitter:Account channel that you just created.
- Now repeat Step 7: import another Twitter channel configuration template and set the options using the values of the new Twitter:Service handle and the additional admin email and password that you just created.
Best Practices for Managing Keywords in Twitter Service Channels
When setting up a Twitter:Service channel, you have the option to add any text in the Keyword field. It is important to use only appropriate keywords. If your keywords are very common or popular, your inbound feed may be cluttered with too many useless posts. In extreme scenarios, Twitter may cut off access to data if the data volumes are too high. This might occur for example if you were to input keywords such #awesome or hello. (Go to www.twitter.com for more information regarding rate limits.)
If one were to set up a channel to monitor mentions of Genesys on Twitter, some appropriate keywords and phrases would include: @Genesys, #Genesys, and Genesys software.
It is essential to check that keywords you use are not too broad or ambiguous. Go to https://twitter.com/search-home and check the keyword(s) you plan to use (one at a time). You will need to view the search results and assess the results. If there were a company called "United Ultra Local Bank Inc." one might be inclined to use the keyword #United. This would be a mistake, as it would source a flood of unnecessary posts from Twitter users that are submitting posts relating to #United Nations, #United States, Manchester #United, and so on. Even worse would be #Check, savings account, #balance, or overdraft as these are even more generic.


