Deploying a Rules Package
Contents
Creating a rules package is the final step before you are ready to test your new application. Refer to the Application Development Tasks for details about the previous steps.
Rules are mandatory for managing actionable events generated from the System and Business event flows submitted by the Browser Tier. To add rules, you must create a package and then a set of rules. For details about rules, refer to the Genesys Rules System documentation.
After completing the steps on this page, the rules are deployed to the Web Engagement Servers.
Complete the following steps to create and deploy a rules package:
- If you need to map your rules to a particular domain, review Multi-Package Domain Oriented Rules.
- Creating a Rules Package
- Creating Rules in the Rules Package
- Deploying the Rules Package
Multi-Package Domain Oriented Rules
Genesys Web Engagement supports multi-package domain oriented rules. You can map your rules package to a particular domain by reversing the domain zone in the name of the rules package. For example, the blog.genesys.com domain would have a rules package called com.genesys.blog.
You can have multiple rules packages on the same server at the same time. New rules packages (with a different package name) that are deployed do not rewrite the current rules, but are instead added to the current rules set. When the existing rules package is deployed, it rewrites selected package rules in the current rules set.
This domain mapping is applied hierarchically - the "root" domain is processed by the "root" package and the sub-domain is process by the sub-package and all parent packaged (including "root").
For example, your website contains the following sub-domains:
- genesys.com
- blog.genesys.com
- communication.genesys.com
- personal.communication.genesys.com
And you have the following rules packages:
- com.genesys
- com.genesys.blog
- com.genesys.communication
- com.genesys.communication.personal
The rules packages are processed as follows:
| Domain | com.genesys | com.genesys.
blog |
com.genesys.
communication |
com.genesys.
communication. personal |
|---|---|---|---|---|
| genesys.com | + | - | - | - |
| blog.genesys.com | + | + | - | - |
| communication.genesys.com | + | - | + | - |
| personal.communication.genesys.com | + | - | + | + |
Creating a Rules Package
Complete the steps below to create the rules package associated with your Web Engagement application. This procedure is an example of how to create a rules package. For further information about creating rules, refer to the Genesys Rules System Deployment Guide.
Prerequisites
- Your environment includes Genesys Rules Authoring Tool. See Genesys environment prerequisites for compliant versions.
- Roles are configured to enable your user to create rules.
- Your CEP Rule templates were published.
Start
- Open the Genesys Rules Authoring Tool and navigate to Environment > Solution > New Rule Package.
- In the General tab:
- Enter a Package Name. For example, myproject.rules.products.
- Enter a Business Name. For example, Products.
- Select web_engagement for Package Type. WebEngagement_CEPRule_Templates appears in the Template table.
- Optionally, you can enter a Description.
- Select WebEngagement_CEPRule_Templates in the Template table.
- Click Save.
End
Creating Rules in the Rules Package
Prerequisites
Start
- In Genesys Rules Authoring Tool, select the rules package you created in the previous procedure.
- Select the Rules tab.
- Click New Linear Rule. This creates a new rule in the Rules table.
Note: Web Engagement does not support GRAT Decision Tables. You must only use Linear Rules. - Select the created rule:
- Enter a Name. For example, Products.
- Enter a Phase. The list of rule phases can be modified by changing the values of the Phases enumeration in the CEP Rules Template. The default value is *.
- Click Add Condition:
- Scroll down to select a condition. For example, a page transition event occurs and belongs to category, which launches the actionable event any time that a user enters or leaves a page on your website.
- Select a category in Parameters. For example, Products. The Parameters list displays the categories that you previously created.
- Scroll down to select a condition. For example, a page transition event occurs and belongs to category, which launches the actionable event any time that a user enters or leaves a page on your website.
- Click Add Action and select an action in the list. For example, generate actionable event.
- Click Save....
- You can create as many rules as you need in your rules package.
End
Deploying the Rules Package
Prerequisites
- Your GRAT application has a connection to the GWE Cluster application.
- You started the Web Engagement servers.
Start
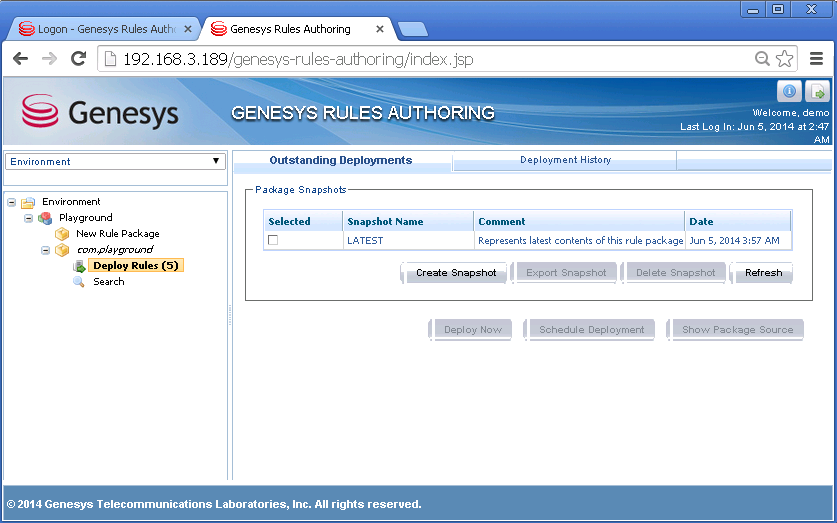
- In Genesys Rules Authoring Tool, navigate to Solution > your rules package > Deploy Rules.
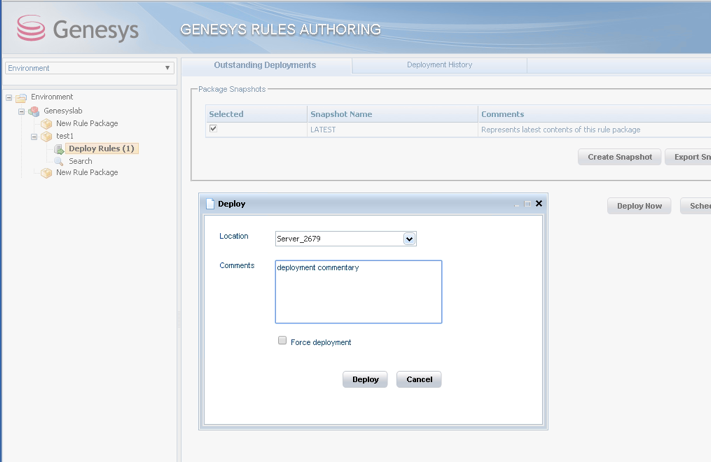
- Select the checkbox next to your rules package in the Package Snapshots section.
- Click Deploy Now. The Deploy window opens.
- Select your Genesys Web Engagement Server for the Location.
- Click Deploy. The rules package is deployed to the Web Engagement system.
End
Next Steps
- If you are following the Lab deployment scenario, you can test your application with the ZAP Proxy.


