Contents
Forward Your Calls
In this lesson, you will learn how to forward your call by using the My Channels tab in the Main Window. This lesson contains the following section:
Forwarding Calls
You can forward your calls to a different destination.
Lesson: Forwarding your calls to a different destination
Purpose:
- To specify a different destination to which your calls are directed temporarily and to cancel a forward.
Prerequisites
- You are logged in to Interaction Workspace (see Lesson: Logging in to Interaction Workspace).
Start
- To forward calls to a different destination, in the Main Window, click Workspace.
- Click the My Channels tab.
- On the media channel that you want to forward, right-click in the Forward column, and select Forward (see the Main Window Workspace My Channels Forward menu figure).
The Forward dialog box is displayed (see the Forward dialog box figure).
- Enter the phone number to which you want to forward your calls.
- Click Apply to set the forward. Click Cancel to return to the My Channels tab without forwarding your calls.
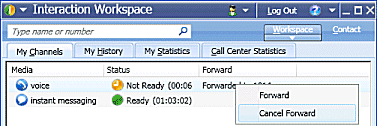
- If you have an active forward set and you want to disable it, in the My Channels tab, right-click in the Forward column and select Cancel Forward (see the Main Window Workspace My Channels Forward menu selecting Cancel Forward figure).
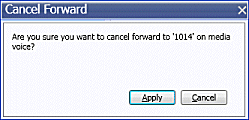
The Cancel Forward dialog box is displayed (see the Cancel Forward dialog box figure).
- Click Apply to cancel the forward. To keep the forward active, click Cancel; this action removes the active forward and changes the Forward status to No Active Forward.
Canceling Your Call Forward
End
This page was last edited on February 15, 2013, at 18:26.
Comments or questions about this documentation? Contact us for support!


