Edit Case Information And Record Information
[Modified: 8.5.117.18, 8.5.118.10,8.5.121.03]
In this lesson, you will learn how to edit the Case Information of your interactions and the Record Information of your outbound campaign voice interactions.
Sometimes when you receive an interaction, there might be errors in the Case Information. For example, a contact might have given erroneous or incomplete information to the IVR, or selected the wrong language preference. Workspace enables agents who are configured to edit Case Information to make changes to specified fields in the Case Information and Record Information views (refer to the Workspace Help for more information on these views).
You can correct fields while you manage the interaction, or you can update fields to reroute the interaction to a different agent or queue.
This lesson contains the following section:
Editing Case Information
You can edit the case information of active interactions if you are configured with this privilege. There are four types of Case Data that you can update:
- Text (word or string of words)
- Check boxes (Boolean: yes/no)
- Dates (date and time)
- Numbers (integer and decimal)
- Specific text or numbers selected from a drop-down list or folder tree
Lesson: Modifying case information
Purpose: To specify a different value for a Case-Information field that is configured to be editable.
Prerequisites
- You are configured to edit case information.
- You are logged in to Workspace (see Lesson: Logging in to Workspace).
- You have accepted an interaction that contains case data.
Start
- When the interaction is displayed on your desktop, view the Case Information view. Move your mouse pointer over the view to see which fields are editable. Editable fields are indicated by a small pencil icon (see the Case Information view, with both editable and non-editable fields figure).
Editable check boxes appear as active, while non-editable check boxes appear as inactive (that is, dimmed—see the Case Information, with both editable and non-editable check boxes figure).
ImportantMandatory fields: Your administrator might have made some editable fields mandatory to be edited before you can mark done, send, or close an interaction. Mandatory fields are indicated by a red asterisk. If you attempt to mark done, send, or close an interaction without editing a mandatory field an error message is displayed, and you are prevented from marking done, sending, or closing the interaction [Added: 8.5.117.18]
Sometimes, not all of the case data is available. There might be fields missing. If you are configured to add missing fields, the Add Field button (
 ) is displayed in the Case Information toolbar.
- Click Add Field to display a drop-down list of fields.
- Select a missing field to display the field in the Case Information view.
- Click X to remove the field.
- Enter the missing Case Data. For certain types of data, what you enter might be restricted to a certain number of characters or certain types and combinations of characters. For example, if you have to enter a credit card number, then the field might only allow certain numbers for a particular type of credit card.
If one of the characters that you type is invalid or the maximum number of characters that is allowed is reached, then nothing will be entered in the text field.
If what you have typed does not match what Workspace is expecting you to enter, an error icon appears to warn you that you must check what you have entered and correct it.ImportantIncorrect format: If you do not correct incorrectly formatted entries before you attempt to mark done, transfer, move the interaction to a workbin, or any other action that transfers ownership of the interaction, a warning message is displayed asking you to either discard your changes or proceed with the action. If you cancel your action, you can correct the entry. If the entry is mandatory, you must set the correct value before you can close the interaction.
- If what you have entered is correct, press Enter to add the Case Data to the case information for the interaction.
- Click an editable check box to select it (see the Case Information with an editable check box selected figure); click it again to de-select it (see the Case Information, with both editable and non-editable check boxes figure).
- Click an editable data-time field to edit it. A calendar and time-picker view is displayed (see the Case Information date and time editor figure).
To set a new date, use the arrows to move the month and year forward and backward, respectively. Click a day to select it.
To set a new time, click an hour, minute, or second, and then use the up and down arrows to increase or decrease the value respectively, or use your keyboard to enter a new value. - Click an editable drop-down list to change its value (see the Case Information drop-down list editor figure).
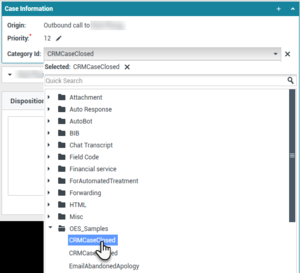
Some drop-down lists might contain a tree structure of folders. The tree structure allows your adminstrator to group different related selections in folders to make it easier for you to find the correct choice. You can either click through the folder structure to find the selection or, if you know the name of the selection you want, just type it in the Quick Search box. To open or close a folder, click it. To select an entry, click it. [Added: 8.5.118.10]
- To edit a text value, click the value to open the text-edit field. Modify the value and press Enter (see the Case Information editable text field figure).
End


