Configuring Pulse

|
Steps to enable the Pulse features available for GMS/CS services in the GAX interface. If you configure Pulse options, you will get widgets including Context Services statistics in your Pulse Dashboard. |
Contents
Pulse is a widget-driven, graphical user application, which is accessible from a web browser as a Genesys Administrator Extension (GAX) plug-in application. Using a direct communication link to a real-time metrics engine, Stat Server, Pulse enables at-a-glance views of real-time contact center statistics within the GAX user interface.
GMS installation already includes default templates for Pulse. If you configure Pulse options, as detailed below, Context Services pushes events to the Stat Server for Pulse which are then available for users in the Pulse dashboards and widgets.
Important
See the Pulse portal page for detailed documentation on this tool.Procedure: Configuring Pulse Options
Purpose: To create and configure the pulse section
Steps
- Start the Configuration Manager and navigate to Applications.
- Edit your GMS application.
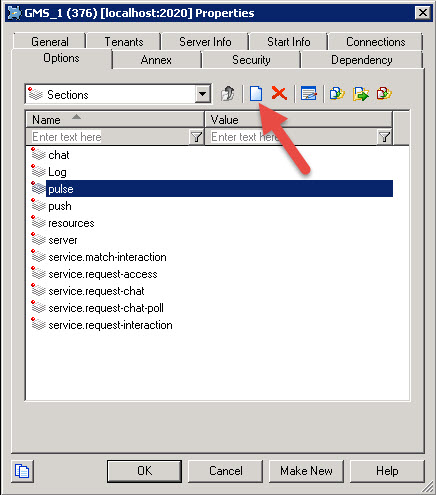
- Select the Options tab, and click on the New button to create a new section.
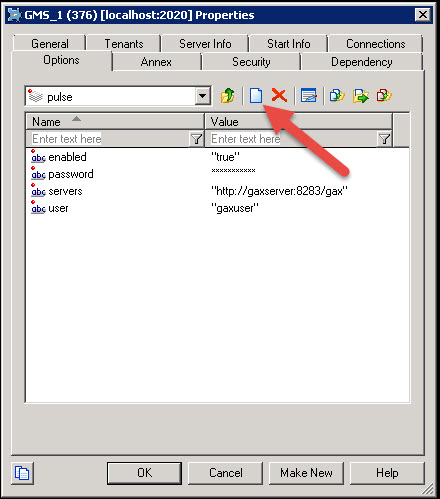
- Select the section and click on the New button to create the following options:
- Enter enabled for the Name, then true for the Value. Click OK.
- Enter user for the Name, then a username who has Pulse authorizations for the Value. Click OK.
- Enter password for the Name, then the username's password for the Value. Click OK.
- Enter servers for the Name, then a list of one or more URLs separated by semicolons which point to Pulse applications for the Value; for instance: "http://gax1dev:8283/gax;http://gax2dev:8283/gax". Click OK.
This page was last edited on January 26, 2015, at 11:02.
Comments or questions about this documentation? Contact us for support!


