Contents
Cassandra Security
This page discusses security configurations for Cassandra.
Protecting Data Stored in the Cassandra Database
The <Genesys Mobile Services installation directory>/etc/cassandra.yaml file enables or disables encryption of Cassandra inter-node communication using TLS_RSA_WITH_AES_128_CBC_SHA as the cipher suite for authentication, key exchange, and encryption of the actual data transfers. To encrypt all inter-node communications, set to all. You must also generate keys, and provide the appropriate key and trust store locations and passwords. Details about Cassandra options are available from:
All transient service session-related data is stored in a Cassandra database that uses memory and the file system. See the <Genesys Mobile Services installation directory>/data folder. Files located here should be protected from unauthorized access.
Cassandra Authentication
The Cassandra API for custom authentication and authorization has been deprecated in 2.x. Although the legacy classes for authentication and authorization are still implemented in GMS for backward compatibility, Genesys recommends that you use the External Cassandra configuration for both authentication and authorization.
Cassandra TLS Support
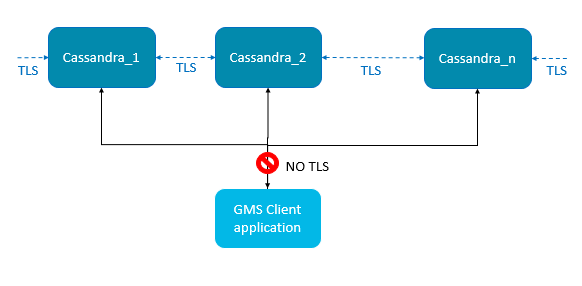
 TLS support for external cassandra includes:
- Inter-node communication (Gossip)
- JMX connection (cassandra tools for monitoring)
GMS Client connections do not support TLS when connecting to the Cassandra servers due to internal driver limitations.
Cassandra Gossip TLS
In Cassandra version 1.1.x (the Cassandra version in GMS), the internode (gossip) encryption is set up in the cassandra.yaml file. Locate the following lines in the cassandra.yaml file:
encryption_options:
 internode_encryption: none
 keystore: conf/.keystore
 keystore_password: cassandra
 truststore: conf/.truststore
 truststore_password: cassandra
Replace internode_encryption: none with internode_encryption: all, as shown in the following example:
encryption_options:
 internode_encryption: all
 keystore: conf/.keystore
 keystore_password: cassandra
 truststore: conf/.truststore
 truststore_password: cassandra
For managing keystore and truststore (and password), see the Oracle documentation keytool-Key and Certificate Management Tool or the Oracle security guide.
Cassandra JMX TLS
Cassandra monitoring and management can be done using a Java Management Extensions (JMX) tool. The JMX access must be protected in order to avoid any remote managing on the GMS embedded Cassandra. To protect JMX access, edit the launcher.xml file that contains the following lines (by default):
<parameter name="jmxport" displayName="jmxport" mandatory="true"
hidden="true" readOnly="true">
     <description><![CDATA[JMX related]]></description>
     <valid-description><![CDATA[]]></valid-description>
     <effective-description/>
     <format type="string"
default="-Dcom.sun.management.jmxremote.port=9192" />
     <validation></validation>
 </parameter>
 <parameter name="jmxssl" displayName="jmxssl" mandatory="true"
 hidden="true" readOnly="true">
     <description><![CDATA[virtual machine related]]></description>
     <valid-description><![CDATA[]]></valid-description>
     <effective-description/>
     <format type="string" default="-Dcom.sun.management.jmxremote.ssl=false" />
     <validation></validation>
 </parameter>
 <parameter name="jmxauthenticate" displayName="jmxauthenticate"
 mandatory="true" hidden="true" readOnly="true">
     <description><![CDATA[virtual machine related]]></description>
     <valid-description><![CDATA[]]></valid-description>
     <effective-description/>
     <format type="string"
default="-Dcom.sun.management.jmxremote.authenticate=false" />
     <validation></validation>
 </parameter>
By default, the TLS and authentication parameters are disabled:
   com.sun.management.jmxremote.ssl=false
   com.sun.management.jmxremote.authenticate=false
For information about enabling these parameters and managing JMX and TLS, see the Monitoring and Management Using JMX Technology chapter in the Oracle Java SE Monitoring and Management Guide.
Embedded Cassandra JMX Authentication
You can follow this procedure to activate the JMX anonymous authentication and see your GMS Cassandra nodes status in the Service Management UI.
- Edit the launcher.xml file and set the following parameter to true: -Dcom.sun.management.jmxremote.authenticate=true
- If missing, add the following parameter:
<parameter name="jmxRemotePassword" displayName="jmxRemotePassword"
mandatory="true" hidden="true" readOnly="true">
<description><![CDATA[virtual machine related]]></description>
<valid-description><![CDATA[]]></valid-description>
<effective-description/>
<format type="string"
default="-Dcom.sun.management.jmxremote.password.file=./etc/jmxremote.password" />
<validation></validation>
</parameter>
- Edit the <GMS Installation directory>/etc/jmxremote.password file to add the following username:
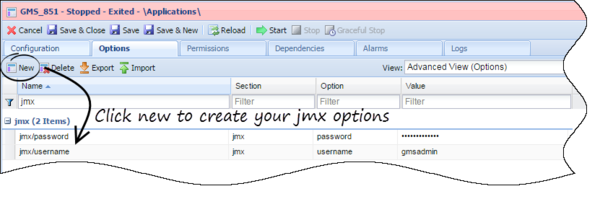
gmsadmin yourpassword - Edit your GMS configuration and create the following options in the Options tab:
Section jmx
username=gmsadmin
password=your-password

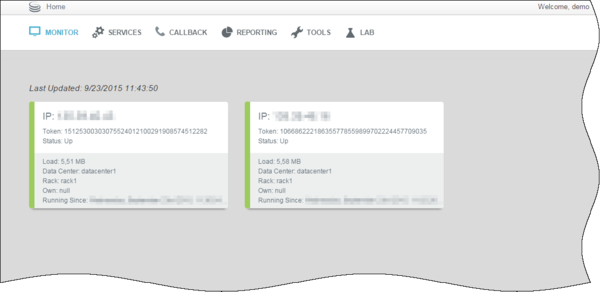
- Start GMS. If you open the Service Administrator UI, you should see the GMS nodes in the Monitor panel, as shown below.

