Contents
Disaster Recovery
- This document has been prepared specifically for Red Hat, Inc., for release with Web Services and Applications 8.5.201.45.
- The information contained herein is proprietary and confidential and cannot be disclosed or duplicated without the prior written consent of Genesys Telecommunications Laboratories, Inc.
- Copyright © 2016 Genesys Telecommunications Laboratories, Inc. All rights reserved.
- For technical assistance, contact your Genesys Customer Care representative.
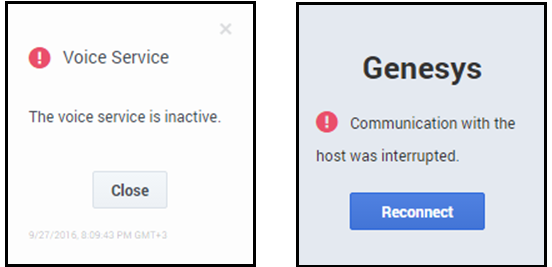
Genesys provides support for disaster recovery in scenarios where the preferred data center goes down. When a disaster scenario occurs while an agent is active on Agent Desktop or Gplus Adapter for Salesforce, the agent is notified in a dialog box and they can click Reconnect to reconnect to the secondary data center. When the preferred data center returns to operation, the agent can then log back into the preferred data center.
In a disaster recovery scenario, any time an agent logs in to Salesforce, the first attempt is to connect to the primary data center. If the login is unsuccessful after a configurable timeout interval, Salesforce connects to the designated disaster recovery data center.
How does disaster recovery affect the user experience?
When a disaster situation occurs to Gplus Adapter for Salesforce users, agents are notified and are requested to take action if needed. For example, if the voice service goes down, logged in agents will see an error message to notify them that the voice service is interrupted. Then when the timeout interval is reached and the secondary data center is available, another dialog box is displayed asking the agent to reconnect.
The user experience for Agent Desktop users is not affected.
How do I configure for disaster recovery?
For Agent Desktops deployments, you don't need to configure anything. Genesys configures disaster recovery for you.
For Gplus Adapter for Salesforce deployments, you need to configure disaster recovery in your Salesforce deployment.
How do I configure disaster recovery for Gplus Adapter for Salesforce?
To perform the following procedure, you need to set up a new call center using an XML file that Genesys provides to you.
Before you begin, ensure that you have:
- A Salesforce administrator role account
- The callcenter.xml file
- Host and port information required to specify call center settings. Genesys provides this information to you.
Start
- Get the callcenter.xml file from Genesys and save to a local folder.
- Log into Salesforce.com with your administrator credentials to open the Home page..
- Select Setup.
- In the Quick Find field, type Call Center.
- Click Call Centers.
- Click Import.
- Click Choose File and navigate to the folder where you saved the callcenter.xml file.
- Click Import.
- Click Edit and fill in the CTI Adapter URL and CTI Adapter Backup URL that Genesys provided to you. When you paste the URLs that Genesys gives you, add the following parameters:
- Add &site-1=<GWSHOST>:<GWSPORT>&disable-dr-reload=true to CTI Adapter URL.
- Add &disable-dr-reload=true to CTI Adapter Backup URL.
End
Next steps
After you add your disaster recovery call center, you must provision the call center with users. If you have a previous Salesforce Call Center, remove users from that Call Center and add the users to the new call center you just added.
Removing Multiple Users
To remove multiple users from a call center:
- Log into Salesforce with your administrator credentials to open the Home page.
- Click Setup, found under the User menu drop-down list, under your user name in the top right corner, to open the Force.com page.
- From the App Setup section on the left side of the screen, click Customize to open the customization options.
- Click Call Center to open the Call Center page.
- Click Manage Call Centers under the Call Center section.
- Click the name of the call center from which you want to remove the Salesforce user.
- In the Call Center Users section, click Manage Call Center Users.
- Select the Action check box next to each user you want to remove.
- Click Remove Users.
Adding Users
You can add new users to your Salesforce call center using the following steps:
- Log into Salesforce with your administrator credentials to open the Home page.
- Click Setup, found under the User menu drop-down list, under your user name in the top right corner to open the Force.com page.
- From the App Setup section on the left-hand side of the screen, click Customize to open the customization options.
- Click Call Center > Call Centers.
- Click the name of your contact center.
- In the Call Center Users section, click Manage Call Center Users. You can also access this button from the Call Center Edit screen, if you are editing your callcenter.xml file.
- Click Add More Users.
- Specify the search criteria to find the users who you want to assign to your call center. For example, you can search by the Last name field.
- Click Find to display the refined list of your search criteria.
- Select the check boxes for the users that you want to add.
- Click Add to Call Center.

