Contents
Basic Configuration
This page details the basic configuration steps required before you can use your Genesys Mobile Services installation. For a more general look at the configuration options available, refer to the Configuration Options Reference.
Basic Configuration Overview
Genesys Mobile Services provides a set of services or APIs that require configuration before the product can be used. The configuration of services is stored into Configuration Server.
Working in Configuration Manager
Genesys Mobile Services is represented by an Application object in the Configuration Server database. This Application object is based on the "Genesys Generic Server" template and contains typical settings for a Genesys application including Server Info, Start Info, and Connections to other servers. It also includes Options that correspond to configuration details for sub-services of Genesys Mobile Services.
Configuration settings are grouped for different service types, and stored in Option sections described below:
- log Section—Standard log file options for this Application object. For more information about these options, refer to your Genesys Framework documentation.
- gms Section—Configuration settings used across different services.
- push Section—Notification service parameters. Not monitored at run-time, so the Genesys Mobile Server instance must be restarted for changes to take effect.
- resource Section—Details about how resource groups are handled. Run-time configuration changes are supported, so changes take effect immediately.
- server Section—Cluster sub-service configuration details. Includes URL representation of this node of the cluster, consisting host, port and application name formatted in the following way: http://web_host:web_port/app_name. (Example: http://yourHostName:8080/gms). Run-time configuration changes are supported, but due to tight logical connection to the web-container configuration, a restart is needed in most cases.
- service.servicename Section—Additional configuration options for customized services.
Some services also rely on configuration details from a Transaction object in Configuration Manager that must be created and configured in your Genesys environment. Note: If setting up multiple Genesys Mobile Services nodes, the configuration options specified in the Application object must be the same for each instance. If you are familiar with working in a Genesys environment, this type of configuration should be second nature. If you require additional information about how to work with Configuration Manager to edit these configuration options, refer to the Help file included with that product.
Creating and Configuring a Resource List
Some services included with Genesys Mobile Services require a list of resources, such as a list of access numbers that can be managed. Such lists are held in a Transactions object, which is then referenced by Options set in the Genesys Mobile Services Application object.
The steps required to create and populate a resource list are provided below. You can also configure these services through the GMS Service Management User Interface.
Start
- Start Configuration Manager.
- Under the tenant you are working with, open the Transactions folder.
- Right-click and select New > Transaction.
- On the General tab, configure the following fields:
- Name—This name must match the resources > resource_list_name option value from your Genesys Mobile Services Application object. The default value is GMS_Resources.
- Type—Select List from the drop down box.
- Alias—Enter an alias of your choice.
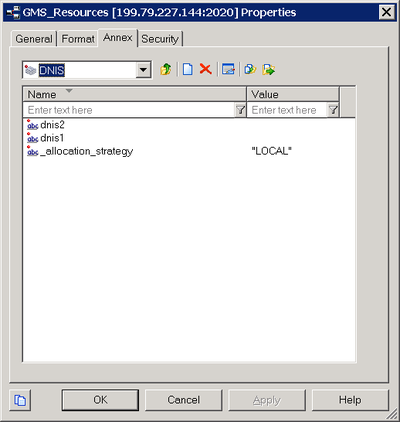
- On the Annex tab, create a new section. The section name used here must match the value of the resource_group option, located in the service.servicename section of your Genesys Mobile Services Application object.
- Add options to the newly created section to create your resource list. The Resource name should not start with an underscore ( _ ).
- Add and set an _allocation_strategy option for this group. The valid values are RANDOM, LOCAL, or CLUSTER.
End
A sample resource list configuration is shown below.
Creating and Configuring a Pattern List
Some services included with Genesys Mobile Services require a list of patterns (for exceptions, and so on) to compare parameter values to a list of defined patterns. These lists are held in a Transactions object, which is then referenced by Options set in the Genesys Mobile Services Application object.
The steps required to create and populate a pattern list are provided below. You can also configure these services through the GMS Service Management User Interface.
Start
- Start Configuration Manager.
- Under the tenant you are working with, open the Transactions folder.
- Right-click and select New > Transaction.
- On the General tab, configure the following fields:
- Name—This name must match the patterns > pattern_list_name option value from your Genesys Mobile Services Application object. The default value is GMS_Patterns.
- Type—Select List from the drop down box.
- Alias—Enter an alias of your choice.
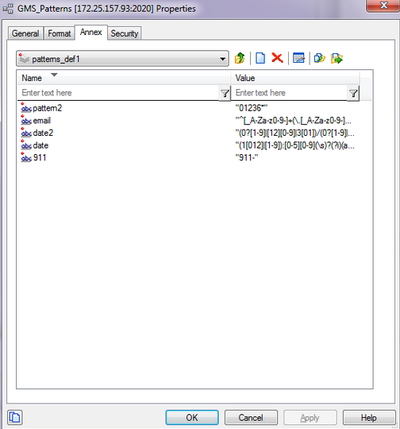
- On the Annex tab, create a new section. The section name used here must match the value of the patterns_group option, located in the service.servicename section of your Genesys Mobile Services Application object.
- Add options to the newly created section to create your pattern list.
End
A sample pattern list configuration is shown below.
Configuring Services for Genesys Mobile Services
To complete your deployment, the following GMS-based services need to be configured:
- request-interaction
- match-interaction
- request-access
Required options are outlined below, with some sample values to help you get started. You can configure these services through the GMS Service Management User Interface.
request-interaction
| Option Name | Option Value |
|---|---|
| _type | builtin |
| _ttl | 30 |
| _service | request-interaction |
| _resource_group | (Use the section name created earlier under your GMS_Resources Transactions object.) |
| _provide_code | true |
match-interaction
| Option Value | |
|---|---|
| _type | builtin |
| _service | match-interaction |
| _delete_match | true |
| _http_status_on_error | 404 (or a valid http status code) |
request-access
| Option Name | Option Value |
|---|---|
| _type | builtin |
| _ttl | 30 |
| _service | request-access |
| _resource_group | (Use the section name created earlier under your GMS_Resources Transactions object.) |
| _access_code_length | 4 |
Additional Configuration
All nodes in your deployment (GMS, ORS, and so on) must be set with the same time.
Single Tenant Support
Note: Introduced in GMS 8.5.003.
For chat service, the default chat endpoint value in the chat section > default_chat_endpoint option can be used for all services. Or by service, you can customize the _chat_endpoint option. These options, default_chat_endpoint and _chat_endpoint, are composed of <tenant DBID>:<chat endpoint name>. The configuration for the tenant DBID is:
- Single-tenant Configuration Server, using the tenant name Resources, with DBID=101
- Multi-tenant Configuration Server, using the default tenant, tenant name is Environment, with DBID=1
- Multi-tenant Configuration Server, using a tenant other than Environment, with DBID distinct from 1


