Configure the Backend Server
Contents
Configuring the Backend Server Application
![]() Purpose: Enter the configuring information for the Web Engagement Backend Server in Configuration Server.
Purpose: Enter the configuring information for the Web Engagement Backend Server in Configuration Server.
Prerequisites
- You created the Web Engagement Backend Server application.
Start
- Open Genesys Administrator and navigate to PROVISIONING > Environment > Applications. Select the application defined for the Web Engagement Backend Server and click Edit...
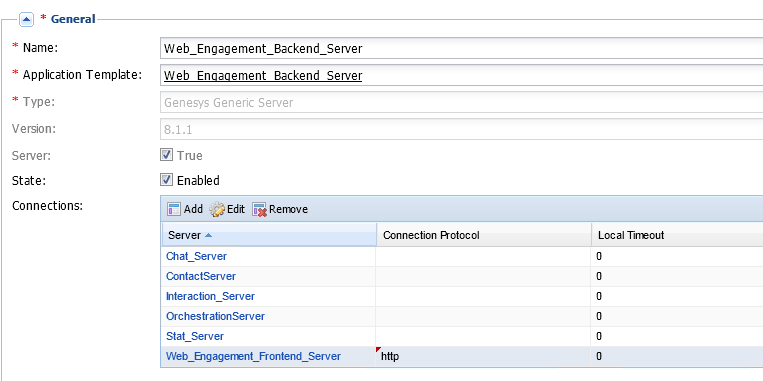
- Configure the Backend Server connections.ca
- In the Connections section of the Configuration tab, click the Add button. The Browse for applications panel opens. Select the Genesys application defined for the Chat Server, then click OK.
ImportantGenesys Web Engagement also supports Chat Server clusters. To configure the Web Engagement Backend Server to work with a cluster of Chat Server objects, see Chat Server Cluster Configuration.
- Repeat the previous step to add the connections to the following servers:
- Contact Server
- Interaction Server
- Stat Server
- Orchestration Server. After you have added the connection, select the Orchestration Server row in the list of connections and click Edit. In the Connection Info window, select the default port for the ID and set the Connection protocol to http. Click OK.
- Web Engagement Frontend Server. If you already created the application for the Frontend Server, you can add a connection to it now. After you have added the connection, select the Frontend Server row in the list of connections and click Edit. In the Connection Info window, set Connection Protocol to http and click OK
If you haven't created the application for the Frontend Server, you can add a connection to it later.
- In the Connections section of the Configuration tab, click the Add button. The Browse for applications panel opens. Select the Genesys application defined for the Chat Server, then click OK.
- Configure the Server Info section of the Configuration tab.
- Click the Add button of the Tenants section.
- Select your application tenant. For instance, Environment.
Note: You should select only one tenant object. - Click OK. The tenant is added to the Tenants table.
- If your Host is not defined, click the lookup icon to browse to the hostname of your application.
- Configure the default http port:
- Click Add in the Listening ports section. The Port Info dialog opens.
- Enter the application's Port. For instance, 9081.
- Mandatory: Select http for the Connection Protocol field.
- (Optional) Enter a description.
- Click OK. The HTTP port with the default identifier appears in the list of Listening ports.
- Optionally, you can add a secure listening port for authenticated users, secured connections, and secure chat:
- Click the Add button. The Port Info dialog opens.
- Enter the ID. For instance, https.
- Enter the Port. For instance, 9443.
- Enter https for the Connection Protocol.
- Choose secured for the Listening Mode.
- Click OK.
- Create the port with the backend/data/rules/deploy identifier.
- Click Add in the Listening ports section.
- Enter backend/data/rules/deploy for the ID.
- Enter the same port value as you did for the default port. For instance, 9081.
- Select http for the Connection Protocol field.
- (Optional) Enter a description.
- Click OK. The HTTP port with backend/data/rules/deploy ID appears in the list of Listening ports.
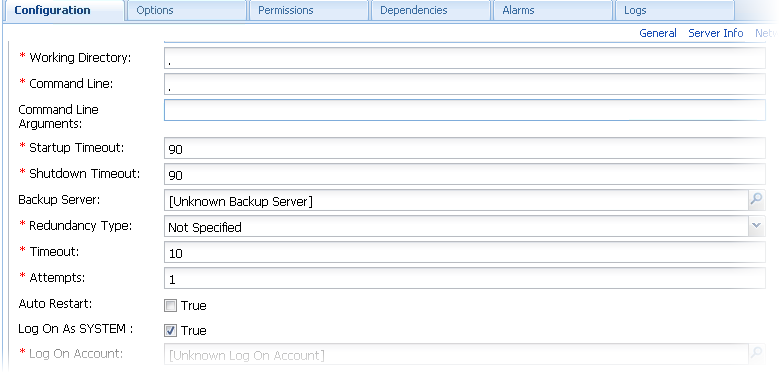
- Enter a period (.) in Working Directory. The path will be filled in automatically when the new Application is installed and connects to Configuration Server;
- Enter a period (.) in Command Line. The command line will be filled in automatically when the new Application is installed and connects to Configuration Server;
- Leave Command Line Arguments blank. Any arguments will be filled in automatically when the new Application is installed and connects to Configuration Server;
- Click Save. The Confirm dialog displays the following message: The host and/or port(s) of the application will be changed. Do you want to continue?
Click Yes. - Select the Options tab. By default, the all option is set to stdout and does not enable logging to a file. Enter a filename if you need logging to file. For example, enter the value "stdout, C:\Logs\WebEngagement\Backend_Server" to write logs both in the standard output console and in a file located in the c:\Logs\WebEngagement\ directory.
- (Optional) You need to create a webengagementannex only if your Web Engagement Backend Server application's type is Genesys Generic Server. Click New on the Options menu.
- Set Location to Annex.
- Enter webengagement for the Section.
- Enter type for the Name.
- Enter backendserver for the Value.
- Click OK to create the new annex. You can see it by selecting Advanced View (Annex) in the View selector.
- If you added a connection to the Frontend Server, in the settings section, set event-mode to true.
- Click the Save & Close button. If the Confirmation dialog opens, click Yes.
End
- Genesys recommends you set the Java heap size for the Backend Server to 3GB or more for a production site. See Generic Cassandra Configuration for details.
- The configuration application for the Backend Server is ready for provisioning. You may need to edit options later according to your application needs.
- If you did not add the Frontend Server to the Connections of the Backend Server, you must do it after the creation of the Frontend Server application.
Next Steps
- If you haven't configured the Frontend Server, go to Configure the Frontend Server.
- If you have configured the Frontend Server, you can install Genesys Web Engagement:
Chat Server Cluster Configuration
Genesys Web Engagement uses Web API Server as the entry point for a cluster of Chat Servers.
To implement a Chat Server cluster for Web Engagement, you must first have a Web API Server application with connections to one or more Chat Server applications or one or more applications of the type Application Cluster. Your Web API Server must also have a connection to Solution Control Server.
For information about how to deploy and configure Web API Server, see the "Manual Deployment—Web API Server and UCS" chapter in the eServices 8.1 Deployment Guide.
When dealing with Web API Server, Web Engagement uses the eServices load balancer component to choose a Chat Server from the cluster for establishing a new chat session. See the "Load-Balancing Configuration for Web API Server" section in the eServices 8.1 User's Guide for more information about creating a Chat Server Application Cluster.
Once your Web API Server application is configured, you can Add a connection to Web API Server on the Backend Server application.
Add a connection to Web API Server on the Backend Server application
Prerequisites
For each Web Engagement Backend Server, you must have a dedicated Web API Server with connections to:
- One or more Chat Server applications, or one or more applications of the type Application Cluster.
- Solution Control Server.
Start
- Open Genesys Administrator and navigate to PROVISIONING > Environment > Applications. Select the application defined for the Web Engagement Backend Server and click Edit...
- In the Connections section of the Configuration tab, click the Add button. The Browse for applications panel opens.
- Select the Genesys application defined for the Web API Server, then click OK. Web API Server is added to the Connections list.
- Click Save.
End


