Installing the Knowledge Center CMS
This chapter describes the process of installing and configuring Knowledge Center CMS that includes following steps:
- Importing the CMS Application Template
- Creating and configuring CMS Application in Genesys Administrator
- Configuring the Data Source
- Installing the CMS
- Granting your agents authoring privileges
- Starting/Stopping the installed CMS application
Before you proceed with these steps you need:
- Configure Knowledge Center Cluster application
- Select and install one of the Relational Database Management Systems (RDBMS) from the supported link
- Configure the load-balancer for access to CMS
Knowledge Center CMS support one of the following RDBMS as persistent storage:
- Microsoft SQL Server 2012
- Oracle 11g
- PostgreSQL
Install the CMS
Import the CMS Application Template
Start
- Open Genesys Administrator and navigate to Provisioning > Environment > Application Templates.
- In the Tasks panel, click Upload Template.
- In the Click 'Add' and choose application template (APD) file to import window, click Add.
- Browse to the Knowledge_Center_CMS.apd file available in the templates directory of your installation CD. The New Application Template panel opens.
- Click Save and Close.
End
Create CMS Applications
Start
- Open Genesys Administrator and navigate to Provisioning > Environment > Applications.
- In the Tasks panel, click Create New Application.
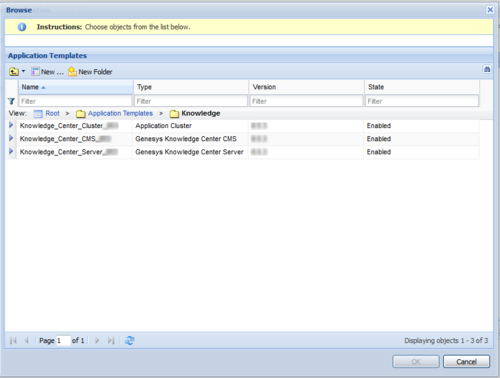
- In the Select Application Template panel, click Browse for Template and select the Genesys Knowledge Center CMS application template that you imported earlier. Click OK.
- The template is added to the Select Application Template panel. Click Next.
- In the Select Metadata file panel, click Browse and select the Knowledge_Center_CMS.xml file. Click Open.
- The metadata file is added to the Select Metadata file panel. Click Next.
- In Specify the appropriate application parameters:
- Enter a name for your application. For instance, Knowledge Center CMS.
- Enable the State.
- Select the Host on which the CMS will reside.
- Click Create.
- The Results panel opens.
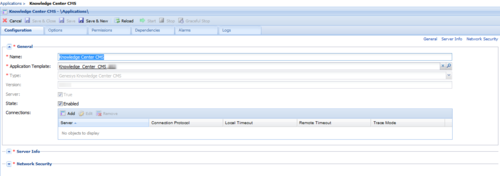
- Enable Opens the Application details form after clicking 'Finish' and click Finish. The Knowledge Center CMS application form opens and you can start configuring the CMS application.
End
Configure the CMS Application
Start
- If your Knowledge Center CMS application form is not open in Genesys Administrator, navigate to Provisioning > Environment > Applications. Select the application defined for the Knowledge Center CMS and click Edit....
- In the Connections section of the Configuration tab, click Add. The Browse for applications panel opens.
- Select the Knowledge Center Cluster application, then click OK.
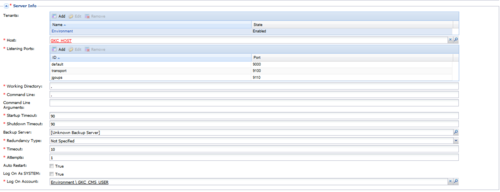
- Expand the Server Info pane.
- If your Host is not defined, click the lookup icon to browse to the hostname of your application.
- In the Listening Ports section, create the default port by clicking Add. The Port Info dialog opens.
- Enter the Port. For instance, 9000.
- Choose http or "https" for the Connection Protocol.
- If you will be using a secure connection to the cluster, choose Secured for the Select Listening Mode.
- Click OK. The port with the default identifier appears in the list of Listening ports.
- Add a port that will be used by Knowledge Center CMS nodes to communicate to each other by clicking on Add and:
- entering clustering in the ID field
- entering the Port. For instance, 9150.
- Clicking OK
- In the Tenants section, add a working tenant by clicking Add. Browse and choose the appropriate tenant in the pop-up dialog. Click OK.
- Uncheck Log On As SYSTEM.
- In Log On Account specify the user account that:
- has the ability to view access groups (this is required if you use access groups to set privileges for your agents)
- has Knowledge.AUTHOR (Allows agent to change data in a knowledge base) privilege and Knowledge.MULTITENANT (Allows to bypass tenants restrictions) in case multi-tenant configuration (required for scheduled synchronization)
- User should have access to the same tenant/tenants in which that CMS is configured
- User should be granted "Read and Execute (RX)" and "Read Permissions (E)" permissions for Environment tenant, if the application configured not in the Environment tenant; user should belong to Administrators Access Group in CMS tenants (required for scheduled synchronization)
- Click Save.
- The Confirmation dialog for changing the application's port opens. Click Yes.
- Go to Application Cluster application, open Options tab. In section cms.general set valid URL to CMS or CMS cluster load balancer in externalURL option (for example, http://<cms host>:<CMS default port>/gks-cms).
End
Configure Data Source
Knowledge Center CMS requires persistent storage to be configured to store all the authored content. Please follow one of the instructions to set up storage of your choice:
- Microsoft SQL Server - Using CMS with Microsoft SQL Server
- Oracle - Using CMS with Oracle
- PostgreSQL - Using CMS with PostgreSQL
Installing the CMS
Windows Installation Procedure
Start
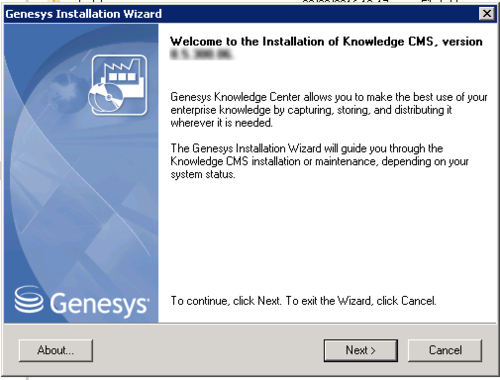
- In your installation package, locate and double-click the setup.exe file. The Install Shield opens the welcome screen.
- Click Next. The Connection Parameters to the Configuration Server screen appears.
- Under Host, specify the host name and port number where Configuration Server is running. (This is the main listening port entered in the Server Info tab for Configuration Server.)
- Under User, enter the user name and password for logging in to Configuration Server.
- Click Next. The Select Application screen appears.
- Select the Knowledge Center CMS that you are installing. The Application Properties area shows the Type, Host, Working Directory, Command Line executable, and Command Line Arguments information previously entered in the Server Info and Start Info tabs of the selected application object.
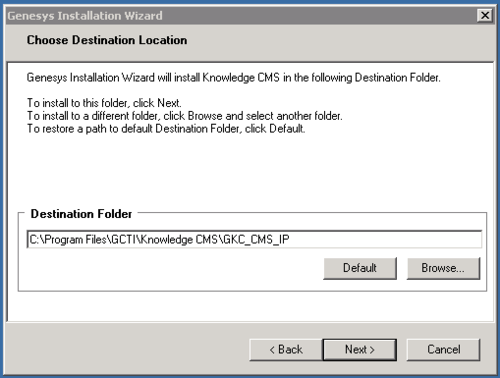
- Click Next. The Choose Destination Location screen appears.
- Under Destination Folder, keep the default value or browse for the desired installation location.
- Click Next. Choose the appropriate version of the Java JDK.
Note: Knowledge Center Server requires Java 1.8 or higher.
- Click Next. The Ready to Install screen appears.
- Click Install. The Genesys Installation Wizard indicates it is performing the requested operation for the Genesys Knowledge Center CMS. When through, the Installation Complete screen appears.
- Click Finish to complete your installation.
- Inspect the directory tree of your system to make sure that the files have been installed in the location that you intended.
End
Linux Installation Procedure
Start
- Open a terminal in the CMS installation package, and run the install.sh file. The Genesys installation starts.
- Enter the hostname of the host on which you are going to install.
- Enter the connection information required to log in to the Configuration Server:
- Hostname—For instance, demosrv.genesyslab.com
- Listening port—For instance, 2020
- User name—For instance, demo
- Password
- If you have a backup Configuration Server, enter the Host name and Port.
- If the connection settings are successful, a list of keys and Knowledge Center CMS applications is displayed.
- Enter the key for the Knowledge Center CMS application that you created previously in Configuration Server.
- Enter the full path to your installation directory and confirm that it is correct.
- If the installation is successful, the console displays the following message:
Installation of Genesys Knowledge CMS has completed successfully.
End
Installing multiple CMS instances
To install multiple CMS instances you need to repeat following steps for every instance:
- Create CMS applications
- Configuring the Knowledge Center CMS Application
- Installing Knowledge Center CMS
Note: Knowledge Center Cluster Application is created just ones for all CMS instances working in the same cluster.
Granting Agents Authoring Privileges
Genesys Knowledge Center supports the following privileges to restrict agent access:
- Administrator (allows a user to carry out Administrator tasks such as creating and editing Knowledge bases)
- Approver (allows a user to Approve and Publish documents)
- Category Author (allows a user to create and update categories)
- Document Author (allows a user to create and update documents)
- Multitenant user (allows a user to work with data in all tenants in the CMS)
To publish document from CMS to Knowledge Server agent also should have "Allows agent to change data in a knowledge base" privilege on Knowledge Server (link to Provide Knowledge Center Access to Agents in Server installation page)
To configure the appropriate privileges for an agent:
Start
- Go to Provisioning > Accounts > Roles.
- In the taskbar, click New to create a new object.
- Set the name of the role in the General section.
- Go to the Role Privileges tab and select the set of roles for Genesys Knowledge Center.
- Open the Genesys Knowledge Center CMS privileges list.
- Set the appropriate privileges to Allowed.
- Go back to the Configuration tab.
- In the Members Section, add the appropriate Agent by clicking the Add button.
- Save and Close.
End
Start and Stop Genesys Knowledge Center CMS
Start the CMS
Windows:
- Windows Services
- the server.bat script
- Genesys Administrator
Start
- You can start the server from Windows Services.
- Open Windows Services
- Select and start the Genesys Knowledge Center CMS [Knowledge Center CMS] service.
- You can use the provided server.bat script.
- Navigate to the Knowledge Center CMS installation server directory and launch the Windows command console (cmd.exe).
- Open server directory
- Type and execute server.bat, without any parameters.
ImportantYou can use entry in the Start > All Programs > Genesys Solutions > Knowledge Center CMS [Knowledge Center CMS] menu to start the Server using server.bat
- You can start the server from Genesys Administrator.
- Navigate to PROVISIONING > Environment > Applications.
- Select the Knowledge Center CMS
- Click Start applications in the Runtime panel.
End
The Genesys Knowledge Center CMS is shown in Started status in Genesys Administrator.
Linux:
- the server.sh script
- Genesys Administrator
Start
- You can use the provided server.sh script.
- Navigate to the Genesys Knowledge Center CMS installation directory in the Unix command console.
- Go to server directory
- Type and execute server.sh, without any parameters.
- You can start the server from Genesys Administrator
- Navigate to PROVISIONING > Environment > Applications.
- Select the Knowledge Center CMS.
- Click Start applications in the Runtime panel.
End
The Genesys Knowledge Center CMS is shown in Started status in Genesys Administrator.
After the CMS start
After successful CMS start you can use following URLs in your browser:
- http://<cms host>:<CMS default port>/gks-cms - to access the CMS user interface
Stop the CMS
Windows:
- Windows Services
- Genesys Administrator
- A console window
Start
- You can stop the server from Windows Services.
- Open Windows Services
- Select and stop the Knowledge Center CMS service.
- You can stop the server from Genesys Administrator.
- Navigate to PROVISIONING > Environment > Applications.
- Select the Knowledge Center CMS.
- Click Stop applications in the Runtime panel.
- If you previously started Genesys Knowledge Center CMS in a console window, you can stop the server by closing the window or navigate to Genesys Knowledge Center CMS installation directory in Windows console (cmd.exe), open server directory and execute command: server.bat stop
End
The Genesys Knowledge Center CMS is shown in Stopped status in Genesys Administrator.
Linux:
- Genesys Administrator
- A console window
Start
- You can stop the server from Genesys Administrator.
- Navigate to PROVISIONING > Environment > Applications.
- Select the Knowledge Center CMS.
- Click Stop applications in the Runtime panel.
- Or you can stop the server from the console window where it was started.
- Press Ctrl+C while the window is active.
- Type Y and press Enter.
- Or you could use provided script server.sh:
- Navigate to the Genesys Knowledge Center CMS installation directory in the Unix command console.
- Go to server directory
- Type and execute server.sh with parameter "stop" (for example: server.sh stop)
End
The Genesys Knowledge Center CMS is shown in Stopped status in Genesys Administrator.


