Getting started
Now that you know what the Gplus Adapter is, you’re probably wondering how to use it. Let’s get started.
How do I log in?
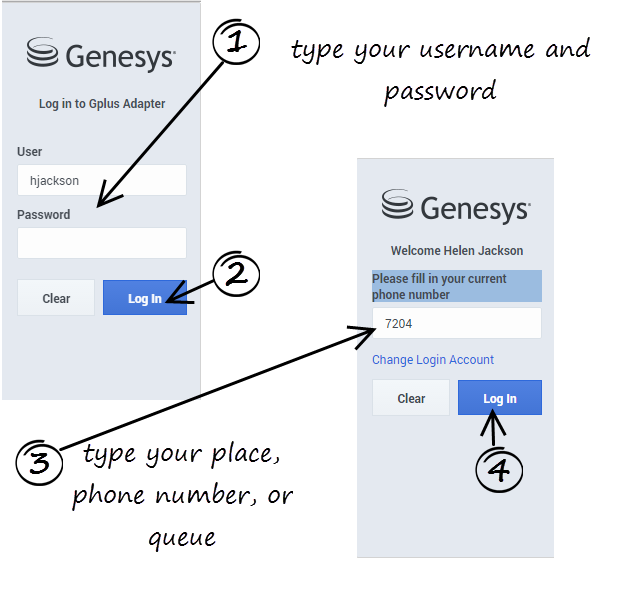
Open a browser (if your system uses a web-based phone, use Chrome) and enter the link for the CRM or ticket application that your supervisor gave you. The Adapter is either in the left pane or you can launch it by clicking Phone in the bottom-right corner of the screen—it's one or the other, depending on how your administrators have configured the CRM.
Depending on how your administrator has configured the adapter, you might also see a secondary login window where you're prompted to enter the name of a place, a phone number, or enter a queue.
See Logging In for more details.
How do I set my status to be available for calls?
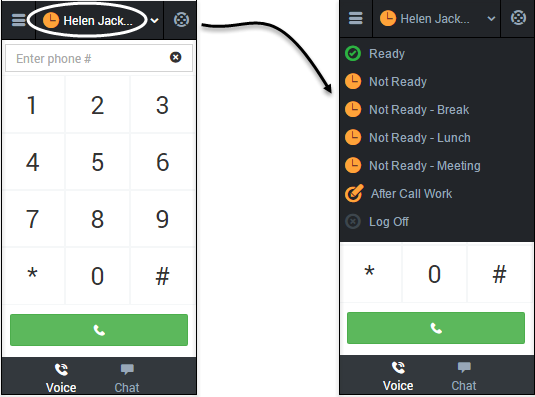
Typically, your status will be Not Ready after you log in. However, your administrator might have configured your status to Ready after login, so it is a good idea to check your status.
You can see your status in the Gplus Adapter for Salesforce on the agent status bar at the top of the adapter. You can also hover over the status bar with your mouse to see more details about login time, phone number, overall state, and media channel state.
You can update your status on all channels that you are logged into or update your status on a single channel:
- To update your overall status, click the agent status bar, and select a new status.
- To update your status for a particular media channel, click the main menu, select Channels to see the list of channels, click the white agent status box, and then select a new status from the list.
For more information about changing your status, including a video that demonstrates how to do it, see Changing Your Status.
Now you are ready to handle customer interactions.
How do I handle customer interactions?
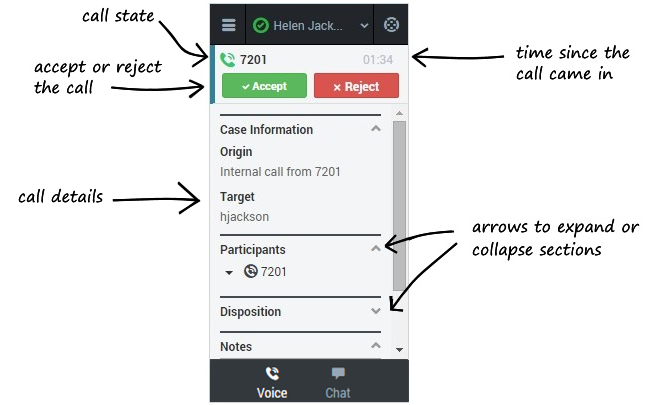
When a call, chat, or email is directed to you, you'll receive a "toast" pop-up in the bottom right-hand corner of your screen. You might also hear a sound.
To answer the call, click Accept. (If you do not accept, it will go to the next available agent and your status will change to Not Ready.)
To get you started, here are some common call handling features:
![]() places the caller on hold.
places the caller on hold.
![]() restores the call.
restores the call.
![]() instantly transfers the call to a contact that you select.
instantly transfers the call to a contact that you select.
![]() ends the call.
ends the call.
![]() calls back the participant who was disconnected from the active call. You can call back a disconnected participant by using the Participants menu.
calls back the participant who was disconnected from the active call. You can call back a disconnected participant by using the Participants menu.
Your organization might require you to note a reason for the call (or a disposition). If so, after the call is complete, click Disposition and select one of the items from the list. Click Mark Done to complete the interaction.
Depending on how your organization is set up, you might now enter an After Call Work state. This is a period of time during which you remain in a Not Ready state to allow time for completing other tasks related to the call. When this period ends, you automatically return to a ready state and can again receive calls.


