Contents
Schedule a Callback
[Modified: 8.5.115.17, 8.5.111.21]
There are three types of callbacks that you can reschedule:
- Outbound campaign interaction callback [Modified: 8.5.115.17]
- Genesys Callback [Added: 8.5.111.21]
- Web Callback
Rescheduling an Outbound interaction as a callback
[Modified: 8.5.115.17] You can reschedule an Outbound campaign call (for example, if the contact is too busy to respond now) to a different date and/or time by using the Reschedule Callback function.
In the Outbound campaign–call interaction window, in the call-action tool bar, click Reschedule Callback (![]() ). The Reschedule Callback view is displayed.
). The Reschedule Callback view is displayed.
Click the Reschedule Callback check box to reschedule the call. After you have specified a new date and/or time and, if necessary, a new number, click End Call (![]() ]) to disconnect the call. Click Done (
]) to disconnect the call. Click Done (![]() ) to reschedule the callback. The Reschedule Callback button changes to
) to reschedule the callback. The Reschedule Callback button changes to ![]() after the call has been rescheduled.
after the call has been rescheduled.
To set a new date, either enter a new date in the date field or use the calendar view to click a new day. Use the left and right arrow buttons to change the month and year.
To set a new time, either enter a new time in the time field or use the up and down arrow buttons to change the hours and minutes.
Click Personal Callback to reschedule the callback from you personally. Leave the Personal Callback check box clear to send the interaction back to the calling queue. [Modified: 8.5.115.17]
- In some environments, all rescheduled calls are personal callbacks. In this case, you will not be able to change the selection.
- In some environments, all rescheduled calls are campaign callbacks (any active agent in the campaign can make the callback). In this case, the Personal Callback check box is not displayed.
To select a new number for the contact, click the Phone drop-down list, and choose a different number.
To add a new number that is to be used for the callback, click New Phone Number. The Add New Number view is displayed. The following options are available for you to use:
- Phone: Enter a new phone number that is to be used for the scheduled callback.
- Type: Select a voice or other media type, such as a mobile phone.
- From: Select a start time for which the device can be contacted.
- Until: Select an end time for which the device can be contacted.
Genesys Callback
[Added: 8.5.111.21]
If Genesys Callback is enabled in your environment, you can either reschedule a current callback interaction or schedule (create) a new callback interaction for your contact.
Reschedule a Callback
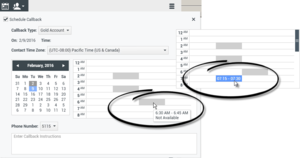
To reschedule your current callback interaction, in the Callback interaction window, click ![]() to open the Reschedule Callback view.
to open the Reschedule Callback view.
Check Reschedule Callback, choose a callback type, a time zone, a date in the calendar, and a time slot in the schedule grid. Time slots that are not available are grey. Available time slots are blue and display the time range. Click outside the view to commit the callback.
Schedule a new Callback from an interaction
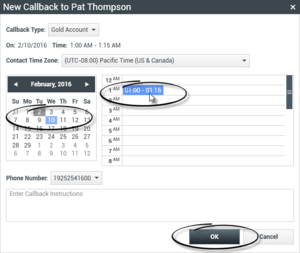
In the toolbar of an existing interactions, such as a voice, chat, email, SMS, and so on, click New Callback ![]() to open the New Callback dialog box.
to open the New Callback dialog box.
Choose a callback type, a time zone, a date in the calendar, and a time slot in the schedule grid. Time slots that are not available are grey. Available time slots are blue and display the time range. Click OK to commit the callback.
Schedule a new Callback from Team Communicator
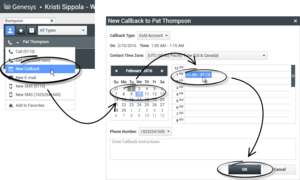
In Team Communicator, find a contact, then select New Callback from the Action menu to open the New Callback dialog box.
Choose a callback type, a time zone, a date in the calendar, and a time slot in the schedule grid. Time slots that are not available are grey. Available time slots are blue and display the time range. Click OK to commit the callback.
Rescheduling a Web Callback
You can reschedule a Web Callback call (for example, if the contact does not answer at the time that he or she requested the Web Callback) to a different date and/or time by using the Reschedule Callback function.
In the Web Callback Preview window, in the call-action tool bar, click Reschedule Callback (![]() ). The Reschedule Callback view is displayed.
). The Reschedule Callback view is displayed.
Click the Reschedule Callback check box to reschedule the call. Use the On field to enter a new date, or use the Calendar picker to click a new date. Specify a new time and call duration by using the From and Till fields. The clock-face display will update to show the new "from" time.
If necessary, you can specify a new number by selecting a number for the contact from the To drop-down list.
After you have specified a new date and/or time and, if necessary, a new number, click the X to close the Reschedule Callback view. The Reschedule Callback button changes to the Rescheduled Callback ![]() button after the callback has been rescheduled.
button after the callback has been rescheduled.
Click Done (![]() ) to reschedule the callback to the date and time that you specified. At the specified date and time, the Web Callback interaction notification is displayed on your desktop.
) to reschedule the callback to the date and time that you specified. At the specified date and time, the Web Callback interaction notification is displayed on your desktop.
Outbound Campaigns Overview
As an agent, you might be working on campaigns (for example, collections, telemarketing, or fundraising) in which the contact interactions are outbound voice calls that are based on calling a predetermined list of contacts.
There are two delivery modes of outbound calls. A supervisor determines in which mode you will work:
- Manual, in which you make outbound calls by requesting an interaction from a preset calling list. Manual delivery has one dialing mode:
- Preview. The system displays contact-related data to an agent, then the agent makes the call to the contact.
- Automatic, in which outbound calls are directed to your desktop. Automatic delivery has three dialing modes:
- Push Preview. The system displays contact-related data to an agent, then the agent makes the call to the contact.
- Progressive. The system dials customer numbers automatically and transfers a call to an agent only if the connection was successfully established.
- Predictive. The system estimates the number of free agents on the basis of current statistics, and may start beforehand, even when no agents are free.
If your supervisor or someone else in your organization starts an Outbound campaign to which you are assigned, you will receive a warning message to inform you that a specific campaign has begun and that you are assigned to that campaign.
Note: If the campaign began before you logged in, a warning message will be displayed. If you are working on a campaign, the My Campaigns view displays the list of active and running campaigns. Active campaigns are indicated by a Started status message in the My Campaigns view.
After you are connected with your contact, you can perform various tasks, depending on the nature of the interaction. For example, you can update customer records, schedule a callback, select a disposition code or do other call actions.
Negotiated Logout
Sometimes, an abrupt agent logout from a campaign will, by its timing, affect the quality of service of a campaign. For example, you might click Logout at the same moment that a predictive or progressive campaign selected you for a subsequent call currently being established with a customer. If Workspace logged you out immediately, this particular call may take more time to be delivered to an agent. To avoid this, your logout is delayed a few seconds, if you initiate it by either of the following methods:
- Select Logout from the Main Window title bar or the Main Menu.
- Select Logout from the Voice channel, from the My Channels view of your Workspace.
If you select Logout while you are receiving an interaction, a system message will be displayed on your desktop to inform you that you are awaiting logoff authorization. The message contains a countdown clock that informs you of how many minutes and/or seconds remain before you will be authorized to log out.
If you dismiss the message window, you can still monitor the time that remains for logout authorization by reviewing your messages in the Main Window or in the My Messages window. You can also place your mouse pointer over the Status icon to display a notification of the time that remains for negotiated logout.
Both the My Messages view and the Status icon ToolTip provide confirmation when your logoff is authorized.
Related Resources
The Workspace Desktop Edition User's Guide (English only) provides detailed lessons for using all the features of Workspace. You might find the following lessons useful:
Related topics
- Outbound Preview Calls
- Outbound Push Preview Calls
- Outbound Progressive Calls
- Call Actions for Outbound Calls
- Voice Interaction


