
Main Window
[Modified: 8.5.104.15, 8.5.108.11, 8.5.109.16]
The Main Window enables you to:
- Manage your status
- Manage your settings and preferences
- Launch new interactions by using the Team Communicator
- View your channels, history, statistics (KPIs) and contact center statistics in My Workspace
- Search for Interactions
- Manage contacts
- Access your workbins
- Manage your active interaction windows by using the Interaction Bar
- View your messages
- View and connect to your voicemail messages
- Accept or reject inbound interactions by using the Interaction Preview
- Start an Instant Message session
- Participate in an Outbound campaign
Main Window videos
The following videos introduce you to the Main Window and setting your status.
Main Window Overview
Main Window Tips & Tricks
Resizing the Main Window
Manage Your Status
[Modified: 8.5.108.11]
Your status is includes whether you are ready to handle interactions, are on a break, or are working on after call tasks.
You can manage your status from two places in the Main Window:
Global Status Menu
The title bar of the Main Window displays your global status icon and your logged in status. You can use the Global Status menu to log on and off of your channels.
Click the Global Status icon (see figure) on the Main Window title bar to open your Global Status menu.

Place the mouse pointer over the Global Status icon to view your status summary.
![]()
The status summary includes your login name, place, channels, and channel status.
If you are logged in to more than one channel, detailed status for each channel is displayed; otherwise, only your Ready state is displayed.
Your Ready status is also displayed in the My Channels tab of the Main Window. You can manage your status and forward interactions from the My Channels tab.
Not Ready Status
When you are handling an interaction, the system interrupts the display of the amount of time that you are in the current state.
If, while you are handling an interaction for a given channel, you set your status to either Not Ready, Not Ready - <reason>, or After Call Work (ACW), the system does not display the amount of time that you are in that state until the interaction is complete. This feature enables your break or ACW time to be displayed according to recorded statistics.
Logoff/Logon Channels
[Modified: 8.5.108.11] You can use the Global Status menu to log on to all channels that are logged off, or to log off from all channels without logging out. You can use the My Channels tab to log on and log off individual channels (Note: This feature might not be available in your environment).

To see what channels are logged on or off, either open the My Channels tab or hover your mouse pointer over the Global Status icon.

Inactivity Timeout
Inactivity Timeout is a security feature that locks the Workspace windows on your workstation if you do not use your mouse or keyboard for a period of time that is defined by your administrator. You must authenticate to reactivate Workspace.
Locking your workstation
If you lock your workstation with or without first setting your status to Not Ready, your administrator might have set up your account to automatically change to Not Ready, with or without a reason.
Manage Your Settings and Preferences
Click the Agent icon (![]() ) to open the Main Menu. You control your settings and set your preferences from the Main Menu.
) to open the Main Menu. You control your settings and set your preferences from the Main Menu.
The Main Menu contains some or all of the following options, depending on how your account is configured by your system administrator:
- Show Statistics Gadget: Displays the Statistics Gadget view.
- Main Window Always on Top: Keeps the Main Window on top of any other window that opens on your desktop.
- Auto-Hide the Main Window: Hides the Main Window at the top of the display only when the Workspace Main Window is docked.
- Refine Place / Channel information: Displays the Advanced Login Parameters view to change your logged-in channel parameters.
- Change Theme: Selects a different predefined appearance from the Theme menu.
- Zoom: Enables you to specify the zoom level of text fields and transcripts.The zoom feature applies to the following views:[Added: 8.5.109.16]
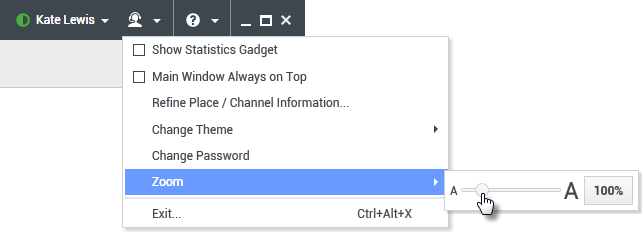
- IM (text entry, transcript, and interaction data tooltip)
- Chat (text entry, transcript, and interaction data tooltip)
- Email (text entry and inbound email view)
- SMS (text entry, transcript, and interaction data tooltip)
- Interaction history (IM, Chat, Email, and SMS)
- Standard responses
- Social media (text entry only)
- Check and Update: Checks for updates to Workspace, and updates your software if an update is available.
- Change Password: Displays the Change Password dialog box.
- Exit: Logs off all channels and closes the application

Click the Help icon (![]() ) to launch this help document or click the Help drop-down menu to launch this help document or get information about Workspace.
) to launch this help document or click the Help drop-down menu to launch this help document or get information about Workspace.
Docking the Main Window
The Workspace Main Window can be used as either a floating toolbar or a docked toolbar. Your administrator must enable this feature.
There are three ways to dock the Workspace Main Window to the top of your display:
- Drag the Workspace Main Window to the top of your display and it will automatically become docked to the top of your desktop display area. If you want to move the Main Window to the top of your display without docking, hold the Ctrl key while dragging the window.
- Double-click the title bar.
- Click Maximize.
When the Main Window is docked, your effective desktop area is reduced by the height of the Main Window. Any open windows, including maximized windows, on your desktop are moved down to accommodate the Workspace Main Window. Pinned or floating mode interaction views do not affect the size of your desktop area.
When the Main Window is docked, the Minimize and Maximize buttons are disabled.
To undock the Main Window, click and drag it away from the top of your display. Your desktop area returns to full size and the Workspace Main Window returns to the size it was before you docked it.
Auto-hiding the Main Window
When the Workspace Main Window is docked you can choose to enable the auto-hide feature. Select Auto-Hide the Main Window from the Main Menu or from the Workspace menu in the System Tray.
In Auto-Hide Mode, the Workspace Main Window is hidden at the top of the display and the desktop area returns to full size when Workspace is not the active application.
To display the Workspace Main Window when it is hidden, do one of the following actions:
- Click the Workspace task button in the Task Bar.
- Move your mouse pointer to the top of your desktop display area; the Main Window is displayed; click it to keep it displayed.
To disable the auto-hide feature, de-select Auto-Hide the Main Window from the Main Menu or from the Workspace menu in the System Tray.
Team Communicator
The Main Window contains the Team Communicator Quick Search field. The Quick Search field is a universal lookup tool. It might be configured to provide Universal Contact Server lookup and Team lookup, or simply Team lookup. Use the Team Communicator to launch a new interaction.

Type a name or number in the search field to begin your search. When you click in the field, the Team Communicator toolbar is displayed. The toolbar enables you to search All, Favorites, and Recent contacts and internal targets; Workspace might be configured to store and display recent calls, including missed calls. It also enables you to filter by contact or internal-target type and to group or ungroup your search results.
My Workspace
My Workspace is a tabbed view that enables you to view and manage your:
Click the Access and use Workspace supporting views button (![]() ) to display the Supporting Views menu, then select one of the following options to open the My Workspace view and activate one of these tabs:
) to display the Supporting Views menu, then select one of the following options to open the My Workspace view and activate one of these tabs:
- My Channels
- My Campaigns
- My History
- My Statistics
- Contact Center Statistics
The My Workspace view is displayed below the Interaction Bar. Click the tabs to view the different My Workspace views.
Interaction Search
[Added: 8.5.104.15] Workspace provides you with multiple ways to find interactions in your contact center interaction database.
- If you know which contact you are searching for, use the Contact Directory to find the interactions exchanged with that contact
- If you were the agent who handled the interaction you can use the My History view to find the interactions that you have handled
However, sometimes you must find an interaction, but you no longer remember who the contact was, or whether it was handled by yourself or another agent. The Workspace Global Interaction Search feature enables you to use the Interaction Search view to look for interactions based on one or more criteria, including words in the body or transcript of the interaction.
To display the Interaction Search view, click the Access and use Workspace supporting views button (![]() ) to display the Supporting Views menu, then select Interaction Search. Use this feature to search for interactions. View details about the search results in the Details Panel.
) to display the Supporting Views menu, then select Interaction Search. Use this feature to search for interactions. View details about the search results in the Details Panel.
Quick Search
To search the Interaction Database, type your search text for in the Quick Search field. Click the magnifying glass to search for the criteria that you have entered: ![]()
Click the X to clear the Quick Search field.
Quick Search combines a subset of search criteria selected by your administrator. It typically applies a "starts with" for each word of the criteria in any of the attributes selected by your administrator.
Search results are displayed in a grid. Click a result entry to display interaction details in the Details tab. You can also use the Note tab to view notes associated with the selected interaction and the Case Data tabs to view the interaction case information.
Advanced Search
Click the Show/Hide Advanced Search toggle button to show or hide
(![]() ) the advanced search feature.
) the advanced search feature.
The Advanced Search feature enables you to enter multiple criteria to refine your search. The Advanced Search pane contains drop-down lists of search criteria that enable you to build a complex search based on multiple criteria such as Status, Subject, processing agent, date or date range, and interaction text.
Use the Match Conditions options to specify whether All or Any of the search conditions that you have specified are applied. Depending on the selected criteria the applied modifier affecting the search may change, for example, to "Matches" or "Equals".
Search results are displayed in a grid. Click a result entry to display interaction details in the Details tab. You can also use the Note tab to view notes associated with the selected interaction and the Case Data tabs to view the interaction case information.
Details Panel
The Details Panel includes the Details, Note, and Case Data tabs.
You can view interaction details in the Details tab for the currently selected interaction in the Details Panel by clicking the Show Details Panel on Bottom/Hide Details Panel toggle button: ![]()
The Details tab displays interaction specific information. For example, if you have selected an email interaction, the Subject, From, To, State, and body of the email interactions are displayed.
The Note tab enables you to view notes that are associated with the selected interaction.
The Case Data tab enables you to view the case information for the selected interaction.
Manage Your Contacts
Click the Access and use Workspace supporting views button (![]() ) to display the Supporting Views menu, then select Contact Directory to open the Contact Directory. Use this feature to search for contacts. View details about the search results in the Details Panel.
) to display the Supporting Views menu, then select Contact Directory to open the Contact Directory. Use this feature to search for contacts. View details about the search results in the Details Panel.
Quick Search
To search the Contact Directory, type the name, phone number, or email address of a contact in the Quick Search field. Click the magnifying glass to search for the criteria that you have entered: ![]()
Click the X to clear the Quick Search field.
Quick Search is a begins with search.
Search results are displayed in a grid or list. Click the Show Contacts in Grid View/Show Contacts in List View toggle button to toggle back and forth between the two views of the Contact Directory: ![]()
Advanced Search
Click the Show/Hide Advanced Search toggle button to show or hide
(![]() ) the advanced search feature.
) the advanced search feature.
The Advanced Search feature enables you to enter multiple criteria to refine your search. The Advanced Search pane contains drop-down lists of search criteria, such as names, email addresses, and phone numbers. It also contains drop-down lists with the following modifiers that determine how the criteria will affect the search: Contains, Begins With, and Is. Use the Match Conditions options to specify whether All or Any of the search conditions that you have specified are applied.
Search results are displayed in a grid or list. Click the Show Contacts in Grid View/Show Contacts in List View toggle button to toggle back and forth between the two views of the Contact Directory: ![]()
Details Panel
You can view contact information and contact history for the currently selected contact in the Details Panel by clicking the Show Details Panel on Bottom/Hide Details Panel toggle button: ![]()
Click the down-arrow to change the Details Panel Layout to display either below or to the right of the Contact Directory:

The Information tab displays basic information about the currently selected contact, including the following:
- General (Title, First Name, and Last Name)
- Phone Number(s)
- Email Address(es)
The contact History tab enables you to view and, if you are configured to do so, edit current and archived interactions that are associated with the currently selected contact.
Depending on what permissions are granted to you by your administrator, you might be enabled to edit one or more fields of the Contact Information view.
My Workbins
A workbin is like a personal queue, in which you can store email and other interactions that are to be handled later.
Click the Access and use Workspace supporting views button (![]() ) to display the Supporting Views menu, then select one of the following workbin views:
) to display the Supporting Views menu, then select one of the following workbin views:
- My Workbins: For all agents, a view of your personal workbins.
- My Team Workbins: For Team Leads (supervisors), a view of all of the workbins that belong to agents that you supervise.
- My Interaction Queues: For Team Leads (supervisors), a filtered view of your system queues.
To view another workbin, click it in the Workbin explorer on the left-hand side of the view. The number of unopened email messages in each workbin folder is indicated next to the name of the workbin folder.
The list of available workbins depends on the configuration of your system. The default selected workbin is the first workbin in the list that is specified by your system administrator. Some of the workbins which might be configured for you include:
- In-Progress: Contains inbound email messages or other workitems that have not been processed.
- Draft: Contains outbound email messages that have been saved as draft.
To view details, notes, and case date about an interaction, select it. Information about the selected interaction is displayed in the tabs at the bottom of the Workbins view. To display the interaction information tabs, click the Show/Hide Details Panel button: ![]()
To open an interaction, double-click it.
You can perform the following functions on selected interactions in workbins by using the Workbin Actions buttons:
- Reply (
 )
) - Reply All (
 )
) - Open (
 )
) - Mark Done (
 )
) - Delete (
 ) — if you have the correct permissions
 - Move to Queue (
 ) — if you have the correct permissions
 - Move to Workbin (
 ) — if you have the correct permissions
 - Edit Case Information (
 ) — (if you have the correct permissions) Opens the Edit Case Information window to enable you to edit the content of the Case Data tab for the selected interaction(s).
Click here for information about handling email interactions.
Manage Your Interactions
Interaction Bar
The Interaction Bar is displayed at the bottom of the Main Window whenever you have one or more active interactions. Each interaction is represented by a control bar and an Interaction Window. You can use the control bar to perform basic actions that are specific to the interaction type, such as ending a call.

Click the control bar for an interaction to give it the focus. All other open interactions are collapsed to the Interaction Bar.
Click the small colored bar on the left of the interaction control, to toggle between pinned mode and floating mode. Each interaction can be set to pinned or floating mode independently.
In pinned mode, the interaction view is displayed in the Main Window below the Interaction Bar, and all other views, such as My Channels, are hidden. Contact view and Response view are accessible.

In floating mode, the interaction view is displayed as a small view that is attached to the bottom of the Interaction Bar. If other interactions are currently open in pinned mode or if one the Workspace views, such as My Channels is currently displayed, they will appear dimmed behind the floating interaction view.

When you have more than one active interaction, click the interaction to display it.
If you place your mouse pointer over an interaction in the Interaction Bar, two things occur:
- A Tooltip is displayed that summarizes the content of the interaction. It includes a summary of all the interactions that are involved in this thread, as well as any consultation interactions that are related to the interaction.
- The media icon in the interaction is a button that activates when you place your mouse pointer near it. If you click the media icon, Workspace switches to that interaction without opening the interaction view.
![]()
Entries in the Interaction Bar flash (or blink) when specific events occur that might require your immediate attention. Chat, SMS Session, and IM Interactions flash when a new message is received.
To allow for the maximum space in the Interaction Bar, when you are handling an interaction, the Team Communicator view is reduced to a button: ![]()
Your system might be configured so that all interaction control bars are automatically collapsed in the Interaction Bar. This might be done to enable you to see a third party application or other content in the Main Window before or during the handling of an interaction. To display an interaction view for a collapsed interaction, click the control bar. Added: 8.5.106.19
Interaction Window
You can use the Interaction Window to handle interactions, such as a voice call or a chat. Each interaction type has its own interaction window.
- Voice Interaction: Enables you to view all of the information that is necessary to handle a voice interaction with a contact or an internal agent.
- Web Callback Interaction: Enables you to view the information that is necessary to handle a web callback voice interaction with a contact.
- Chat Interaction: Enables you to view all of the information that is necessary to handle a chat interaction with a contact or an internal agent.
- Email Interaction: Enables you to view all of the information that is necessary to handle inbound and outbound email interactions with a contact or internal agent, and how to handle QA review of outbound email interactions.
- SMS Interaction: Enables you to view all of the information that is necessary to handle an SMS interaction with a contact.
- Workitems: Enables you to view non-interactive media types, such as faxes.
This video shows you how to manage the display of the interaction, the contact information and history, and the standard responses in the Interaction Window.
View Your Messages
[Modified: 8.5.100.05]
The message display is a scrollable list of changes to the status of various network components, such as Contact Server, Statistics Server, Interaction Server (for chat, email, and workitems), and your Voice switch. You can also view messages that are broadcast to you.
Click the Access and use Workspace supporting views button (![]() ) to display the Supporting Views menu, then select My Messages to open the My Messages view which displays a list of messages from your system administrator or supervisor.
) to display the Supporting Views menu, then select My Messages to open the My Messages view which displays a list of messages from your system administrator or supervisor.
Workspace might be configured by your administrator to display the number of unread broadcast messages by using a "message waiting indicator" (![]() ) both on the Access and use Workspace supporting views button (
) both on the Access and use Workspace supporting views button (![]() ) and in the Supporting Views menu (see View and Connect to Your Voicemail Messages for more information.
) and in the Supporting Views menu (see View and Connect to Your Voicemail Messages for more information.
View and Connect to Your Voicemail Messages
[Added: 8.5.100.05]
If your system is configured to enable you to use Workspace to retrieve your voicemail messages, a "messages waiting indicator" (![]() ) is displayed on the Access and use Workspace supporting views button (
) is displayed on the Access and use Workspace supporting views button (![]() ).
).
Click (![]() ) to display the Supporting Views menu. Your voicemail boxes are displayed in the menu. If you have voicemail messages that you have not played, a "messages waiting indicator" (
) to display the Supporting Views menu. Your voicemail boxes are displayed in the menu. If you have voicemail messages that you have not played, a "messages waiting indicator" (![]() ) is displayed beside the name of the voicemail box.
) is displayed beside the name of the voicemail box.
To call your voicemail box select it from the Supporting Views menu. A new internal interaction is launched. Use the keypad to enter your authentication information.
The message waiting indicator displays the total of all unplayed and unread messages in your voicemail boxes and the My Messages view.
For information about using your voicemail boxes, refer to Connecting to your Voicemail Messages in the Workspace 8.5.1 User's Guide.
Interaction Preview
If a new interaction arrives at your workstation, you are notified by the Interaction Preview interactive notification, unless you are configured for auto-answer. The preview includes attached data that enables you to decide whether to accept or reject the interaction.
Instant Message
Start an Instant Message session with an internal target
Outbound Campaign
Participate in an Outbound campaign
Related Resources
The Workspace Desktop Edition User's Guide (English only) provides detailed lessons for using all the features of Workspace. You might find the following lessons useful: