Installing Knowledge Center Server
Import the Knowledge Center Server Application Template
Start
- Open Genesys Administrator and navigate to Provisioning > Environment > Application Templates.
- In the Tasks panel, click Upload Template.
- In the Click 'Add' and choose application template (APD) file to import window, click Add.
- Browse to the Knowledge_Center_Server_851.apd file available in the templates directory of your installation CD. The New Application Template panel opens.
- Click Save and Close.
End
Create Server applications
Start
- Open Genesys Administrator and navigate to Provisioning > Environment > Applications.
- In the Tasks panel, click Create New Application.
- In the Select Application Template panel, click Browse for Template and select the Genesys Knowledge Center Server application template that you imported earlier. Click OK.
- The template is added to the Select Application Template panel. Click Next.
- In the Select Metadata file panel, click Browse and select the Knowledge_Center_Server_851.xml file. Click Open.
- The metadata file is added to the Select Metadata file panel. Click Next.
- In Specify Application parameters:
- Enter a name for your application. For instance, Knowledge Center Server' .
- Enable the State.
- Select the Host on which the Knowledge Center Server will reside.
- Click Create.
- The Results panel opens.
- Enable Opens the Application details form after clicking Finish and click Finish.
The Knowledge Center Server application form opens and you can start configuring the Knowledge Center Server application.
End
Configuring the Knowledge Center Server Application
Start
- If your Knowledge Center Server application form is not open in Genesys Administrator, navigate to Provisioning > Environment > Applications. Select the application defined for the Knowledge Center Server and click Edit....
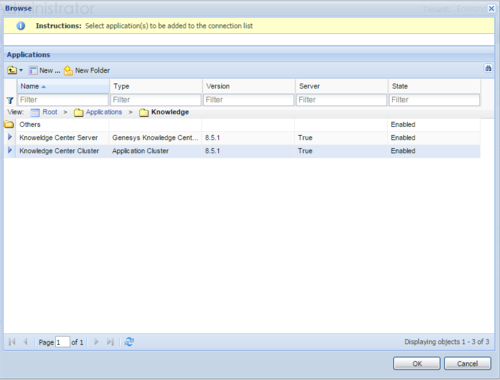
- In the Connections section of the Configuration tab, click Add. The Browse for applications panel opens. Select the Knowledge Center Cluster application, then click OK.
- Expand the Server Info pane.
- If your Host is not defined, click the lookup icon to browse to the hostname of your application.
- In the Listening Ports section, create the default port by clicking Add. The Port Info dialog opens.
- Enter the Port. For instance, 9092. This should be the port number for the Knowledge Center Server instance.
- Click OK. The port with the default identifier appears in the list of Listening ports.
- Optionally, you can explicitly add Transport port for ElasticSearch engine. If you do not define transport port, port 9300 will be used. To specify the stop port, click the Add button. The Port Info dialog opens.
- Enter transport for the ID field.
- Enter the Port. For instance, 9001.
- Click OK.
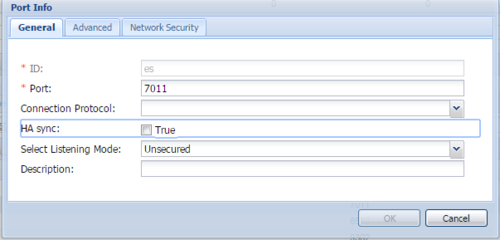
- Optionally, you can explicitly add a port for access to ElasticSearch engine. If you do not define this port, port 9200 will be used. To specify the stop port, click the Add button. The Port Info dialog opens.
- Enter es for the ID field.
- Enter the Port. For instance, 7011
- Click OK.
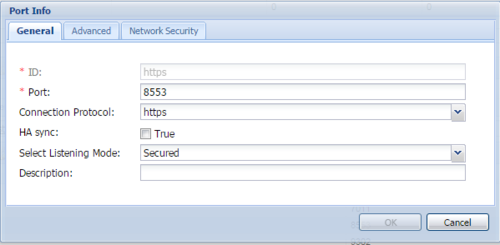
- Optionally, you can add a secure listening port for authenticated users, secured connections, and secure chat. Click Add. The Port Info dialog opens.
- Enter https for the ID field
- Enter the port . For instance, 8553
- Enter https for the Connection Protocol.
- Choose Secured for the Listening Mode.
- Click OK.
- In the Tenants section, add a working tenant by clicking Add. Browse and choose the appropriate tenant in the pop-up dialog. Click Ok.
- Ensure the Working Directory and Command Line fields contain "." (period).
- If you are using Access Groups to assign privileges to agents:
- Uncheck Log On As System
- In Log On Account specify the user account that has the ability to view access groups (for example, user from the Super Administrators access group).
- Click Save.
- The Confirmation dialog for changing the application's port opens. Click Yes.
- (Optional) Select the Options tab. In the [log] section, the all option is set to stdout by default. Enter a filename if you wish to enable logging to a file. For example, you can enter stdout, C:\Logs\Knowledge\Knowledge_server to force the system to write logs both to the console and to a file.
- In your installation package, locate and double-click the setup.exe file. The Install Shield opens the welcome screen.
- Click Next. The Connection Parameters to the Configuration Server screen appears.
- Under Host, specify the host name and port number where Configuration Server is running. (This is the main listening port entered in the Server Info tab for Configuration Server.)
- Under User, enter the user name and password for logging into Configuration Server.
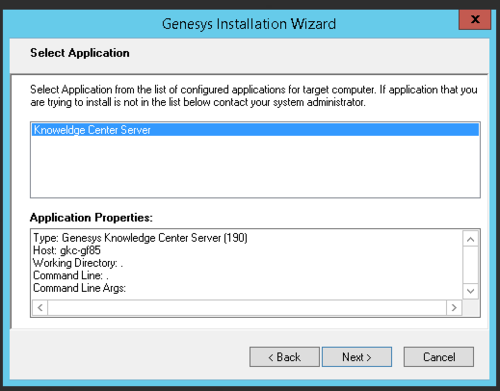
- Click Next. The Select Application screen appears.
- Select the Knowledge Center Server application that you are installing. The Application Properties area shows the Type, Host, Working Directory, Command Line executable, and Command Line Arguments information previously entered in the Server Info and Start Info tabs of the selected Application object.
- Click Next. The Choose Destination Location screen appears.
- Under Destination Folder, keep the default value or browse to the desired installation location.
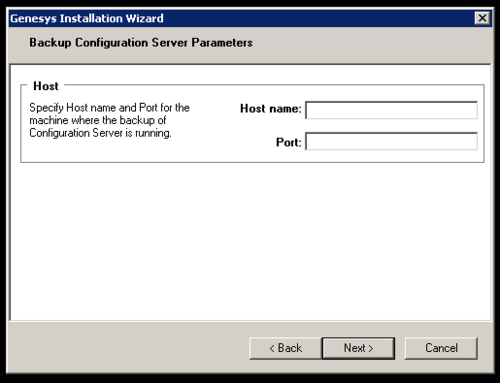
- Click Next. The Backup Configuration Server Parameters screen appears.
- If you have a backup Configuration Server, enter the Host name and Port.
- Click Next. Choose the appropriate version of the Java JDK.
- Click Next. The Ready to Install screen appears.
- Click Install. The Genesys Installation Wizard indicates it is performing the requested operation for Backend Server. When through, the Installation Complete screen appears.
- Click Finish to complete your installation.
- Inspect the directory tree of your system to make sure that the files have been installed in the location that you intended.
- Open a terminal in the Genesys Knowledge Center Server CD/DVD or the Genesys Knowledge Center Server installation package and run the install.sh file. The Genesys installation starts.
- Enter the hostname of the host on which you are going to install.
- Enter the connection information required to log in to the Configuration Server:
- Hostname—For instance, demosrv.genesyslab.com
- Listening port—For instance, 2020
- User name—For instance, demo
- Password
- If you have a backup Configuration Server, enter the Host name and Port.
- If the connection settings are successful, a list of keys and Genesys Knowledge Center Server applications is displayed.
- Enter the key for the Genesys Knowledge Center Server application that you created previously on Configuration Server.
- Enter the full path to your installation directory and confirm that it is correct.
End
Installing Knowledge Center Server
Windows Installation Procedure
Start
End
Linux Installation Procedure
Start
If the installation is successful, the console displays the following message:
Installation of Genesys Knowledge Center Server, version 8.5.x has completed successfully.
End
Understanding the Knowledge Center Server Configuration Files
Knowledge Center Server includes an embedded Jetty server and Lingua Tools in its installation folder. Product installation pre-configures all of the links between these resources, but there are cases in which they need to be changed. This section describes how to work with the configuration files stored in the Knowledge Center Server.
Jetty Configuration
After you complete these steps, Knowledge Center Server will be available as a web service on the following URLs:
- http://host:jetty.port/gks-server—GKC Server
- http://host:jetty.port/gks-sample-ui—Sample UI sandbox
ElasticSearch Engine Configuration
- Go to the ./server folder and open the gks.yml configuration file.
- Configure the following settings:
- index.number_of_shards: #—Number of ElasticSearch shards
- path.data : [PATH]—Path to the folder that contains index data for this node (default: /gks/data)
- path.freeling : [PATH]—Path to Freeling data folder
- path.plugins : [PATH] – path to Pulse Plugins
- path.geoip : [PATH]\GeoLite2-City.mmdb—Path to geo database used for calculations of IP location
Language Resources Configuration
- GEOIP Database
- Database for Geo-IP Location
- The path to /linguatools/geoip/GeoLite2-City.mmdb can be changed in the gks.yml file: path.geoip.
- Freeling tokenizer:
- In Windows
- The path to /linguatools/freeling/data/ can be changed in the gks.yml file: path.freeling.
- The following path will be added to the Windows PATH variable during installation: Path to installation directory/linguatools/freeling/bin.
- In Linux
- The path to /linguatools/freeling/data/ can be changed in the gks.yml file: path.freeling.
- setenv.sh exports the following environment variables:
- FREELINGSHARE—Path to Path to installation directory/linguatools/freeling/data
- LD_LIBRARY_PATH—Path to Path to installation directory/linguatools/freeling/bin
- In Windows
Provide Knowledge Center Access to Agents
Genesys Knowledge Center supports the following privileges to restrict agent access:
- Knowledge.ADMINISTER—Configure knowledge bases in the Knowledge Center Cluster application
- Knowledge.AUTHOR—Create, populate, and manage knowledge bases
- Knowledge.REPORTING—Extract data on the activities carried out by agents and customers while using the knowledge service
To configure the appropriate privileges for an Agent:
Start
- Go to Provisioning > Accounts > Roles.
- In the taskbar, click New to create a new object.
- Set the name of the role in the General section.
- Go to the Role Privileges tab and select the set of roles for Genesys Knowledge Center.
- Open the list of privileges for Knowledge Center Server.
- Set the appropriate privileges to Allowed.
- Go back to the Configuration tab.
- In the Members section, add the appropriate Agent by clicking the Add\ button.
- Save and Close.
End


