Use the My Shared Transport and Browse Shared Transport views to manage your participation in shared transport. You can create your own shared transport or join an existing one. Shared transport can be a company bus or a carpool arranged by a group of agents.
Use this view to create shared transport, view join requests from others, or leave shared transport. You can also switch to the Browse Shared Transport view if you have not already created a shared transport.
Watch this video to see how shared transport management works:
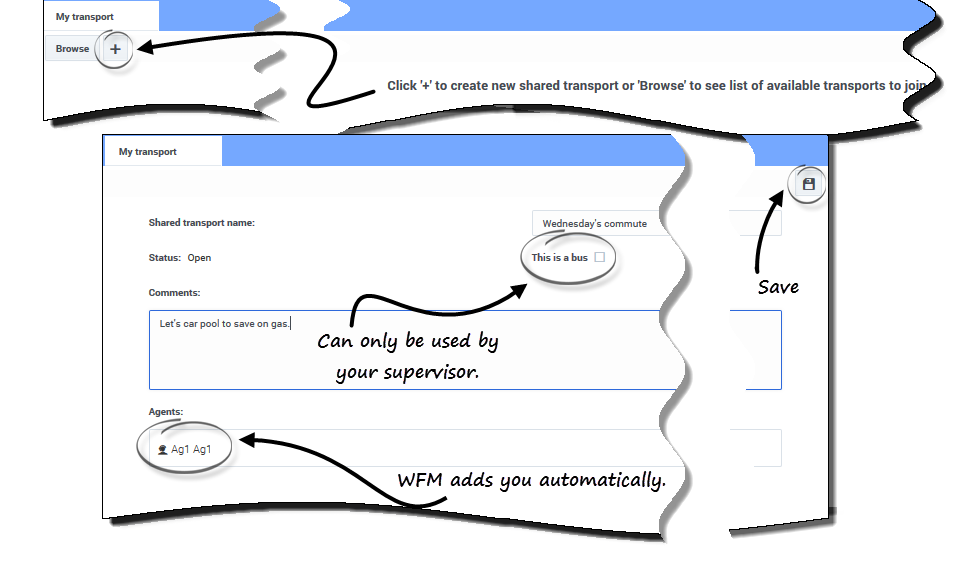
To create shared transport:
- In the My Shared Transport view, click Create
 to open a separate view, enabling you to enter the following shared transport details:
- In the Shared Transport Name field, enter the name of the new shared transport.
- In the Comments field, enter descriptive comments, if any.
- Click Save.
After you save the shared transport, two other buttons appear:
- Leave transport—Enabling you to leave or cancel this shared transport.
- Join requests—Enabling you to view join requests from others for this group.
The shared transport and related information is added as new record in Browse Shared Transport table with a status of Confirmed. You are automatically added as a participant.
You can change some of the properties in a shared transport that you created, such as the shared transport name or the comments.
To edit shared transport:
- Click My Shared Transport.
- When the view opens, change the properties, as required.
- Click Save.
Accepting and declining Join requests
If you have created shared transport for carpooling, you will receive requests from other agents to join your group.
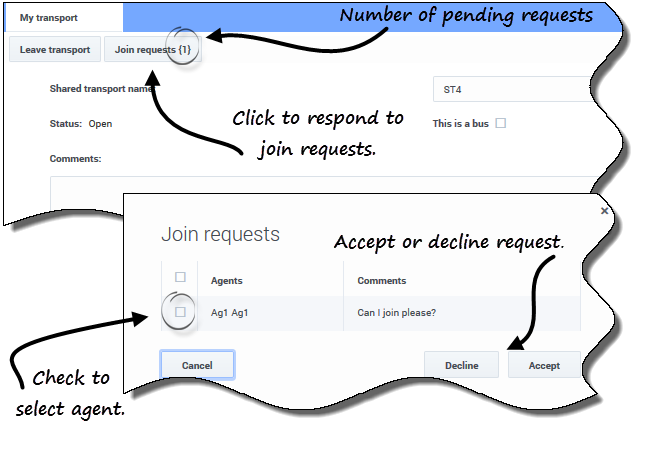
To respond to join requests:
- In the My Shared Transport view, click the Join requests button.
- The number in brackets indicates the number of pending requests.
- When the Join Requests dialog opens, click the check box beside the agent's name.
- Click Decline or Accept.
For example:
- You receive requests to join from Agent1 and Agent2.
- You accept Agent1's request and decline Agent2's request.
- Agent1 sees the status Confirmed in the Browse Shared Transport view for this transport group; Agent2 sees the status Declined.
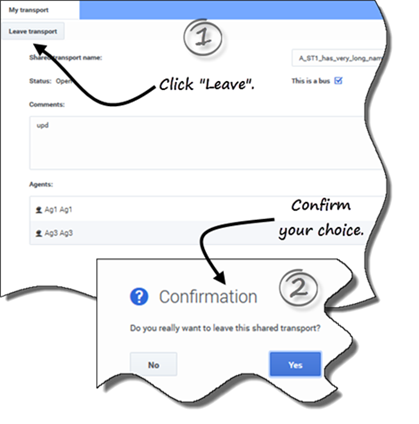
To leave shared transport:
- In the My Shared Transport view, click Leave transport.
- A Confirmation dialog box opens.
- Click Yes to leave the group or No to cancel this action and stay in the group.
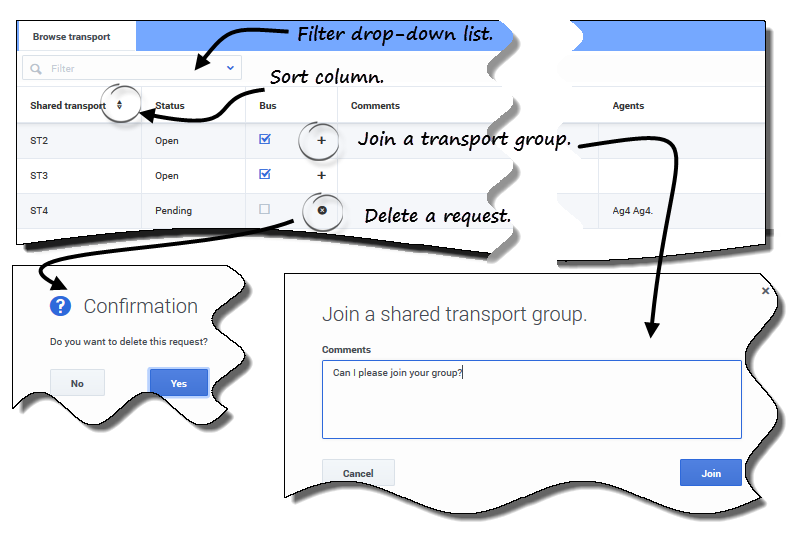
Use the Browse Shared Transport view to browse existing shared transport in a table format with these columns and fields:
- Filter by—Select Shared Transport Name, Agent's First Name, or Agent's Last Name from this drop-down menu. You can also enter search criteria in this field. Leave this field empty to show all shared transport.
- Shared transport—The name of the shared transport. Use the Sort controls
 to sort this column in ascending or descending order.
 - Status—The shared transport status (open or closed). An open status indicates that this shared transport is open for new requests. A closed status indicates that it is closed to new requests.
- The Status column also contains the status of the agent’s join request (confirmed, pending, or declined).
- Bus—When selected, the check boxes in this column specify a bus as the mode of transportation provided by company. (Agents are driven to work by company bus.) Only supervisors can create groups with Bus checked. When unchecked, it means a carpool (created by the agents) is the mode of transportation
- Actions—Clicking the icons in this column enables you to join shared transport, leave it, or delete your request to join.
- Comments—View comments in this column that are associated with the shared transport.
- Agents—This column contains a list of the participants in the shared transport.
You can create join requests in the Browse Transport view.
To request to join shared transport:
- In the Actions column, click the Join icon in the appropriate row.
- A Join shared transport dialog opens.
- In the Comments field, enter any comments related to this join request.
- Click the Join button (or click Cancel to cancel the action).
- The status of this shared transport changes to Pending.
Deleting requests to join
You can delete join requests in the Browse Transport view.
To delete join requests (see the figure in Requesting to join shared transport):
- In the Actions column, click the Delete icon in the appropriate row.
- A Confirmation dialog opens.
- Click Yes to confirm the deletion or No to cancel the action.
You can leave your current shared transport by clicking Leave transport. If you are the only participant and the shared transport is not a bus, it is removed from the table and you are no longer a participant. If the shared transport has other participants it is not removed from the table.


