Installing The Interaction Workspace Developer Toolkit
Contents
Use Procedure: Installing Interaction Workspace Customization on the Windows operating system to install the Interaction Workspace application and Developer's Kit on your development workstation. This procedure installs everything that is required to build and test an Interaction Workspace extension. For information about how to build a custom extension or customize Interaction Workspace, see the Interaction Workspace 8.1 .NET Developer's Guide & API Reference.
Procedure: Installing Interaction Workspace Customization on the Windows operating system
Purpose: To install the deployment files for Interaction Workspace Customization on your development workstation.
Prerequisites
- Preparing The Configuration Layer
- Microsoft Visual Studio 2008 or Microsoft Visual Studio 2008 Express Edition
- .NET Framework 3.5, SP 1
Start
- On your desktop, open the Interaction Workspace disc or the Interaction Workspace IP and double-click the Setup.exe file.
You might be asked to reboot your system to delete or rename certain system files before the Installation Wizard runs. - On the Welcome panel, do one of the following:
- Click Next to begin the installation procedure.
- Click Cancel to exit the Genesys Installation Wizard.
- Click About to open the Interaction Workspace ReadMe file in your default browser.
If you clicked Next, the Select Options panel is displayed. - On the Select Options panel, do one of the following:
- Choose Install Interaction Workspace Developer Toolkit, and click Next.
- Click Back to return to the Welcome panel.
- Click Cancel to exit the Genesys Installation Wizard.
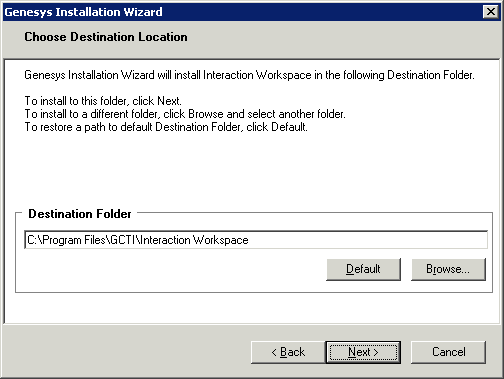
If you clicked Next, the Choose Destination Location panel is displayed (see the Figure - Choose Destination Location panel of the Genesys Installation Wizard). - On the Choose Destination Location panel, specify the location on your development workstation in which the Interaction Workspace customization files are to be installed by doing one of the following:
- Type a location in the Destination Folder text box.
- Click Default to reset the location to the default location.
- Click Browse to navigate to a destination folder.
- With the destination folder specified, do one of the following:
- Click Next.
- Click Back to return to the Select Options panel.
- Click Cancel to exit the Genesys Installation Wizard.
If you clicked Next, the Ready to Install panel is displayed. - On the Ready to Install panel do one of the following:
- Click Install to install the Interaction Workspace customization files.
- Click Back to return to the Choose Destination Location panel.
- Click Cancel to exit the Genesys Installation Wizard.
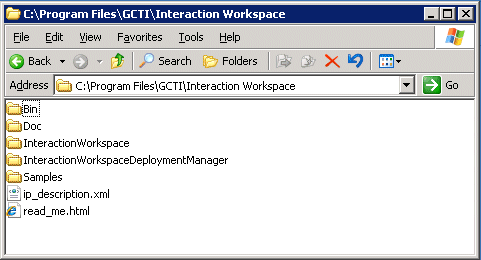
If you clicked Install, the Interaction Workspace customization files are installed in the location that you specified (see the Figure - Contents of the Interaction Workspace install disc or image copied onto the web-server host).
The Interaction Workspace folder contains the following:- The Bin folder, which contains the Interaction Workspace API
- The Doc directory, which contains the Interaction Workspace 8.1 .NET Developer's Guide & API Reference (InteractionWorkspaceSDKNet.chm)
- The InteractionWorkspace folder, which contains Interaction Workspace application files
- The InteractionWorkspaceDeploymentManager folder, which contains the application files that are required to deploy customized code, including the Deployment Manager application (InteractionWorkspaceDeploymentManager.exe), and the following subfolder:
- WebPublication"Contains publish.htm and setup.exe files (the bootstrap files for client-side prerequisites)
- The Samples directory, which contains code samples that demonstrate Genesys best-practices recommendations for developers
- When installation is complete, the Installation Complete panel is displayed.
- Click Finish to exit the Genesys Installation Wizard.
End
Next Steps
- (optional) Procedure: Installing the Interaction Workspace SIP Endpoint.
- Refer to the Interaction Workspace 8.1 .NET Developer's Guide & API Reference for information about how to use the toolkit and samples to customize Interaction Workspace.
This page was last edited on January 25, 2018, at 19:08.
Comments or questions about this documentation? Contact us for support!


