Contact Group Configuration
Contents
In Advisors, the term contact group means an forecasting entity from a workforce management system. These are activities in Genesys WFM, forecast groups and staff groups in Aspect eWorkforce Management, and contact types in IEX TotalView.
To configure the hierarchy displayed on the WA dashboard and control how contact groups' metrics are rolled up, create associations between:
- Contact groups and the business objects that become the levels of the hierarchy in the Contact Centers pane
- Contact groups and applications
- Contact groups and agent groups
Access in Advisors to contact groups is not configured in Configuration Manager. Advisors users only have access or not to them indirectly, via access to business objects related to them.
Access to business objects that form levels in the hierarchy on the WA dashboard must be configured by an administrator in Configuration Manager. Objects and data relating to or depending on objects to which users have no permissions will not be displayed, either in the dashboard or on this page.
If contact groups do not load or do not update on the Contact Group Configuration page in the Administration module, see information about how to import contact groups in the Performance Management Advisors 8.5 Deployment Guide.
Contact Group Configuration Page
To configure contact groups, use the Contact Groups Configuration page. It has four tabs:
- Rollups (aggregations: create associations between contact groups and business objects -- contact centers, application groups, and reporting regions or operating units)
- Contact Groups - Applications: create associations between contact groups and applications from Genesys Stats Server or CISCO ICM.
- Contact Groups - Agent Groups: create associations between contact groups and agent groups from Genesys Stats Server or CISCO ICM.
- Details of contact groups
Rollups Tab
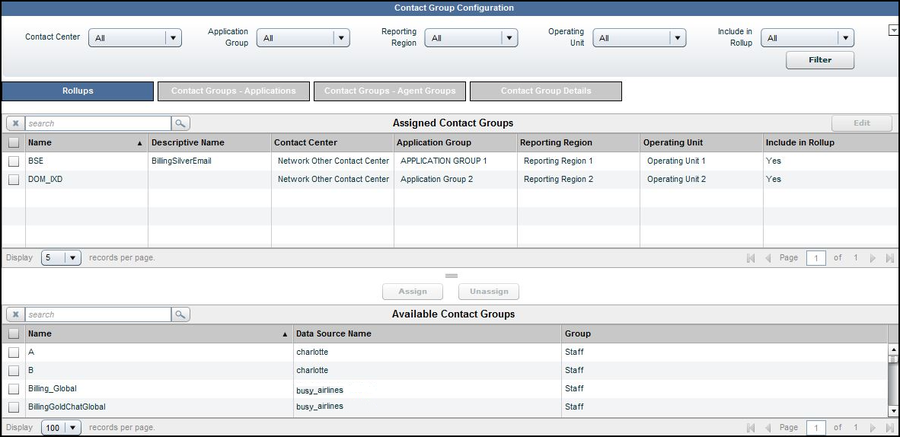
The Rollups tab allows you to define how information displays, summarizes, expands, and contracts in the Contact Centers pane on the dashboard.
To configure a contact group, assign a contact center, an application group, and a reporting region or operating unit toit. These assignments are required for the contact group to display on the dashboard and to be included in the metric rollup for the specific grouping.
You have the option to do bulk configuration of rollup relationships for CCAdv and WA. For information about bulk configuration, see information about bulk configuration in the Performance Management Advisors 8.5.0 Deployment Guide.
Filtering the Display of Rollups
You can filter the list of objects in the Rollups display.
Filter by business object and other properties using the menus and the Filter button at the top of the page.
Sorting the Display of Rollups
To sort the data in the Rollup table, click on a column heading. The arrow in the down or up position indicates which column is sorted.
Assigning Contact Groups for Rollup
Start Procedure
- Select the Rollups tab.
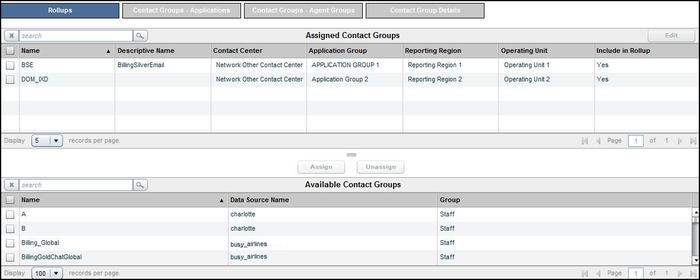
The following screenshot shows the Rollups tab in the Contact Group Configuration page. - Select a contact group from the Available Contact Groups pane by checking its check box. You can select multiple contact groups in the same way. The changes you make will apply to all those you select. To navigate to the next or previous page use the page controls
- To associate the contact group for rollup, click Assign. The Assign Rollups pane displays.
- Define the rollup by selecting a contact center, application group, reporting region, and/or operating unit for the contract group.
If you did not select a filter to display the data in the tables, the following defaults are applied:- Include in Rollup: Yes
- Click Assign. The Assign Rollups dialog box closes.
- In the main Rollups tab, a confirmation message displays and the details display in the table.
The Assign Rollups dialog does not appear if the required related business objects were already specified in the filter options. If only some of the mandatory objects are specified, then only the remaining missing ones need to be specified.
Editing a Contact Group Rollup
Start Procedure
- Select Rollups.
- Select one or more contact centers from the list.
- Click Edit.
- Edit the rollup by selecting a contact center, application group, reporting region, and/or operating unit.
- To roll up the metric values of a contact group to an application group, contact center, regional level, or enterprise level, select Yes for the Include in Rollup.
Selecting No for Include in Rollup excludes the values from the WA rollup.
For the violations triggered by threshold rules on a contact group’s metrics to display on the dashboard, you must select Yes for Include in Rollup. - Click Save.
Contact Groups – Applications
Use the Contact Groups - Applications tab to assign applications to contact groups. The content of this page depends on the selected CCAdv/WA configuration mode.
Integrated Configuration Mode
If integrated configuration mode is enabled, the list of available applications presents applications that meet all of the following criteria:
- Configured applications
- Applications mapped to the same business objects to which the selected contact group is mapped
- Applications not mapped to this, or any other, contact group
If such an application is mapped to the contact group, and then later removed from CCAdv configuration, this application disappears from the applications assigned to the contact group and the list of available applications. It no longer contributes metric values to the WA dashboard.
The same thing happens if the configuration of the application or the contact group is modified in a such way that their business objects no longer match.
In integrated configuration mode, you must assign one or more applications to the contact group.
In integrated configuration mode, agent groups assigned to the applications are automatically assigned to the contact group
Independent Configuration Mode
If independent configuration mode is enabled, the list of available applications represents a set of all applications that are not mapped to this, or any other, contact group. Contact group-to-application mappings are independent of the CCAdv configurations. You can assign any application to a contact group that is not associated with an agent group contact center.
In independent configuration mode, agent groups assigned to the applications are not automatically assigned to the contact group
Contact Group - Applications
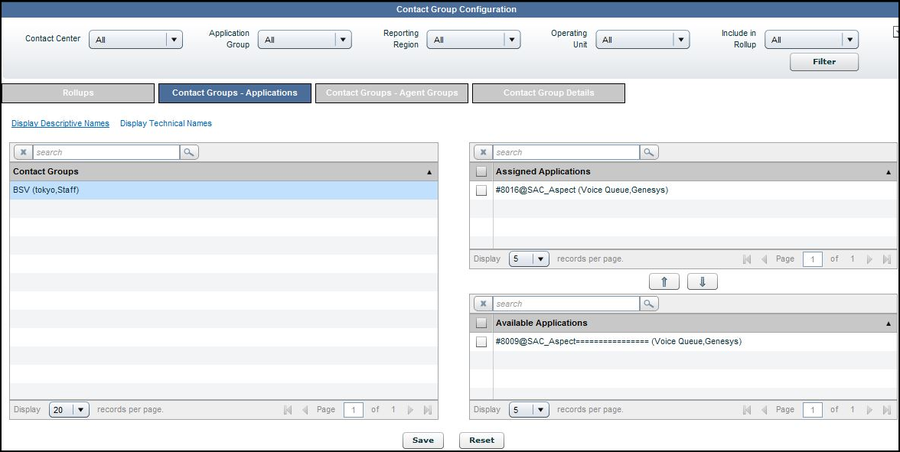
The following screenshot shows the Contact Groups – Applications tab.
You can opt to display either descriptive or technical names of objects by clicking the Display Descriptive/Technical Name link.
Start Procedure
- Select the Contact Groups - Applications tab.
- Use the filters in the uppermost panel to filter the display of contact groups in the Contact Groups panel.
The display shows contact groups, assigned applications and available applications. - Select a contact group in the left panel.
This displays the already assigned applications, if any, in the Assigned panel on the right. Applications that are available for assignment appear in the Available panel. Chat, e-mail, and outbound metrics are not available in WA. Consequently, applications that are interaction queues or calling lists are never available here. - To move an application between the Available and Assigned panels, check its check box and click on either the up or down arrow between the two panels.
- Click Save.
Contact Groups - Agent Groups
All types of contact centers are available for selection in the Contact Center drop-down menu. The menu contains both agent group contact centers, and other types of contact center. The names of AGCCs display with the names of the related network contact center (NCC), formatted as NCC Name: AGCC Name.
The contact groups mapped to any type of contact center display in the Contact Groups pane. The content of other panes on this page depends on the selected CCAdv/WA configuration mode.
There is no restriction on the number of contact groups to which an agent group can be mapped.
Available Agent Groups in Integrated Configuration Mode
In integrated configuration mode:
- If the selected contact group is mapped to an AGCC, then here are the steps to make an agent group appear in Available Agent Groups for assignment to a contact group:
- In Application Configuration:
- Configure an application, assigning it to a network contact center.
- Assign the agent group to the application.
- In Agent Group Configuration:
- Assign the agent group to the agent group contact center.
- Now in Contact Group Configuration:
- Configure contact group 1, assigning it to the same business objects as the application.
- Now the agent group will appear in the Available Agent Groups in the Contact Group - Agent Groups tab, and you can assign the agent group to contact group 2.
- In Application Configuration:
- If the selected contact group is mapped to any other type of contact center, no available agent groups display in integrated configuration mode. The list of assigned agent groups is shown, but you cannot edit it. The agent groups are those mapped to the applications that are mapped to the contact group and also to the same business objects to which the contact group is mapped. The page, in this case, can be used only for viewing the lists of agent groups expected on the dashboard view.
Available Agent Groups in Independent Configuration Mode
In independent configuration mode:
- If the selected contact group is mapped to an AGCC, the list of available agent groups includes all agent groups that have the following characteristics:
- assigned to the same AGCC to which the selected contact group is mapped
- Include in WA property set to Yes
- not already mapped to the selected contact group
- If the selected contact group is mapped to any other type of contact center, the list of available agent groups includes all agent groups that are not mapped to the selected contact group. Any such contact group can be mapped directly to any agent group present in the available agent group list.
Contact Groups - Agent Groups
The following screenshot shows the Contact Groups – Agent Groups page.
The Contact Groups - Agent Groups tab allows selection of contact centers of any type. Each AGCC name is shown together with its parent NCC name. The names display in the following format: NCC Name: AGCC Name
You can opt to display the descriptive or technical of contact groups and agent groups, by clicking on the Display Descriptive/Technical Names link.
Start Procedure
- Select the Contact Groups - Agent Groups tab.
- Use the filters in the uppermost panel to filter the display of contact groups in the Contact Groups panel. The display shows configured contact groups, the agent groups assigned to them, and the available agent groups.
- Select a contact groupfrom the left panel. This displays the already assigned agent groups, if any, in the Assigned panel on the right.
Agent groups that are available for assignment appear in the Available panel. Note that though agent groups associated only with interaction queues or calling lists will appear here, you should not assign these agent groups to a contact group. This is because you cannot assign the interaction queue or calling list to a contact group, and so these agent groups will never appear in the WA dashboard. - To move an object between the Available and Assigned panels, check its check box and click on either the up or down arrow between the two panels.
- Click Save.
Contact Group Details
The Contact Group Details table displays the details of each contact group, including:
Name: The name of the contact group provided by the workforce management system.Source: The workforce management system that provided the contact groups (for example, Genesys Workforce Management, Aspect eWFM, IEX TotalView) or the Site ID (or the contact center ID) of the contact group from the Genesys Workforce Management. For more information on where this name comes from, see the section on importing contact groups in the Deployment Guide.Group: The type of contact group (for example, forecast or staff).Active: Indicates whether the contact group is active or not. The status will be Yes if the last time WA imported that system’s data, the contact group was present in the imported data. The status will be No if the last time WA imported that system’s data, the contact group was not present in the imported data.Include in Rollup: Indicates whether or not WA should use this contact group when calculating metrics of related business objects, and display this contact group on the dashboard.
Start Procedure
- To display the details of a contact group either select from the list or search and select.
- Type a meaningful name in the Descriptive Name field.
- Include in Rollup: Check the box to include the contact group in rollups.
In addition to this setting, the contact group must be configured, that is, related to a contact center, application group, reporting region, and/or operating unit. - Click Save.
A confirmation message displays and the details display in the table.


