Contents
Testing a Screening Rule
There are two ways to test a screening rule: on the UCS database, and on specially-created text.
Procedure: Testing screening rules on the UCS database
Purpose: To test a screening rule on all interactions in the UCS database that relate to the current tenant.
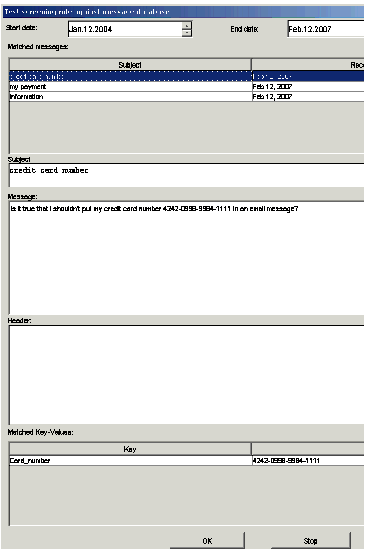
- Click Test against whole database near the bottom of the Screening Rule Editor. The Test screening rule against message database dialog box appears, as shown in "Test Screening Rule Against Message Database Dialog Box."
- Adjust the contents of the Start date and End date boxes to cover the desired timespan, then click Find.
-
If there are a great many interactions and the testing process is taking too long, you can click Stop.
The results of the test display as follows:
-
The Matched messages area lists all interactions that match the rule.
-
The Subject, Message, and Header boxes show the text of the subject, body, and header of the interaction that is selected in the Matched messages area.
-
The Matched Key-Values area shows all keys in the interaction’s user data whose values match the rule. In the example in "Test Screening Rule Against Message Database Dialog Box," the screening rule created a key-value pair to hold the matched string, in this case a series of sixteen digits that could be a credit card number.
Next Steps
-
Test a rule on text that you create.
Procedure: Testing screening rules on specially-created text
Purpose: To test a screening rule on text that you create for that specific purpose.
Summary
At the bottom of the Screening Rule Editor is the Test messages area, shown in "Test Messages Area." Use this area to create messages that you can test screening rules on.
- Click Add new to open the Test message dialog box, in which you can enter the address, subject, and body of a test message as shown in "Test Message Dialog Box."
-
Click OK to return to the Screening Rule Editor.
-
Double-click an existing test message to edit it.
-
Select a test message and click Delete to delete it.
- Select the rule on the Screening tab, then open the Screening Rule Editor..
-
Select a test message from the list in the Test messages area.
-
Click Test rule to apply the rule to the selected message.
-
A message window appears, reporting whether the selected message matches the rule.
Next Steps
-
Learn how to Search for Screening Rules.
Important
The test messages created by each user are stored separately, and are not synchronized between multiple Knowledge Manager instances. Test messages that you create are stored on your local machine under the default Documents folder of the logged-in Windows User folder, in the UserInfo file. This file is binary and must not be edited manually. This page was last edited on March 19, 2014, at 23:44.
Comments or questions about this documentation? Contact us for support!


