Contents
Pre - Installation Steps
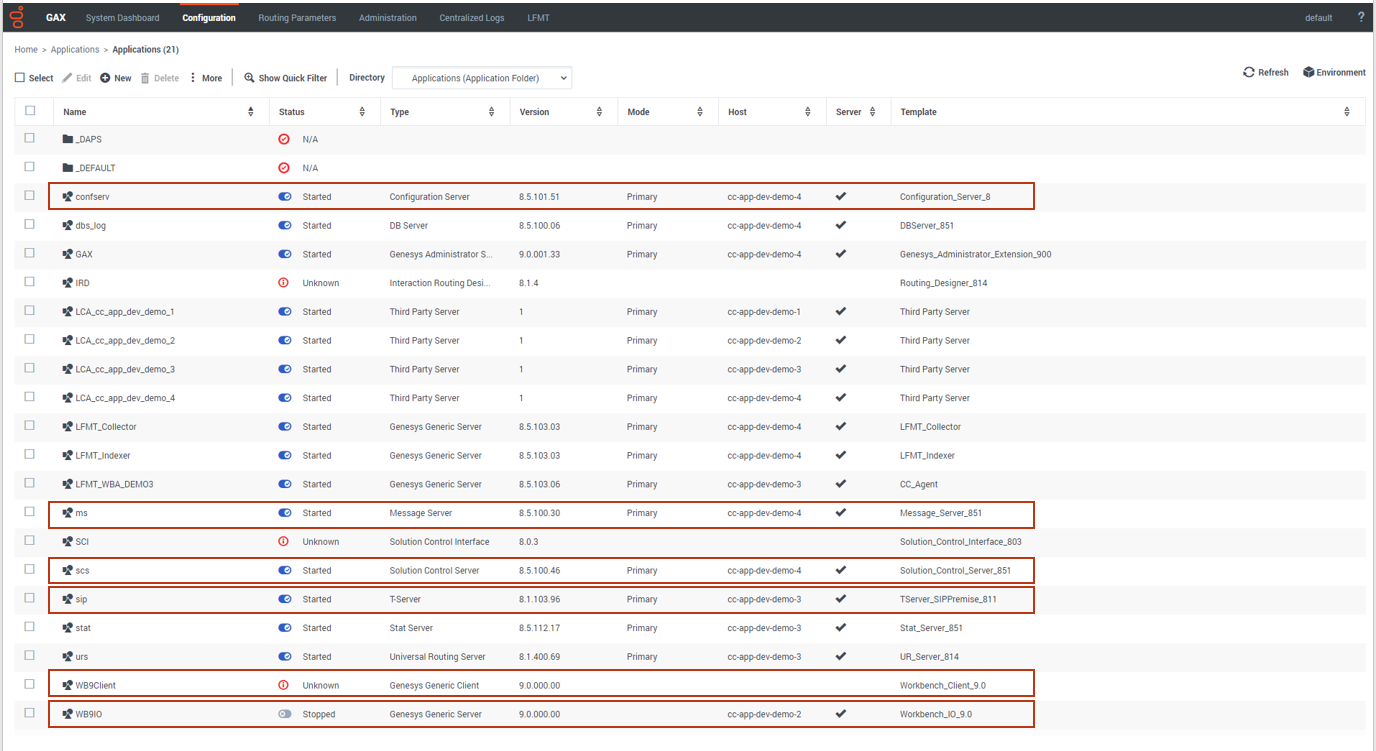
Genesys Engage Application Object Requirements
Workbench integrates to the Genesys Engage platform, as such the following Genesys Engage Objects will be required and leveraged by Workbench:
| Component | Description/Comments |
|---|---|
| Genesys Engage Workbench Client application/object | enables Engage CME configured Users to log into Workbench |
| Genesys Engage Workbench IO (Server) application/object | enables integration from Workbench to the Engage CS, SCS and MS |
| Genesys Engage Configuration Server application/object | enables integration from Workbench to the Engage CS; authentication and Config Changes |
| Genesys Engage Solution Control Server application/object | enables integration from Workbench to the Engage SCS; Alarms to WB from SCS |
| Genesys Engage Message Server application/object | enables integration from Workbench to the Engage MS; Config change ChangedBy metadata |
| Genesys Engage SIP Server application/object (optional) | enables integration from Workbench to the Engage SIP Server enabling the Channel Monitoring feature *Workbench integrates to SIP Server only and not SIP Server Proxy |
- Ensure each and every Engage CME Application has an assigned Template else the Workbench installation will fail.
- Ensure Engage CME Hosts Objects have an IP address assigned else the Workbench installation will fail.
Genesys Engage Application Configuration Pre-installation Steps
Please follow the sections below to:
- Import the Workbench Installation Package using GAX
- Provision the Workbench 9 IO (Server) Application using GAX
- Provision the Workbench 9 Client using GAX
- Provision the Workbench 9 Client Role using GAX
Workbench Installation Package Import using GAX
The following steps provide a guide to importing the mandatory GAX Workbench 9 Installation Package containing the Workbench 9 Templates and Applications configuration:
- Login into GAX
- Navigate to Administration
- Click New
- Select the Installation Package Upload (includes templates) option
- Click Next
- Click Choose File
- Browse to the extracted Workbench_9.x.xxx.xx_Pkg folder
- Double-click into the templates folder
- Double-click into the wb_9.x_gax_ip_template folder
- Double-click the Workbench_9.x_GAX_Template_IP.zip file
- Click Finish
- Click Close when the import has successfully completed
Example Workbench Installation Package:
The procedure above will provide the:
IO and Client Templates:
Workbench Admin Role:
Provisioning the Workbench IO (Server) Application using GAX
This Workbench IO (Server) Application is used by Workbench to integrate to Genesys Engage components such as Configuration Server.
- Log into GAX
- Navigate to Configuration.
- In the Environment section, select Applications.
- In the Applications section, select New.
- In the New Properties pane, complete the following:
- If not already, select the General tab
- In the Name field, enter an Workbench IO Application Name i.e. WB9IO
- Click on the Template field and navigate and select the Workbench_IO_9.x.xxx.xx Template
- In the Working Directory field, enter "..." (period character)
- Not explicitly required for Workbench 9, but a mandatory CME field
- In the Command Line field, enter "..." (period character)
- Not explicitly required for Workbench 9, but a mandatory CME field
- In the Host field, select the host where Workbench Primary will be installed.
- In the Connections tab, click the Add icon to establish connections to the following applications:
- (Optional) The primary or proxy Configuration Server from which the configuration settings will be retrieved. This is only required if connecting to Configuration Server via TLS. See the Genesys Security Deployment Guide for further instructions. Note: The security certificates must be generated using the SHA-2 secure hash algorithm.
- Click Save to save the new application.
The Workbench IO (Server) Application (i.e. "WB9IO") configuration has now been completed; this enables Workbench to Genesys Engage integration both from an installation and run-time perspective.
- For a successful Workbench installation/run-time, the System/User Account for the Workbench IO application must have Full Control permissions.
- The "WB9IO" Application will have a dummy [temp] Section/KVP due to mandatory prerequisite packaging.
Provisioning the Workbench Client Application using GAX
This Workbench Client Application is used by Workbench for Client Browser connections to Workbench, without it, no Users can log into Workbench.
- Log into GAX
- Navigate to Configuration.
- In the Environment section, select Applications.
- In the Applications section, select New.
- In the New Properties pane, complete the following:
- If not already, select the General tab
- In the Name field, enter an Workbench Client Application Name i.e. WB9Client
- Click on the Template field and navigate and select the Workbench_Client_9.x.xxx.xx Template
- Click Save to save the new application.
The Workbench Client (i.e. WB9Client) Application configuration has now been completed; this enables Users to login to Workbench.
- The "WB9IO" (Server) Application (or equivalent name) will have a dummy [temp] Section due to mandatory prerequisite packaging.
Provisioning the Workbench Client Role using GAX
- Log into GAX
- Navigate to Configuration.
- In the Accounts section, select Roles.
- In the Roles section, select New.
- Select None in the drop down for Role Template
- Click OK
- If not already, select the General tab
- In the Name field, enter a Workbench Administrator Role Name - i.e. "WB9_Admin"
- In the Description field, enter "When assigned to Users, grants access to the Workbench\Configuration Console."
- Select the Role Members tab
- Add your relevant Access Group(s) and/or Person(s)
- Select the Assigned Privileges tab
- Check the Workbench Admin Access checkbox
- click Save
The WB9_Admin Role has been created.
Therefore, certain assigned Users, will now have visibility/access to the Workbench Configuration Console, enabling the Configuration of Workbench Applications, Settings and Features.

An example of the "Super Administrators" Access Group being assigned the "WB9_Admin" Role:
Changes Console ChangedBy field for Genesys Engage Changes
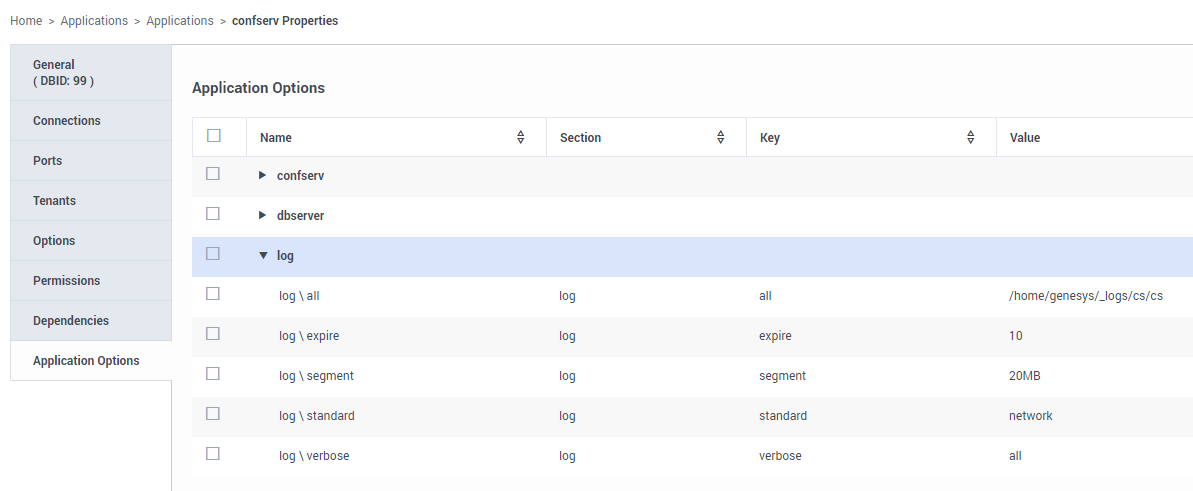
For the Changes Console ChangedBy field to be accurate (not "N/A"), the following Genesys Engage configuration is required:
- A connection from the respective Genesys Engage Configuration Server or Configuration Server Proxy to the Genesys Engage Message Server that Workbench is connected to.
- If not already, standard=network added to the log section of the Configuration Server or Configuration Server Proxy that Workbench is connected to.


