
Contents
Filtering the Available Agents List
When you are adding participants to a meeting and there is a large number of agents to select from, you might want to use the Filter ![]() (found at the top of the Available Agents pane) to easily group them by Activities, Multi-Site Activities, or Contracts.
(found at the top of the Available Agents pane) to easily group them by Activities, Multi-Site Activities, or Contracts.
After you create one or more filters, they appear as bullets above the Available Agents list. If only one item is selected for the filter, the bullet shows the selected item's name. If more than one item is selected, the bullet shows the number of items in the filter.
When you click Filter ![]() in the Available Agents pane, you will see three tabs, all of which have the following controls:
in the Available Agents pane, you will see three tabs, all of which have the following controls:
Common Controls
| Applies the selected items in a list (activities, multi-site activities, or contracts). | |
| Closes the Filter pane without applying the selected filter conditions. | |
| Opens a pane containing a list of items for selection (depending on the tab you selected: Activities, Multi-Site Activities, or Contracts). | |
| Removes any previously selected items from the Filter by.. list. | |
| Uses search criteria to quickly find items in long lists. | |
Enables various sort options, depending on the list of items you are sorting:
|
Filtering Agents by Activities
- In the Available Agents pane, click Filter
 .
.
- The Filter by.. pane opens with the Activities tab selected by default.
- In the Filter by Activities pane, click Add
 .
. - When the list of activities opens, select one or more activities, and click Apply
 .
. - In the Activities tab, if the filter contains all selected activities, click Apply again.
- To remove an activity from the filter, click Remove
 before applying the filter.
 - To close this pane without applying any of the selected items, click Close
 .
.
- The filter now appears at the top of the Available Agents pane.
Filtering Agents by Multi-Site Activities
- In the Available Agents pane, click Filter .
The Filter by.. pane opens with the Activities tab selected by default. - Click Multi-Site Activities.
- In the Filter by Multi-Site Activities pane, click Add .
- When the list of multi-site activities opens, select one or more activities, and click Apply .
- In the Multi-Site Activities tab, if the filter contains all selected activities, click Apply again.
- To remove an activity from the filter, click Remove before applying the filter.
- To close this pane without applying any of the selected items, click Close .
- The filter now appears at the top of the Available Agents pane.
Filtering Agents by Contracts
- In the Available Agents pane, click Filter .
- The Filter by.. pane opens with the Activities tab selected by default.
- Click Contracts.
- In the Filter by Contracts pane, click Add .
- When the list of contracts opens, select one or more contracts, and click Apply .
- In the Contracts tab, if the filter contains all selected contracts, click Apply again.
- To remove a contract from the filter, click Remove before applying the filter.
- To close this pane without applying any of the selected items, click Close .
- The filter now appears at the top of the Available Agents pane.
Viewing and Removing Filters
Filters appear at the top of the Available Agents list, which now contain only the filtered items. You can see the contents of a filter in two ways:
- Click the filter to open a list of them.
- Hover your cursor over the filter to see a pop-up that displays them.
For example, in the figure below the user clicked the Activities (2) filter, which opened the Filter by Activities pane listing the items in that filter.
To remove a filter without opening it, click the X in the bullet itself.
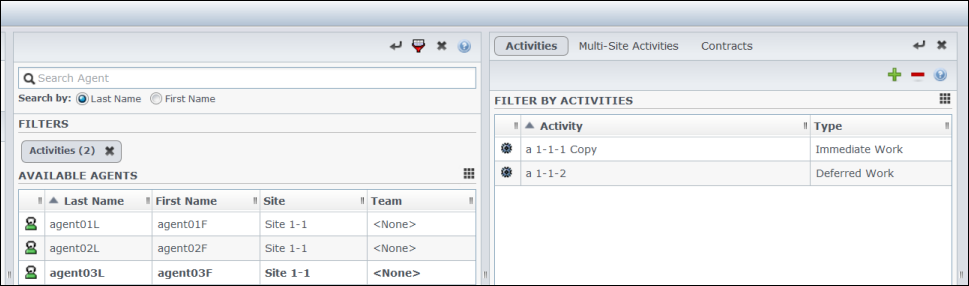
Figure: Filter Bullets in Meetings View