Integrating with Source Control
Contents
This section describes setup instructions for using source control with Composer. The ClearCase source control system is supported as well as Subversion.
ClearCase Plug-in Installation
To install ClearCase plug-ins for use with Composer:
- Install ClearCase on the machine that Composer will run on.
- Exit Composer. If you want to print these instructions to use after closing Composer, click the Print Page icon at the top-right of the Eclipse Help window.
- Install the ClearCase Eclipse plug-in from IBM:
- Get the following files from IBM's website:com.rat.cc.win32-20080131A.zip and com.r.cc.ccrefresh.all-20061107.zip
Note: Actual ZIP file and directory names may change as IBM continues to update the plug-ins. These documented names are current at the time of this writing. These plug-ins are for Eclipse v3.3 and not 3.4. Even though Composer 8.1. is based on Eclipse 3.4, Genesys recommends that you install the plug-ins listed for Eclipse 3.3.
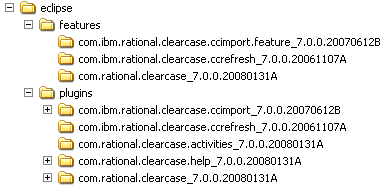
- Extract the two ZIP files to a location of your choosing, essentially merging the contents. There is a duplicate file .eclipseextension in the two ZIPs; you can safely ignore that file. The ZIP files, when extracted, create a directory structure like:
- If it does not already exist, create the directory ${Composer 8.1.Install}\features, where ${Composer 8.1.Install} is the installation root of your Composer 8.1 installation.For example, ${Composer 8.1.Install} might be C:\Program Files\GCTI\gvp\Composer 8.1
- From the directory where the ZIP files were extracted, copy the folders in the features directory to ${Composer 8.1.Install}\features, and copy the directories in the plugins directory to ${Composer 8.1.Install}\plugins.
Note: Instead of dropping the extracted zip file content in these two locations, you may place the entire (eclipse folder) extracted content in the following folder location ${Composer 8.1.Install dir}\dropins.
- Ensure that ClearCase capabilities are enabled.
- Go to Window > Preferences > General > Capabilities.
- Make sure that the Team checkbox is checked. It must be checked in order for ClearCase MVFS Support and ClearCase SCM Adapter preference items to appear in the Preferences window. Please note you must restart Composer to see the changes.
- Enable MVFS Support:
- Start Composer.
- Select Window > Preferences > Team > ClearCase MVFS Support.
- Click the Workspace link underMVFS Support Preferences and select the Refresh Automatically check box.
- Click the Apply button.
- Click OK to close the Workspace dialog box.
- Again, open Window > Preferences > Team > ClearCase MVFS Support and make sure that Enable ClearCase dynamic view file system support is selected, then click OK.
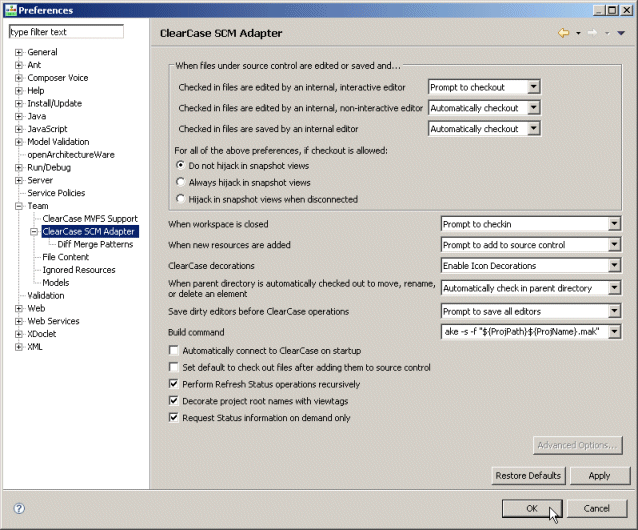
- Configure the ClearCase plug-in. Configuration can be accessed from Window > Preferences > Team > ClearCase SCM Adapter from the tree in the left-side panel. The recommended settings are shown in the image below:
Note: You can read more about ClearCase features and working with ClearCase view from the help topic Rational ClearCase SCM Adapter available from the Eclipse Help system. These help topics will be available only after installing ClearCase plugins.
ClearCase Usage
To use ClearCase functionality within Composer:
- Create a view using ClearCase Explorer, or use an existing view.
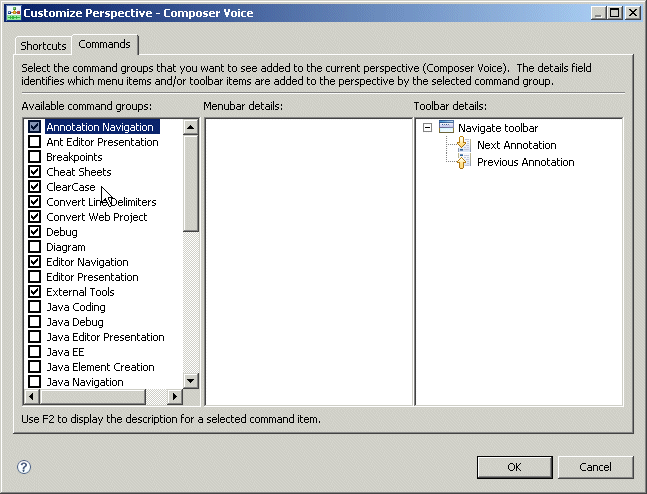
- In Eclipse, if you don’t see the ClearCase toolbar, make the toolbar appear by clicking Window > Customize Perspective. In the dialog box that displays, click the Commands tab, select the ClearCase command group and click OK.
After this, any Composer Project that resides in a ClearCase view will have the view name displayed next to it in the Project Explorer window. Also, the icons for files and folders under source control will show the status, such as checked out, hijacked, and so on.
Creating a Composer Project Managed by ClearCase
To create a new Composer Project that will be managed by ClearCase:
- Bring up the Project wizard (File > New).
- Clear the Use default location check box and enter in the Location field a path that resides inside your ClearCase view.
The path becomes the root of the Composer Project. Note that the files in the new project will not be checked into ClearCase until you use the Add to Source Control function.
To add a project that is already checked into ClearCase to your Composer 8.x workspace:
- Use the Import wizard (File > Import).
- Select Existing Projects into Workspace.
- In the Select root directory field, enter the path of the project residing in your ClearCase view. Check the box corresponding to the Project name.
Important: Leave the Copy projects into workspace box unchecked. If it is checked, the imported project will not be under ClearCase control.
To edit a file that is under source control, it must be checked out from ClearCase. After editing, it can either be checked in to create a new source control version, or the checkout can be undone to revert the file back to its previous version. You can also compare changes to the previous version before checking it. All of these operations can be accessed in several alternative ways:
- Right-click the file name in Composer's Project Explorer view, and use the Team submenu.
- Select the file in Composer's Project Explorer view, and use the ClearCase menu on the top menubar.
- Select the file in Composer's Project Explorer view, and use one of the buttons on the ClearCase toolbar.
Note: If you choose to remove a ClearCase-managed Composer Project from your workspace, you will be prompted with a Confirm Project Delete message. Genesys strongly recommends that you choose the Do not delete contents option. This leaves the files in your ClearCase view untouched. Otherwise, the files may be removed from source control.
Subversion Configuration
Subversion is a client–server versioning system. You can integrate Subversion with Composer in order to have a version control over Projects. Subversion creates and maintains a repository on the Project web server. Its clients run on Composer machines and connect to the Subversion server over the Internet.
Note! The integration steps below are not version-specific or Composer-specific. The steps refer to the interface and capabilities provided by the Eclipse Integrated Development Environment (IDE) (Subclipse Team Provider plug-in) and CollabNet (CollabNet Subversion Server) products.
The recommended steps are as follows:
- Install and Configure Subversion Server.
- Download the Collabnet Subversion server from the website: http://www.collab.net/downloads/subversion/
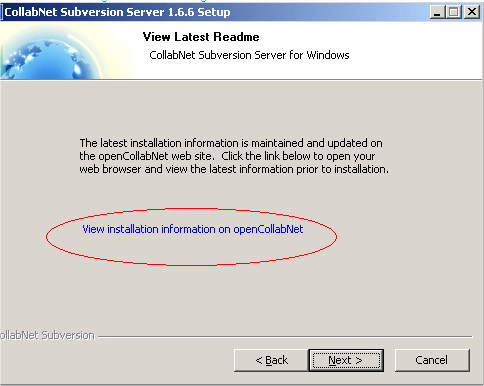
- Follow the installation and configuration instructions from the vendor for the operating system you are working with. Complete registration if required. When the installation executable runs, the wizard has an option to View Installation Information.
Note: If you are running IIS on the server machine during installation of Collabnet Subversion server, you may wish to change the Apache port to “81” instead of the default 80 to avoid conflict.
- Follow post installation instructions from the vendor and complete Collabnet Subversion server configuration.
- Configure the Subversion repository. Follow the instructions provided by the vendor (http://www.collab.net/downloads/subversion/) to define the permissions, user name, and password for accessing the repository. Use the instructions for the specific version of the Callabnet Subversion server that you installed in step 1.
Note: Subclipse provides an option for creating a repository, but this is more suited for personal development where you do not need to share your code. Typically, you would set up a Subversion server, create the repository on the server and then point Subclipse at the server.
- Install the Subversion client using the capabilities of Eclipse by adding Subclipse to the Eclipse IDE. Subclipse is a project to add Subversion support to the Eclipse IDE. Use Eclipse's Software Manager to add Subclipse to our Eclipse IDE.
- Add the Subclipse update version compatible with Subversion server installed in step 1.
- From Composer's Help menu, choose Install New Software to open the Install wizard.
- Select the required Subclipse update from the site: (http://subclipse.tigris.org/update_1.6.x/)
Note: The above link may not be current. In this case, check the http://subclipse.tigris.org/ site. The Download and Install section lists update sites for various Eclipse versions. Choose the correct site based on the Eclipse version for Composer. Composer’s Eclipse version can be determined from Help > About and clicking the Eclipse.org icon.
- Click on the Download link to go to the download page. There you will find the URL to enter into the Eclipse Install wizard.
- Follow the wizard and instructions provided in the Help > Contents > Workbench User Guide for installing new software.
- Restart Composer if required by installer.
- Create the CVN (Subversion) item in Composer menu bar. Follow the Eclipse instructions on customizing perspectives /creating command groups (Help > Contents > Workbench User Guide > Concepts > Perspectives > Configuring perspective command groups.
- Define CVN repository location to your Eclipse IDE. Follow the instructions provided in Help > Contents > Workbench User Guide > Getting Started > Team SVN Tutorial. Use the instructions for Specifying a project location.
For more details working with CVN, please, see Help: Subclipse - Subversion Eclipse plugin.
Checkin Error
If you are using Source Control tools, checking in Composer Projects contents after a Project Upgrade may results in an error. See Checkin Error During Source Code Integration.


