Working with Prompts
Contents
- 1 Working with Prompts
- 1.1 Opening the Prompts Manager
- 1.2 Selecting a Composer Project
- 1.3 Selecting a Language Resource
- 1.4 Columns in the Prompts Manager View
- 1.5 Non-US Locales
- 1.6 Reviewing and Managing Prompts
- 1.7 Recording Prompts
- 1.8 Exporting a Prompt Listing
- 1.9 Prompt Listing Usage For a Recording Studio
- 1.10 Sample Exported Prompt Listing
- 1.11 Importing Prompt Resources
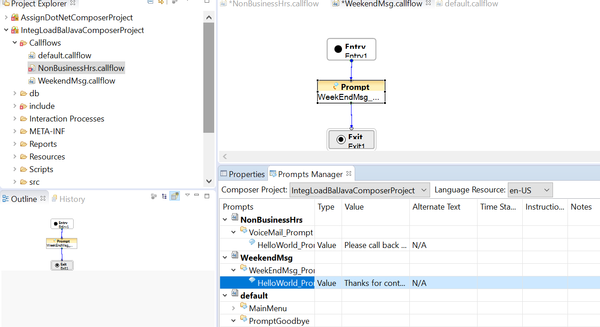
There is both a Prompts Manager perspective and a Prompts Manager perspective. The Prompts Manager provides the ability to quickly review all prompts in a Composer Project from a central place. It displays the relevant information about all prompts in all callflows present in your workspace, one project at a time. It displays prompt item text, associated audio file(s) and allows you to play prompt resource files directly from the Prompts Manager view. The Prompts Manager also enables you to tweak your prompts by rearranging prompt items, changing prompt item text, and recording new audio files using microphone input and associating them with prompts in your Projects. It provides the ability to quickly jump to a specific prompt block in the callflow diagram with a simple right-click so that other changes can be made to the prompt. Prompt Manager works in conjunction with the prompts properties popup dialog.
Opening the Prompts Manager
To open the Prompts Manager perspective:
- Select Window > Open Perspective > Other > Prompts Manager.
- Or select the Prompts Manager Perspective
 toolbar button.
To open the Prompts Manager view:
- Select Window > Show View > Prompts Manager.
- For an additional Prompts Manager setting, see the figure in topic Project Properties dialog box. Expand Prompts Manager.
Selecting a Composer Project
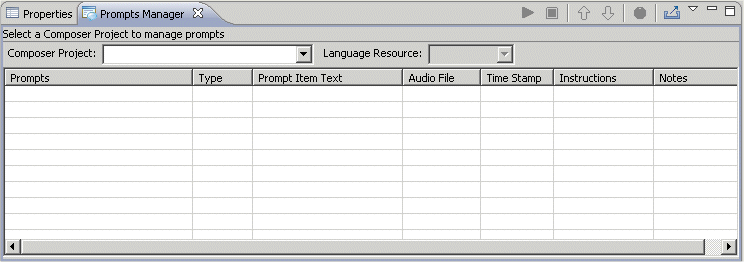
To select a Composer Project for which to manage prompts, the Prompts Manager view:
- Select a project from the Composer Project drop-down list.
Selecting a Language Resource
- Select a Language Resource. If not using en-US, see the special note on Non-US Locales.
The Prompts Manager displays all the prompt-related blocks for all the callflows in the selected Project.

Notes
- The Prompts Manager will not work with non-Composer projects (such as hand-coded applications).
- Note the Language Resource dropdown selection box. The prompt audio resource is located in the appropriate language resource folder location (for example:/Resources/Prompts/<locale>/audioResourceFile.vox.
- Starting with 8.0.2, a Composer Project upgrade sets the default Project locale to en-US. If other than en-US, right-click the Composer Project in the Project Explorer, and select Properties > Locales to set the default and active locales.
- Use only a 32-bit Eclipse environment to play audio files from the Prompts Manager view. If you are using a 64-bit version Eclipse environment, playing audio throws the following error: java.lang.UnsatisfiedLinkError: .\configuration\org.eclipse.osgi\bundles\470\1\.cp\AFUtil.dll: Can't load IA 32-bit .dll on a 64-bit platform.
Columns in the Prompts Manager View
A prompt item row in the Prompts Manager view displays the following column details:
- Prompts -- A tree hierarchy consisting of the following elements; Root elements, studio diagram callflow/sub-callflow file name. Studio diagram elements may have diagram block elements. These diagram block elements may have prompt/retry prompt item elements.
- Type -- The type of prompt item (audio resource/value/variable)
- Prompt Item Text -- Any associated text with the prompt item.
- Audio File -- The relative path of the audio file associated with this prompt item.
- Time Stamp -- The Date/Time stamp when the audio file was created or recorded. This helps in identifying the newer/older prompts.
- Instructions -- If additional item specific information needs to be given, such as a certain word needs to be emphasized when recording at the recording studio.
- Notes -- Any notes that you would like to associate with the prompt item for later reference.
Non-US Locales
By default, Composer provides prompts audio resources for the en-US locale. The supplied PlayBuiltinType.js under Resources/Prompts in the Project Explorer defines a global variable called promptBaseUrl with the value en-US. When using a different locale in a callflow (other than en-US in the Language Resource field in Prompts Manager), you must provide the associated audio files and PlayBuiltinType.js. Adjust the path with the associated prompt resource locale folder path.
Reviewing and Managing Prompts
Once you have laid out your diagram and wish to review the flow of the application, you can use the Prompts Manager to do the review. It is useful to have the callflow and Prompts Manager view open together so that the flow of the application can be traced using the callflow while reviewing prompts using the Prompts Manager. Select the Composer Project(s) containing prompts you wish to manage. You can review and manage your prompts as follows:
- Expand a Prompt block in the Prompts column of the Prompts Manager view to display all prompts associated with that block.
- Select a prompt row. The Prompts Manager view displays detailed information about the prompt.
- You can view prompt item text in the Prompts Manager.
- For prompts that have an associated audio file, click the Play icon
 in the Prompts Manager view to hear the audio file.
 - Click the Stop icon
 to stop playing the audio file.
Note: To play back VOX audio files in their correct encoding (U-Law/A-Law), you may need to set the encoding properties in the Composer Project settings. To change the settings, go to the Project Explorer, right-click the Composer Project folder, and select Properties. Select the Prompts Management section and set the Encoding property accordingly.
- To modify the sequential order of the prompt items within a block, select a prompt item element row and click the Up or Down icon.
 in the Prompts Manager view.
 - To locate the diagram block in the studio diagram callflow that is associated with a selected row, right-click a prompt row and select Display in callflow from the context menu. If the callflow (or studio diagram) is not currently open, it will be opened in the editor and the selected block will be highlighted with a blue outline.
- To modify a value (for example, the prompt item name, the prompt item text, and so on) from within the Prompts Manager view, double-click the table cell, type a new value, and press Enter. Certain table cell values may not be modified.(for example, callflow diagram name, prompt type, and so on).
Supported Audio File Formats Audio files are encoded and outputted in various audio file formats. The following audio file formats are recommended and supported for playback and recording within Prompts Manager:
| File Extension | Sample Rate | Sample Size | Bit rate (Bandwidth) | File Format | Encoding |
| .vox | 8000 Hz | 8-bit | 64 bits/sec | Raw audio (mono) | u-law |
| .vox | 8000 Hz | 8-bit | 64 bits/sec | Raw audio (mono) | a-law |
| .wav | 8000 Hz | 8-bit | 64 bits/sec | Audio with .wav header (mono) | PCM |
Refer to the VoiceXML 2.1 Reference Help on the Genesys Voice Platform Wiki for additional formats that GVP supports. Those additional formats can be played back and recorded using third party tools outside of Composer.
Recording Prompts
The Prompts Manager view provides a button to launch a recorder/player that can record and play back a single prompt item’s audio file. The newly-recorded file will replace any existing audio file associated with the highlighted prompt item. Notes:
- Related prompt audio settings are located in the Composer Project Settings. In the Project Explorer, right-click the Composer Project folder, and select Properties. Select the Prompts Management section for prompt audio settings.
- To record a prompt item using Prompts Manager, the prompt item must be of type Resource in the Prompts Manager view. If you do not want to specify an audio resource at this time or wish to record your own resource prompt using the Prompts Manager, you may instead define a value in the Alternate Text field shown below.
To record a prompt from within the Prompts Manager view:
- Select a callflow within a Project.
- Open the Prompts Manager (Window > Show View > Prompts Manager).
- Select an existing prompt row of type Resource.
- Click the Record icon
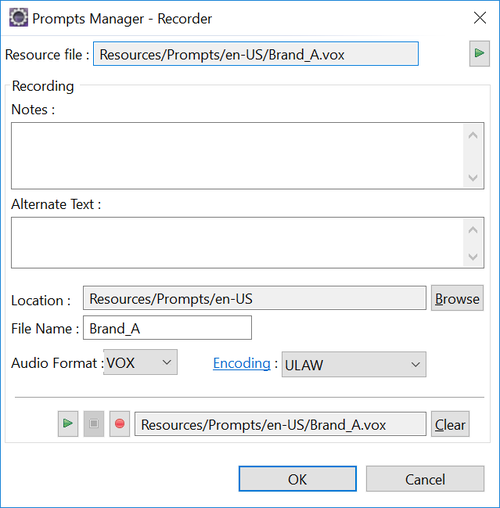
 to open the Prompts Manager - Recorder dialog box as shown below:

The Prompts Manager - Recorder dialog box assists in the recording, playback, and storing of the audio file.
- Type any notes for this prompt in the Notes field.
- Type an alternate text string in the Alternate Text field. This text is used to generate audio using #Text-to-Speech in place of the audio file should the audio file not be available at runtime.
- Select the default recording Location, or click Browse to navigate to an alternate location. Note: Genesys recommends that you keep your language specific audio files in the/Resources/Prompts/<language-code> folder.
- Type a recording file name or keep the current name.
- If the audio recording format displayed in the Recorder is not the format you wish to use, click Audio Recording Format to open the Properties dialog box for this Composer Project, from which you can change the audio format to WAV or VOX. You can also specify the encoding as ALAW or MULAW.
- Click OK in the Properties dialog box to accept the new audio format setting for this Composer Project.
- Click Clear if you want to clear the current resource file and create a new one.
- Click the Record icon
 to record your audio prompt. A microphone should be connected and volume levels should already be set properly.
 - Click the Stop icon
 to stop the recording.
 - Click the Play icon
 to play back the new audio prompt. You can re-record if necessary.
 - Click OK when you are finished to close the Prompts Manager - Recorder dialog box. At this point, Prompt Manager will save any changes you have made. If you click Cancel, no changes are saved to the project.
Exporting a Prompt Listing
The Composer Prompts Manager provides the ability to export a prompt listing of all prompts in a Composer Project along with the attributes shown in Prompts Manager, such as instructions and notes. This facility is useful if you need to send your prompts out for professional recording and want to include instructions and text to be recorded along with prompt names. To export a prompt listing from within the Prompts Manager view:
- Click the Export Composer Project Prompts icon
 in the Prompts Manager view, or
 - From the File menu, select Export. Expand Composer and select Export Prompt Listing, or
- Right-click with any prompt or Prompt block selected, and select Export Composer Project Prompts from the context menu, to open the Export dialog box.
- Select the Composer Project whose prompts you wish to export from the drop-down list.
- Select the file format for your exported data from the drop-down list. You may select either xml or csv format.
- Click Browse to navigate to a destination location to hold your prompt export file. The exported file will have the name: <voiceprojectname>.xml or <voiceprojectname>.csv.
- Click Finish to complete the export request.
XML Format Description Below is an example snippet from a prompt listing export in XML format: <prompts project="JavaComposerProject_Voice_Business"> <prompt callflow="Main" block="WelcomePrompt" name="WelcomePrompt_Prompt1" type="Resource" interpret-as="Audio" value="Resources/Prompts/en-US/Brand_A.vox" format="" alternateText="" instructions="" notes="" /> … </prompts>
| XML Tag | Attribute Name | Description |
| <prompt> | project | The Composer project that is being exported. |
| <prompt> | callflow | The name of the callflow diagram where the prompt resides. |
| <prompt> | block | The name of the diagram block where the prompt resides. |
| <prompt> | name | The name of the prompt item. |
| <prompt> | type | The type of prompt, such as Value, Resource, or Variable. |
| <prompt> | interpret-as | The interpretation of the prompt value. |
| <prompt> | value | The value of the prompt item. |
| <prompt> | format | If applicable, the format of the value. Used for interpret-as, Date or Time. For example, 24 Hour or 12 Hour. |
| <prompt> | alternatetext | The alternate text for the prompt. Used for an invalid value. For example, if an audio resource does not exist or the variable data is invalid. |
| <prompt> | instructions | Text for additional or specific information instructions. For example, if a certain word needs to be emphasized when recording at the recording studio. |
| <prompt> | notes | Any further notes from the user. For example, identify if an associated audio file was recorded by the Prompts Manager or if the audio file was from a recording studio. Shows the source, which will be set by the user (Recorded/Imported/Unknown). |
CSV Format Description The CSV format separates each prompt-related value by commas. The ordered values represents the following:
- Callflow
- Block Name
- Prompt Type
- Interpret-As
- Prompt Name
- Value
- Format
- Alternate Text
- Instructions
- Notes
The following is a snippet from the prompt listing Export in CSV format: Main,WelcomePrompt,Resource,Audio,WelcomePrompt_Prompt1,"Resources/Prompts/en-US/Brand_A.vox","",,"",""
Prompt Listing Usage For a Recording Studio
A recording studio may use the details in the sample exported prompt listing below when preparing an audio recording for a prompt item. This transcript-like format is intended to assist with producing professional sounding recordings. The five prompt items are in sequenced order to provide a sense of tone in relation to where the recorded message is at the beginning/middle/end of the overall message. The recorder:
- Uses the block name attribute to determine which set of prompt items belong together.. For example, the last five prompt items are from the same Menu1 prompt block.
- Is typically interested in prompts where type="Resource" and interpret-as="Audio", as these are the audio resources that are to be professionally replaced.
- Uses the value from the alternateText attribute to determine what should be said for the recording.
- Uses the instructions attribute for additional details from the developer, such as instructions to emphasize a certain word in the prompt message.
Sample Exported Prompt Listing
<prompts project="JavaComposerProject_Voice_Business"> <prompt callflow="CompanyABC" block="Prompt1" name="Prompt1_PromptMsg1" type="Resource" interpret-as="Audio" value="Resources/Prompts/en-US/Welcome.vox " format="" alternateText="Welcome to A B C bank." instructions="" notes="Prompts Manager recorded file." /> <prompt callflow="CompanyABC" block="Menu1" name="Menu1_PromptMsg1" type="Resource" interpret-as="Audio" value="Resources/Prompts/en-US/MainMenu_A.vox" format="" alternateText="Main menu." instructions="" notes="Default Composer audio file." /> <prompt callflow="CompanyABC" block="Menu1" name="Menu1_PromptMsg2" type="Resource" interpret-as="Audio" value="" format="" alternateText="To check your balance press one or say check balance." instructions="Place emphasis on 'check balance'" notes="" /> <prompt callflow="CompanyABC" block="Menu1" name="Menu1_PromptMsg3" type="Resource" interpret-as="Audio" value="" format="" alternateText="To make a bank to bank transfer press two or say transfer." instructions="Place emphasis on the word 'transfer'" notes="" /> <prompt callflow="CompanyABC" block="Menu1" name="Menu1_PromptMsg4" type="Resource" interpret-as="Audio" value="" format="" alternateText="To repeat these options press five or say repeat." instructions="Place emphasis on the word 'repeat'" notes="" /> <prompt callflow="CompanyABC" block="Menu1" name="Menu1_PromptMsg5" Naming For ease of importing the new audio recordings into Composer, Genesys recommends making the name the same as the attribute value of the respective prompt entry. For example, MainMenu_A.vox in the below snippet. This avoids having to rename the files when they are imported into Composer as described in the Importing Prompt Resources topic. <prompt callflow="CompanyABC" block="Menu1" name="Menu1_PromptMsg1" type="Resource" interpret-as="Audio" value="Resources/Prompts/en-US/MainMenu_A.vox" format="" alternateText="Main menu." instructions="" notes="Default Composer audio file." />
Importing Prompt Resources
See the Sample Exported Prompt Listing, which should be used as a transcript by the recording studio. After receiving the prompt audio resources from the professional audio recording studio, be sure to place the audio files in the correct Composer Project resource path. This ensures that the resources will work properly with the existing callflows that will use them. The Composer prompt resources are stored under the Composer Project folder ../Resources/Prompts. Example: ../Resources/Prompts/en-US/Brand_A.vox For a prompt item with audio resource Resources/Prompts/en-US/Brand_A.vox, the new professionally recorded audio file must be identically located and named Resources/Prompts/en-US/Brand_A.vox. If you do not do this, you must go to the callflow diagram block properties to set the new prompt resource path, or rename the file to match existing prompt settings. Note: When importing multilingual prompts, be sure to place the audio resource files in their corresponding prompt resource locale folder. For example,
- English -- United States ../Resources/Prompts/en-US
- Spanish -- Spain ../Resources/Prompts/es-ES
To import file resources to the target Composer Project, use the Project Explorer. Or simply copy and paste the files to the target prompts resource folder location of the Project Explorer.
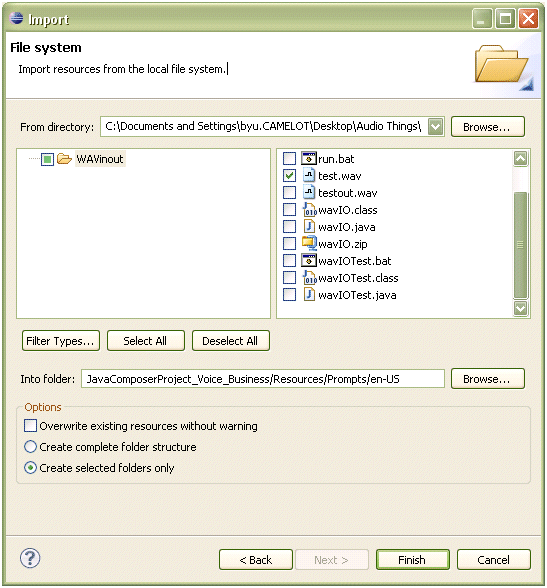
As an alternative, importing may be achieved by using File > Import… Expand and select General > File System. In the Import dialog, set the From directory field and Into folder fields, select the desired files, and click Finish. A sample is shown below.


