Your First Application: Routing Based on DNIS or ANI
Contents
The steps below lead you through creating a simple routing strategy workflow for voice interactions. This workflow routes incoming calls based on the number dialed by the customer (DNIS) English-speakers dial one number; Spanish-speakers dial another number. Assume this number is attached to the interaction when it arrives at the contact center.
Note: The same type of Composer configuration could also be used to route incoming calls based on the originating phone number (ANI).
Starting the Workflow
After creating a new Project in Composer Design or Composer perspective:
- Click the
 button on the main toolbar to create a new workflow and continue with step 2. Alternatives:
- Select File > New > Workflow Diagram or select File > New > Other. In the New dialog box, expand Composer > Diagrams. Select Workflow Diagram and click Next. Continue with step 2.
- Or use the keyboard shortcut: Ctrl+Alt+R and continue with step 2.
- In the Main workflow tab, select Empty Diagram and click Next.
- Select the parent Project.
- Name the diagram (must have an extension of .workflow) and click Finish. The Workflows folder in the Project Explorer shows the name of your diagram under your Project.
- Select the Workflows folder in the Project you just created.
- Build the diagram as described below.
Creating the Workflow Diagram
For general guidelines on placing, configuring, and connecting blocks, see the Using the Designer topic.
- Connect to Configuration Server. You can also use the keyboard shortcut: Alt+I+C.
- Create a new project called "DNIS_Routing."
- Add the following blocks from the Palette to the canvas area: Entry, Branching, Target (add two), and Exit.
- Use the ConnectionLinks to connect the Entry block to the Branching block.
Typically, you start by segmenting incoming interactions to take different paths in the workflow. For example, you could segment by date, time of day, day of week, number dialed (DNIS), or originating number (ANI), just to mention a few examples. You could also segment based on a logical expression that you create in Expression Builder. You can use the Branching block for this purpose as described below.
- Select the Branching block to cause the lower Properties tab to show the fields associated with the block. An alternative method is to right-click the Branching block and select Show Properties View from the shortcut menu.
- In the Properties tab, opposite theConditions field, click under the Value column. This brings up the
 button.
 - Click the
 button. This brings up the Branching Conditions dialog box.
 - In the Branching Conditions dialog box, select Add. Condition0 appears under Node Name.
- Change Condition0 to 8004662809.
- Click opposite 8004662809 under Expression. This brings up the
 button.
 - Click the
 button to bring up Expression Builder.
Using Expression Builder
We will now define two sample expressions in Expression Builder. In the case of the Branching block, the expressions will define the branching conditions that will cause interactions to take different paths in the strategy.
- Click the
 button on the right to expand Expression Builder.
 - Expand Workflow variables followed by System.
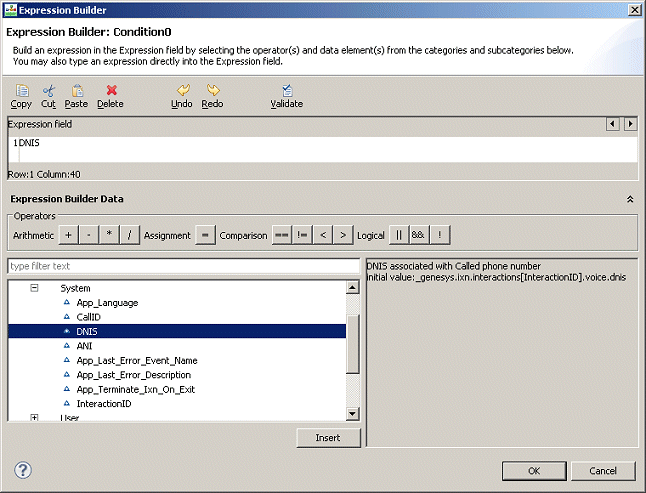
- Double-click DNIS. Expression Builder appears as shown below.
- Continuing with this example, note that "DNIS" appears to appear under Expression field opposite 1. ANI and DNIS correspond to URS functions getDNIS() and getANI(). These functions can be used in a call or workflow to read the DNIS and ANI of the call. ANI is the originating phone number (user name of the calling SIP phone). DNIS is the number that the user dialed (provisioned number for the application, or "dialog" if you're making the call through the debugger).
- Opposite Operators, click the button for the equal sign (=). data.DNIS= now appears under Expression field.
- Type a single quote after the equal sign.
- Type the 800 number. For this example, use 8004662809.
- Type a single quote after the number. Expression field now shows data.DNIS='8004662809'.
- Click the
 button to validate the expression. No syntax error found appears above.
 - Click OK to close the Expression Builder dialog box and return to the Branching Conditions dialog box.
- In the Branching Conditions dialog box, select Add. This time Condition1 appears under Node Name.
- Change Condition1 to 8008361447.
- Click opposite 8008361447 under Expression. This brings up the
 button.
 - Click the
 button to bring up Expression Builder.
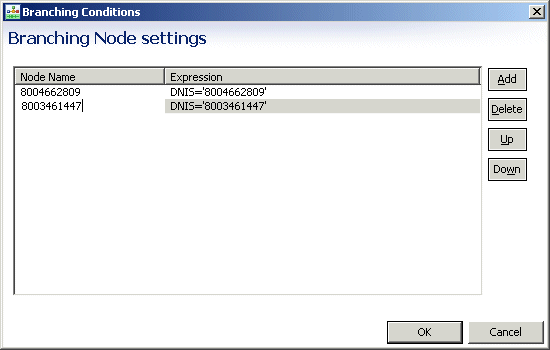
 - Repeat the Expression Builder steps to add the second expression: DNIS='8008361447' and click OK. The Branching Conditions dialog box now appears as shown below.
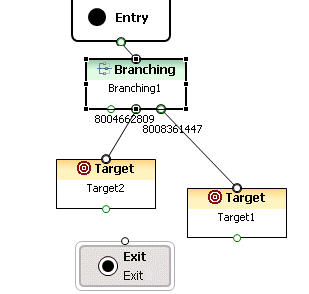
- Click OK in the Branching Conditions dialog box. The Branching block now shows three ports.
- The second and third ports correspond to the conditions defined in the Expression Builder.
- As described ahead, the first port could be used for default routing or another purpose.
- Connect the second port to the Target block below it.
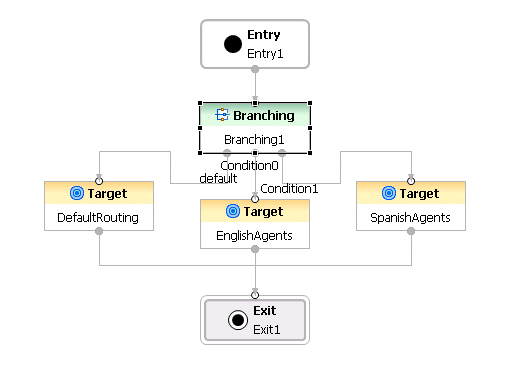
- Connect the third port to the Target block below it. The routing strategy diagram (8.0.3) now appears as shown below.
- Save the diagram as it exists so far by selecting File > Save.
Target Selection
This section describes how to configure the Target blocks in our example strategy diagram. Targets refers to routing target objects that exist in your Configuration Database. For example: Agent, Agent Group, ACD Queue, Place, Place Group, Route Point, Skill, or Variable.
- Click a Target block to cause the lower Properties tab to show fields. An alternative method is to right-click the block and select Show Properties View from the shortcut menu.
- In the Properties tab, opposite the Name property, type EnglishAgents. The name must start with an underscore or a letter.
- Click under Value opposite the Targets property to display the
 button.
 - Click the
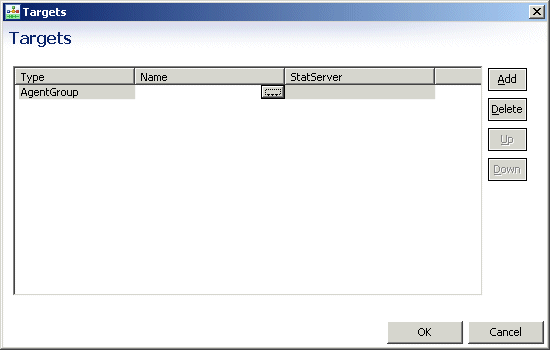
 button. The Targets dialog box opens.
 - Click Add in the Targets dialog box.
- Click under Type to display a down arrow.
- Click the down arrow and select the target type. Available selections are: Agent, AgentGroup, ACDQueue, Place, PlaceGroup, RoutePoint, Skill, or Variable.
- Select AgentGroup. AgentGroup appears under Type.
- Click under the Name field to display the
 button.
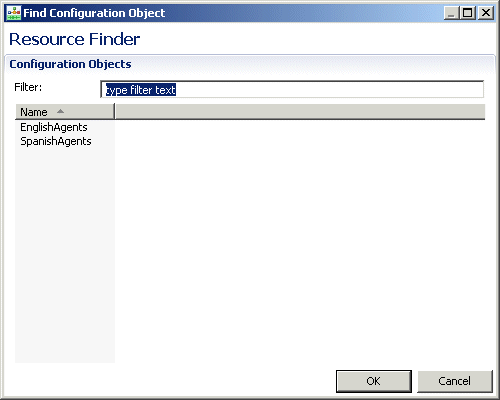
- Select a routing target. In this case, select EnglishAgents and click OK.
- Click OK in the Targets dialog box.
Routing Based on the Value of a Statistic
You have the option of instructing Universal Routing Server to use the value of a statistic during target selection. For example, you may wish to route to an agent who has been in a "Ready" state for the longest period of time.
- If you have not already done so, make sure the Configuration Server preference is set to control whether or not to create Router predefined statistics when connecting to the Configuration Server.
- In the Properties tab, opposite the Statistic property, click under the Value column to display the
 button.
 - Click the
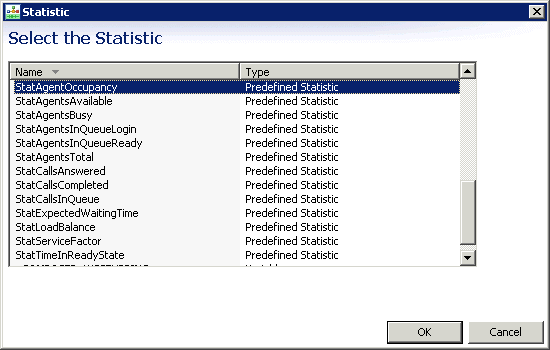
 button to open the Statistics dialog box.
You can select from the following statistics:
| CallsWaiting | RStatLoadBalance | StatTimeInReadyState |
| InVQWaitTime | StatAgentsTotal | StatAgentsAvailable |
| PositionInQueue | StatCallsAnswered | StatAgentsBusy |
| RStatLBEWTLAA | StatCallsCompleted | StatAgentsInQueueLogin |
| RStatCallsInQueue | StatCallsInQueue | StatAgentsInQueueReady |
| RStatCallsInTransition | StatEstimatedWaitingTime | StatAgentLoading |
| RStatCost | StatExpectedWaitingTime | StatAgentLoadingMedia |
| RStatExpectedLBEWTLAA | StatLoadBalance | StatAgentOccupancy |
| RStatExpectedLoadBalance | StatServiceFactor |
For a definition of each statistic, refer to the chapter on routing statistics in the Universal Routing 8.1 Reference Manual.
- For the sample strategy, select StatTimeInReadyState.
- In the Properties tab, opposite the Statistics Order property, click under the Value column to display a drop-down menu.
- Select Max from the drop-down menu since we want the agent who has spent the maximum amount of time in a Ready state. You have no finished configuring the first Target block.
Adding Additional Blocks and Connecting
- Repeat the steps in the Target Selection section to define properties for the second Target block for Spanish-speaking Agents.
- Repeat the steps in the Target Selection section to add a third Target block named DefaultRouting for default routing where you route to an Agent target type.
- Connect the three Target blocks to the Exit object. The routing strategy diagram now appears as shown below.
Saving
- Save the diagram as it exists so far by selecting File > Save. You will not be able to generate code if you do not save the file.
- If you have set your Configuration Server preferences to do so, validate the code by selecting Diagram > Validate.
You can also click the Validate icon ![]() on the upper-right of the Composer main window when the workflow canvas is selected. The Problems tab shows the results of validation for this particular Resource. Fix any problems before continuing.
on the upper-right of the Composer main window when the workflow canvas is selected. The Problems tab shows the results of validation for this particular Resource. Fix any problems before continuing.
Generating Code
- Generate the code by selecting Diagram > Generate Code, or by clicking the Generate Code icon
 on the upper-right of the Composer main window when the canvas is selected. Check the Problems tab for errors and fix any problems. If code generation succeeds, click OK at the confirmation dialog box. The SCXML code is generated in the src-gen folder.
 - Test the workflow.
- Deploy the workflow.

